Back-End Fault Tolerance
The Traffic Manager has a strong approach to fault tolerance. Pools can be configured in a number of ways to ensure that traffic is managed as efficiently as possible.
If a node in a pool fails, this is detected by the Traffic Manager’s health monitors. It can also be detected during load balancing, if the node does not respond to a request. No more requests are sent to that node, but are instead distributed across the other nodes in the pool. When the failed node recovers, it is brought back into service slowly until the Traffic Manager is satisfied that it can be relied upon.
A pool can be associated with a “failure pool”. If every node in the original pool should fail, requests will be diverted to this failure pool.
To set a failure pool, click Services > Pools and then click the name of the pool you want to modify. In the "Basic Settings" section, select a failure pool from the drop-down list.
A typical failure pool for an HTTP service might consist of a single "sorry server". This can rewrite all requests it receives to request a simple Web page, which displays an "out of service" message.
The Traffic Manager provides a direct way to serve a simple error page if a pool fails. For instructions on how to set up a custom error page, see Handling Errors.
Priority Lists
Within a pool, you can set up a priority list. This allows you to group the nodes in order of priority. You can specify the minimum number of machines you want to receive traffic at any one time.
Suppose you have three servers, “primary1”, “primary2” and “primary3”, used for normal traffic, and two off-site backup servers, “backup1” and “backup2”. Your requirement might be to ensure at least two servers are always available.
The two backup servers could be set up as a failure pool for the three primary servers: however, the failure pool is only used if every node in the primary pool fails. If both primary1 and primary3 were to fail, only primary2 would receive traffic.
Instead, you can set up a grouped priority list. This has two priority groups: {primary1, primary2, primary3} and, below it, {backup1, backup2}. You specify that a minimum of two nodes must be available at any one time.
With all the servers running, all three primary servers are in use; the backup machines do not receive traffic.
If primary1 fails, there are still two nodes in the higher group available to take requests; these two nodes handle all the traffic.
If primary3 now fails, only one node is left in the higher group. You have specified that two servers must be available. The Traffic Manager starts to send requests to both machines in the backup group: requests are now being handled by primary2, backup1 and backup2.
No more priority levels are available. In the event that more nodes fail, traffic is balanced across the remaining nodes. If every node fails traffic will be passed to the pool’s failure pool, if it has one.
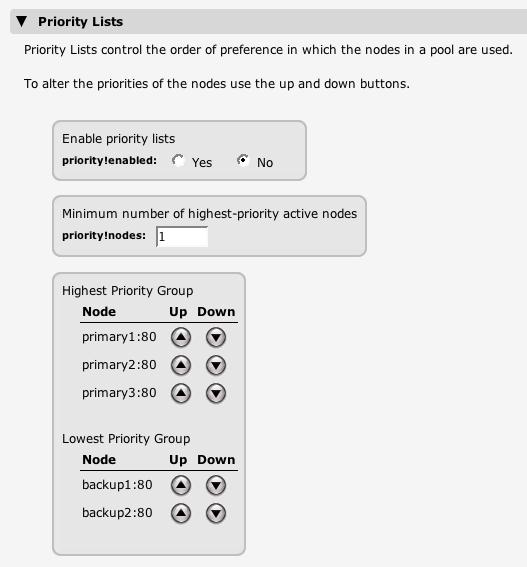
To set up priority groups for a pool, edit that pool via the Pools > Edit page. Click Load Balancing, and unfold the “Priority Lists” section.
The nodes in the pool are shown in a list, marked Highest Priority Group. To enable priority lists for this pool, set priority!enabled to “Yes” and priority!nodes to the minimum number of nodes you want to be continuously available. Then use the up and down arrows beside each node to create other groups above or below the original one.
The nodes in the lower priority groups are not used, until the number of nodes available in the highest group falls below the minimum you specified. Then all the nodes in the next group down are brought into service. The healthy servers from these top two groups are used, until enough of them fail that fewer than your specified minimum are available; at this point the whole of the next group is brought into use. This continues until all the priority groups are being used.
If every node in the pool should fail, requests will be directed to its failure pool, if one is configured.