Managing Your First Service
To begin managing your first service, create a virtual server and a default pool. There are two ways to do this: using the “Manage a New Service” wizard or the “Configure” pages.
Browse to the Web address of the Admin UI of your fully configured Traffic Manager. Log in with your username and password.
For full details of how to install and configure the Traffic Manager, see the Pulse Secure Virtual Traffic Manager: Installation and Getting Started Guide for the product variant you are using.
Using the Wizard to Create a Virtual Server and Pool
Click the "Wizards" drop-down menu and select Manage a New Service. Step through the instructions that follow.
1.Specify a name that you will use to identify the virtual server. Choose a protocol and port for the virtual server (e.g. HTTP, port 80).

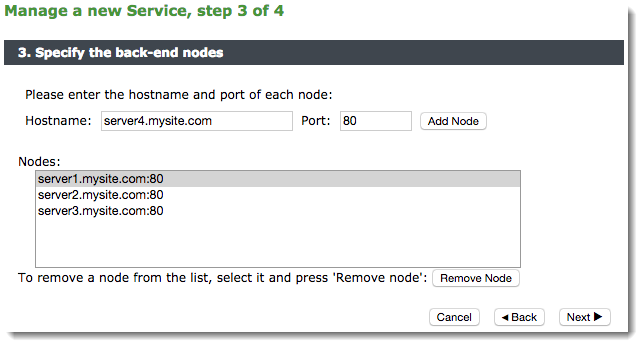
2.Create a list of back-end nodes, which will form the default pool for the virtual server. The nodes are identified by hostname and port. You can modify them later from the Pools > Edit page (see Pools). You should ensure that you can serve content directly from the hostname-port combinations you specify.
If, for evaluation purposes, you are running a Traffic Manager on the same machine as your web server (or other test server), you need to make sure the two services are listening on different ports.
For example, suppose you are managing traffic to a Web server. The default HTTP port is 80; so you might have the Web server listening on port 8080 and the Traffic Manager listening on port 80. This means that entering the machine name in a browser (such as server1.mysite.com) will send traffic via the Traffic Manager.
3.Review the settings you have chosen, then click Finish.
4.You can now test your Traffic Manager setup by browsing to the machine and port you set up for your new service.
Names for virtual servers, pools, error files, and so on, cannot begin with a period (.), an underscore (_), or a pound sign (#), and cannot end with a tilde (~).
Creating a Pool and Virtual Server Manually
Click the Services button on the top bar of the Admin UI. Use the Services pages to manage your virtual servers, pools, and Traffic Managers.
Creating a Pool
1.First you must create a pool of back-end servers. Click the Pools tab and fill in the details in the “Create a New Pool” section.
Choose a name for the pool, and enter a list of nodes (unless you enable Autoscaling, in which case no nodes are required). Each node should be listed in the form “server1.mysite.com:80”, where 80 is the port “server1” is listening on. The nodes should be separated by spaces:
s1.mysite.com:80 s2.mysite.com:8080 s3.mysite.com:80
2.Click Create Pool. You will be taken to the Pools > Edit page for your new pool, where you can edit its basic and more advanced settings.
Creating a Virtual Server
1.Click the Virtual Servers tab to create a new virtual server. You must specify a name, a protocol, and the port the virtual server is to listen on. If you are installing the Traffic Manager and your server software on the same machine, note the comment about port numbers in the previous section.
You must select a default pool for the virtual server. Requests will be assigned to this pool unless a rule specifies another pool or action.
2.Click Create Virtual Server. You are taken to the Virtual Servers > Edit page for your new virtual server, where you can edit basic and advanced settings. These include the IP addresses (specified by domain name or address) the virtual server listens on.