Upgrading Your Traffic Manager
This section contains details of how to upgrade and, if necessary, revert your Traffic Manager virtual appliance version.
Before You Start
These instructions describe the upgrade and reversion functionality available in version 21.4. For upgrades from an earlier release, use the Upgrading instructions in the Pulse Secure Virtual Traffic Manager: Installation and Getting Started Guide applicable to the former version. Functionality described here might not be present in earlier releases.
CAUTION
If you are upgrading from Traffic Manager versions earlier than 9.9, you must install a new instance of the Traffic Manager virtual appliance and import your configuration into it. This is due to the underlying operating system on earlier virtual appliances missing packages required in version 9.9 and later. For more information on creating and importing configuration backups, see the Pulse Secure Virtual Traffic Manager: User’s Guide.
Before you start, make sure you have enough system resources to perform the upgrade:
•Available memory: The Traffic Manager requires a minimum of 2 GB of RAM to function normally. If the Traffic Manager in question currently has less memory, assign more to the virtual machine before proceeding.
•Free disk space: For an upgrade to succeed, a minimum of 2.7 GB must be free on the /logs partition. To confirm your current disk usage, use the System > Traffic Managers page of the Admin UI.
Ivanti recommends you backup your configuration as a precaution before upgrading a Traffic Manager. Use the System > Backup page to create a snapshot of your current configuration that you can restore later if necessary.
For further information on upgrading and space requirements, see the Pulse Community Web site:https://community.pulsesecure.net
Upgrading a Cluster of Traffic Managers
This section is applicable to upgrades from version 17.4 and later only. Versions of the Traffic Manager earlier than 17.4 do not contain the cluster upgrade functionality described here. Instead, you must upgrade each cluster member individually. See the documentation applicable to the version you have for more details.
An upgrade initiated on one cluster member can optionally be rolled out to all other cluster members automatically.
To initiate an upgrade, you must first obtain the software package specific to your product variant. For clusters containing two or more Traffic Managers, one of the following scenarios must apply:
•Where a cluster contains Traffic Managers of only one variant (for example, VMware virtual appliances), the uploaded software package is applicable to all Traffic Managers in the cluster. Hence, an upgrade initiated on one Traffic Manager can upgrade all other Traffic Managers in the cluster without further user intervention.
•Where a cluster contains Traffic Managers spanning multiple platforms (for example, a mixed cluster of software instances and virtual appliances), a single uploaded software package applies only to a subset of your cluster. To upgrade all the Traffic Managers in your cluster, obtain software upgrade packages that cover all product variants used. Then, execute an upgrade for each product variant in turn from any cluster member (regardless of that cluster member’s host platform).
In the event an upgrade fails on any Traffic Manager in the cluster, the default behavior is to roll-back the upgrade in progress and leave your entire cluster on the previous working software version.
Command line upgrades contain an additional option to not automatically roll-back all Traffic Managers in the event of an upgrade failure. You can instead instruct the cluster members which upgraded successfully to remain using the new version, and to only roll-back the Traffic Managers that failed. However, you must not make any configuration changes while your cluster is in a mixed-version state.
Caveats for VMware Users
Certain earlier versions of the Traffic Manager were built for VMware platforms that have since been updated or changed. Before upgrading to the latest version of the Traffic Manager, Ivanti recommends you check your virtual machine settings for any of the following out-of-date configuration values:
|
Setting |
||
|
Virtual Hardware |
"VM Version" set to 10 or earlier |
Set to 11 or later (depending on the ESX version you are running, you might be offered more than one virtual hardware version) |
|
Guest OS |
Other Linux |
Ubuntu Linux 64 |
|
Network Adapter Type |
VMXNET or VMXNET2 (Enhanced) |
VMXNET3 |
If you have configured your virtual appliance with additional network adapters, make sure you update the adapter type for each one.
You must correct all of these settings before performing an upgrade.
To correct your VMware configuration
1.Shut down the virtual appliance.
2.Edit the virtual machine settings.
3.Make your changes according to the values in the table.
4.Save your settings, and restart the virtual appliance.
If your virtual appliance has several network adapters defined with distinct configuration differences, such as with connections to different virtual networks, deleting and recreating them might disrupt the expected interface assignment order within your virtual machine (eth0, eth1, and so on). You must confirm that the newly created adapters are connected to your virtual machine as per your original configuration.
Performing an Upgrade
Traffic Manager version upgrades involve installation of a new operating system image and a full system restart. To achieve this, the Traffic Manager maintains a secondary disk partition into which the new system image is installed. The Traffic Manager then applies a copy of the configuration from the previous version to the new version, marks the partition as primary, and restarts the virtual appliance.
The previous partition is not deleted, but instead marked as dormant. This dual-partition mechanism facilitates a roll-back capability, should you need to revert to the previous version (see Reverting to an Earlier Version).
Traffic Manager releases earlier than 18.2 install maintenance releases inside the same partition as the parent release. For example, 17.2r1 and 17.2r2 are installed into the same partition holding feature release 17.2. From version 18.2 onwards, all Traffic Manager upgrades are treated equally, regardless of the type of change being attempted. In other words, each new feature release or maintenance release is installed to the alternate partition.
Only one previous version can be maintained on the virtual appliance in addition to the current version. If you have previously upgraded to a new version, upgrading a further time overwrites the oldest version held. Take note that this operation is permanent – the overwritten version cannot be retrieved after the upgrade is applied.
Before you begin, obtain the relevant Traffic Manager appliance installation package. Packages are named according to the following convention:
ZeusTM_<version>_VMware-Appliance-Upgrade-x86_64.tgz
ZeusTM_<version>_Xen-Appliance-Upgrade-x86_64.tgz
ZeusTM_<version>_hyperv-Appliance-Upgrade-x86_64.tgz
ZeusTM_<version>_kvm-Appliance-Upgrade-x86_64.tgz
Perform the upgrade through the Admin UI or from the virtual appliance command line.
To upgrade using the Admin UI
1.Log in to the Admin UI, and click System > Traffic Managers > Upgrade....
2.Follow the instructions to upload and apply the upgrade package. Where you are upgrading a cluster of Traffic Managers, select which of your other cluster members should receive the upgrade package (subject to the platform rules in Upgrading a Cluster of Traffic Managers).
To upgrade using the command line
1.Copy the upgrade package to the virtual appliance using the Linux scp command, or Windows based pscp (http://www.chiark.greenend.org.uk/~sgtatham/putty/) or WinSCP (http://winscp.net/eng/index.php).
CAUTION
Ivanti recommends the package is copied to the /logs partition to avoid any disk space issues during the upgrade process.
2.Connect to the virtual appliance command line.
3.To upgrade the current Traffic Manager only, run the command:
ZEUSHOME/zxtm/bin/upgrade <package_filename> [<args>]
To upgrade a cluster of Traffic Managers, run the command:
ZEUSHOME/zxtm/bin/upgrade-cluster --package <package_filename> --mode <mode> [<args>]
To see the full list of optional arguments available for each command, add the --help argument.
For upgrade-cluster, <mode> is either “info” (just report on the potential upgrade) or “install” (perform the upgrade). Additionally, upgraded cluster members reboot automatically into the new software version by default. To override this behavior, use the option --no-restart.
4.Follow the instructions provided. The upgrade program then copies your configuration data to the new version, but a reboot is required before you can start to use it.
Subsequent configuration changes in the original version are not migrated to the new version.
5.Reboot the virtual appliance when convenient from the Admin UI or command line (type "reboot").
Reverting to an Earlier Version
The upgrade process preserves the previous Traffic Manager version in a separate disk partition to facilitate a reversion capability. To revert to the previous version, use the Switch Versions feature in the Admin UI or the rollback program from the command line.
This procedure does not retain any configuration you have made since upgrading to the current version. It is strictly a roll-back procedure that reinstates the selected software version and reinstates the previous configuration settings. Therefore, Ivanti strongly recommends that you make a backup copy of your configuration before reverting your virtual appliance.
To revert the Traffic Manager to a previous version using the Admin UI
Traffic Manager versions earlier than 10.4 do not contain a switch feature in the Admin UI. If you roll back to a version earlier than 10.4 and then want to switch again to a different revision, or even to return to the newest software version, you must use the command line “rollback” program until you reach version 10.4 or later.
1.Login to the Admin UI of the Traffic Manager you want to revert.
2.Click System > Traffic Managers and locate the “Switch Versions” section:
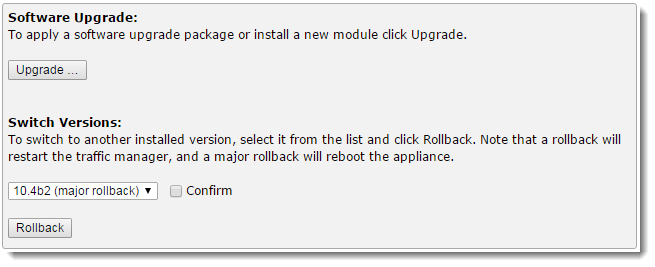
The Switch Versions section is hidden if there are no applicable versions to revert to.
3.Select a Traffic Manager version to use from the drop-down list.
4.Tick Confirm and then click Rollback to start the roll back process.
To revert the Traffic Manager to a previous version using the command line
1.Connect to the virtual appliance command line.
2.Ensure you are the root user.
3.Run the command:
$ZEUSHOME/zxtm/bin/rollback
This starts the rollback program:
Rollback
Copyright (C) 2022, Ivanti, Inc. All rights reserved.
This program allows you to roll back to a previously installed version of the software. Please note that the older version will not gain any of the configuration changes made since upgrading.
Do you want to continue? Y/N [N]:
4.Type Y and press Enter to continue. The program lists all versions of the Traffic Manager it can restore:
Which version of the Traffic Manager would you like to use?
1) 18.2
2) 18.3 (current version)
Select a version [2]
5.Select the version you want to restore, and press Enter.
6.The Traffic Manager stops the current version and restarts itself with the selected version.
If you need to cancel this process and return to the latest version, repeat the rollback procedure and select the newer version to restore. You do not need to reinstall the latest version of the Traffic Manager to achieve this. The change in version is applied permanently; subsequent virtual appliance reboots continue to use the version you select from the rollback program.
For rollbacks to 18.1 or earlier, be aware that if you subsequently decide to roll forward again to version 18.2 or later, the Admin UI “Switch Versions” feature is not supported. Use only the command line rollback program for this purpose.
Changing Your Traffic Manager Version Manually
If the rollback program is unable to complete a version change, you can perform the operation manually by editing the virtual appliance "boot menu" from the console.
Due to boot menu updates implemented in version 18.2, this process applies only if you want to switch between Traffic Manager versions from 18.2 onwards. For version changes between version 18.2 (or later) and version 18.1 (or earlier), use only the rollback program. For more information, contact Pulse Secure Technical Support.
To edit VMware and Hyper-V based virtual appliances
1.Ensure you have access to the virtual appliance console.
2.Reboot the virtual appliance from the System > Traffic Managers page of the Admin UI, or from the console (use the command "reboot").
3.During the reboot process, press Escape when you see the 5-second countdown on the console.
4.Select the required version from the list provided.
To edit Citrix Xen and QEMU/KVM based virtual appliances
1.Log in to the appliance console as the "admin" user.
2.Run the command:
grub-set-default <version>
where <version> is a string representing an available Traffic Manager release (for example, the string “zeus183” refers to the Traffic Manager 18.3 release). For the list of applicable releases and their associated version string, run the command:
/opt/zeus/zxtm/bin/rollback-helper --list-versions
3.Type "reboot" at the prompt to reboot your appliance.