Using the Initial Configuration Wizard
Before you begin, make sure you have met all the requirements listed in Prerequisites. Ivanti recommends that you read this chapter fully before continuing.
A newly installed virtual appliance requires some basic information in order to function. The Traffic Manager gathers this information over a series of steps that form the Initial Configuration wizard. To access the wizard, use your Web browser. The wizard URL is displayed on the virtual appliance console.
Type the URL into your browser to view the first step of the wizard:
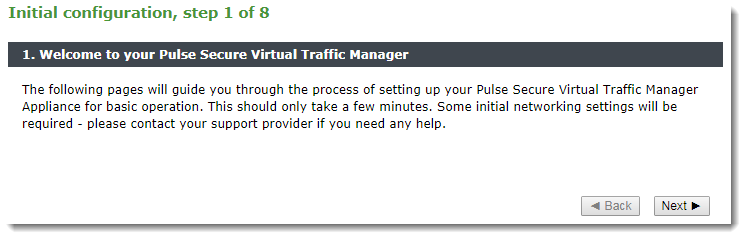
Click Next to begin the initial configuration of your virtual appliance.
Accept the Terms and Conditions of Sale
Read and accept the Ivanti Terms and Conditions of Sale, available from the URL shown:
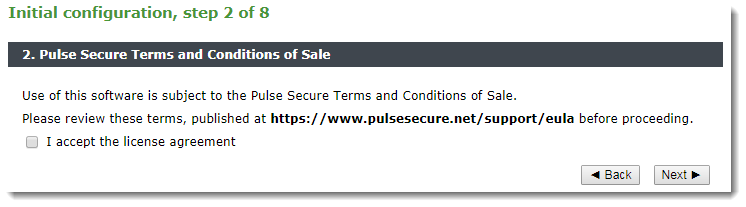
Read the agreement fully. If you agree to its terms, click I accept the license agreement and then click Next to continue. You cannot proceed with the wizard, and thus use the software, if you do not accept the license agreement.
Configuring Networking
Use this page to set your virtual appliance basic network configuration. A summary of the network settings to be applied to your virtual appliance is given at the end of the wizard.
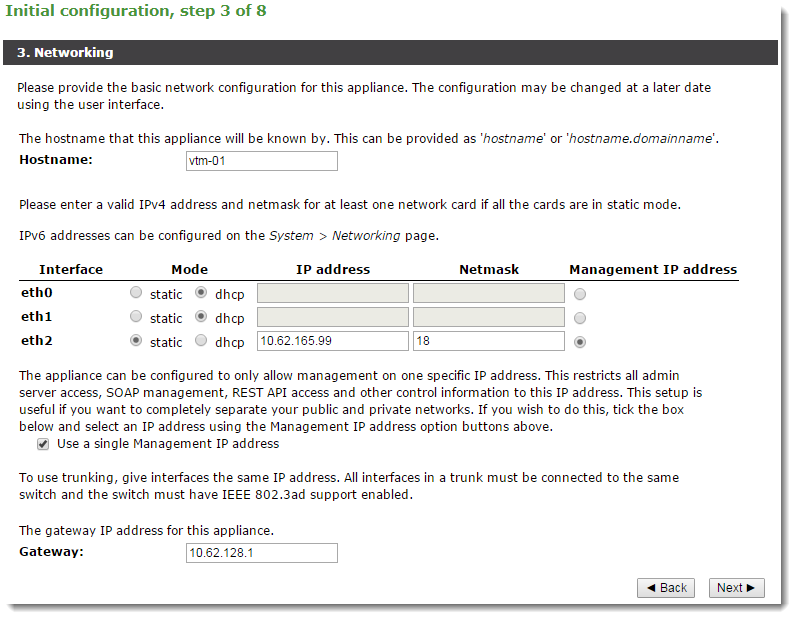
Configure the following settings:
|
Setting |
|
|
Hostname |
The hostname of the appliance, in either the simple form or fully qualified form (for example, "vtm1" or "vtm1.mgmt.site.com"). If you intend to create a cluster of Traffic Manager virtual appliances and you are using DNS servers for name resolution, it is important that the name you choose is resolvable from your name servers. Name resolution issues are flagged up later in the wizard. |
|
Mode |
The mode of the network interface. Choose one of the following options: •static: manually configure the IP address and netmask for the interface. •dhcp: use DHCP to automatically obtain network settings for the interface. To use DHCP with your Traffic Manager deployment, Ivanti recommends that your network infrastructure is configured with long-life IP reservations for each interface in your system. IP address renewal after lease expiry can cause service interruption and communication issues in your Traffic Manager cluster. If you select DHCP for at least one of your interfaces, the Traffic Manager attempts to automatically obtain a default gateway, name server, and search domain from the DHCP service. If successful, the Traffic Manager uses these settings in place of any values entered during the wizard. |
|
IP address |
The IP address in dotted quad notation (for example, 192.168.1.101) for each interface. |
|
Netmask |
The netmask for the associated IP address (for example, 255.255.0.0) for each interface. |
|
Use a single Management IP |
Click to restrict management traffic to a single interface. Then click the Management IP radio button next to the interface you want to use. Management traffic includes access to the Traffic Manager Admin UI, external API access, and internal communications within a Traffic Manager cluster. This address normally resides on a private or dedicated management network. If you are cloning a VMware based virtual appliance using guest customization, this feature is disabled on the cloned instances to ensure they remain accessible. For further information, see Cloning and Guest OS Customization. Ivanti recommends only choosing to use a management address if you have a dedicated, reliable management network. Each management address is a single point of failure for an entire Traffic Manager cluster. All of your management addresses must always be available. To later modify the management IP address, use the System > Traffic Managers page of the Admin UI. Note that a software restart is required for this procedure. |
|
Gateway |
The IP address of the default gateway. This IP address is also used for network connectivity tests by your Traffic Manager, and the gateway machine should respond to "ping" requests for this purpose. If it does not, you must configure your Traffic Manager with an additional machine to ping instead. To set a different address to ping, use the Admin UI after your Traffic Manager has been configured. A DHCP service configured to provide a gateway IP address takes precedence over the value manually specified here. |
To modify the network settings of a fully configured Traffic Manager, use the System > Networking page in the Admin UI. For further details, see the “Configuring System Level Settings” chapter of the Pulse Secure Virtual Traffic Manager: User’s Guide.
CAUTION
Configuring IP addresses on unplugged interfaces is not recommended. Routing problems could occur if the IP address is located on the same subnet as an IP address on a connected interface. If the IP is on the same subnet as the management port, your virtual appliance might become unreachable.
For optimum performance, Ivanti recommends that you use separate interfaces for front and back end traffic. In other words, for traffic between remote clients and the Traffic Manager, and for traffic between the Traffic Manager and the servers that it is load balancing.
You might find the "Network Layouts" chapter of the Pulse Secure Virtual Traffic Manager: User’s Guide helpful in planning your network. Additionally, the Pulse Community Web site (https://community.pulsesecure.net) contains several articles about configuring your Traffic Manager.
DNS Settings
Use this page to configure the IP addresses of the name servers to use for DNS resolution and the DNS search domains. In each case, enter a single value or space-separated list of values. These settings are optional, but if you configure one or more name servers, you can use your servers' hostnames rather than IP addresses. This can make subsequent configuration tasks easier.
If you selected DHCP for at least one of your network interfaces, the Traffic Manager attempts to automatically obtain a default gateway, name server, and search domain from the DHCP service. If successful, the Traffic Manager uses these settings in place of any values entered during the wizard.
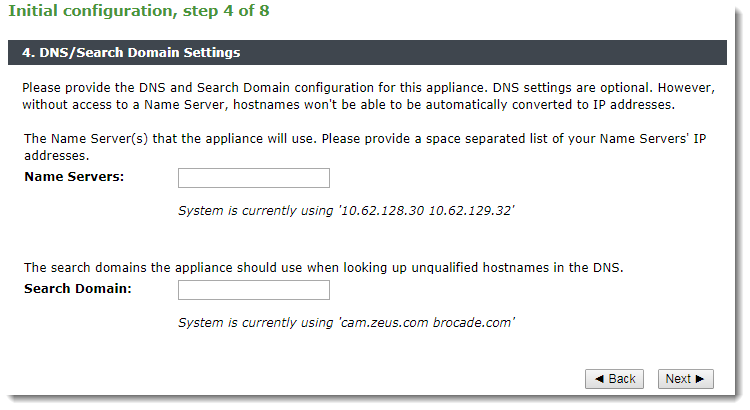
The Traffic Manager works correctly without access to external name servers, however you then have to use IP addresses instead of hostnames when setting up pools of servers, or manually enter the hostname to IP mappings, which can be done from the Admin UI (in the "DNS" section of the System > Networking page) after you have completed the Initial Configuration wizard.
Hostname Resolution
The Traffic Manager attempts to resolve your chosen hostname to an IP address using the Name Servers specified (or obtained through DHCP). Where the hostname cannot be resolved, the wizard suggests using one of the IP addresses assigned to your network interfaces instead to identify this Traffic Manager to other cluster members:
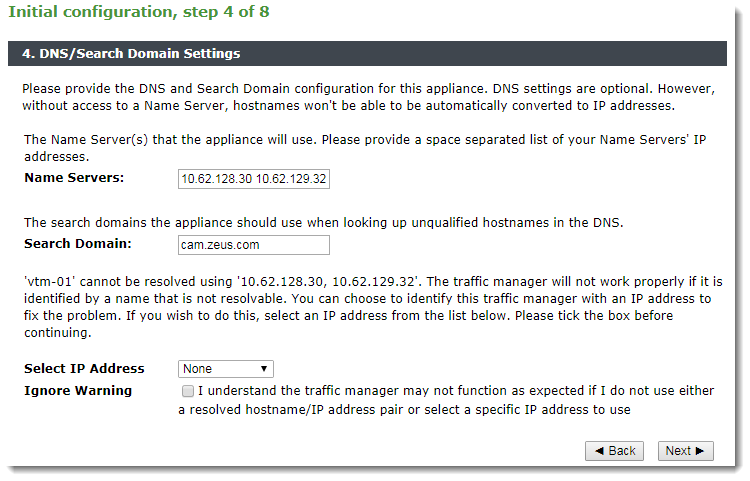
Select the desired IP address from the drop-down list, or select "None" to force the wizard to set the Traffic Manager name to be the unresolvable hostname. However, you can experience connectivity issues until the hostname successfully resolves to an IP address within your DNS. Read and confirm your acknowledgement of the Ignore Warning message by clicking the checkbox provided.
To change the identifying IP address after the wizard has completed, use the “Replace Traffic Manager Name” section on the System > Traffic Managers page of the Admin UI.
If you are cloning a VMware based virtual appliance using guest customization, this feature is disabled on the cloned instances. For further information, see Cloning and Guest OS Customization.
Timezone Settings
Use this page to set the time zone for the virtual appliance. This ensures that any logs and diagnostic messages generated by the Traffic Manager have the correct timestamps:
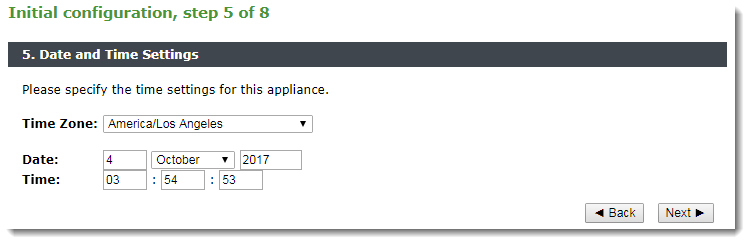
Some Traffic Manager variants manage the date and time through the host environment. In these circumstances, this step contains only the time zone setting.
After initial configuration is complete, you can additionally configure some virtual appliance variants to synchronize with a collection of Network Time Protocol (NTP) servers. For further details, see the Pulse Secure Virtual Traffic Manager: User’s Guide.
Admin Password
Use this page to set the password for the admin user. This is the master password that is used when configuring the virtual appliance through a Web browser. If you enable password authentication for SSH, you can also use the this password when you log in to an instance using SSH (with the username “admin”).
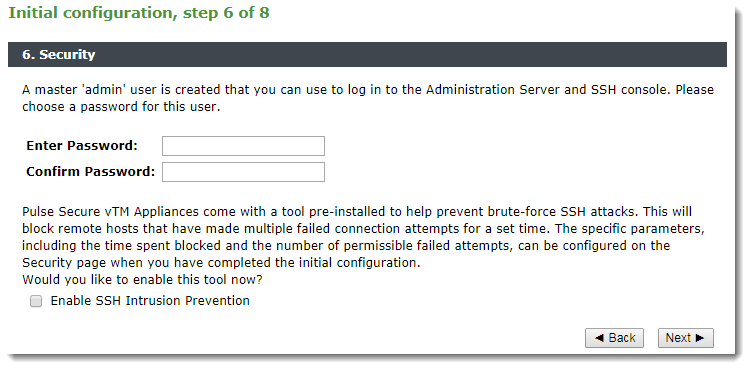
The Traffic Manager also contains the option to enable SSH Intrusion Detection to help prevent brute-force SSH attacks on your virtual appliance. Ivanti strongly recommends you enable this option.
License Key
The Traffic Manager requires a license key to operate fully. The feature set and bandwidth limits are determined by the license applied, the details of which can be seen on the System > Licenses page of the Admin UI after the Initial Configuration Wizard has completed.
Choose either to upload the license key now, to register for flexible licensing using Pulse Secure Services Director, or to skip licensing and instead run the Traffic Manager as the Community Edition (for more details, see The Community Edition).
Flexible licensing through the Services Director is available only for certain virtualization platforms. This option is marked inactive where it is not applicable.
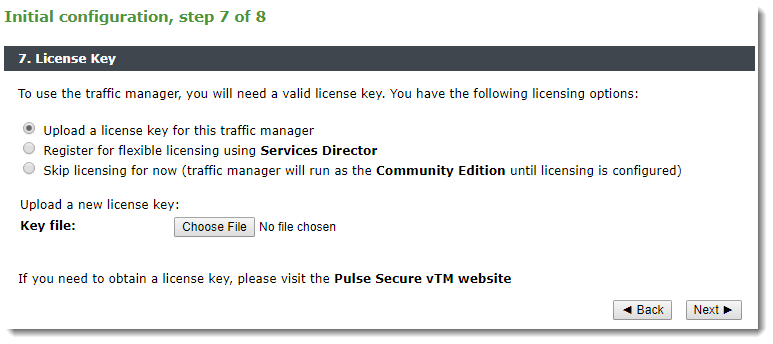
Click one of the following options:
•To upload a license key now, click “Upload a license key for this traffic manager” and then click Choose file to select a suitable key file from your local workstation. Click Next to verify.
•To license this Traffic Manager instance as part of a Pulse Secure Services Director deployment, click “Register for flexible licensing using Services Director” and follow the instructions contained in your Services Director documentation.
To use flexible licensing, make sure you are using Pulse Secure Services Director version 2.4 or later.
•To add a license key later, or to use the Traffic Manager as the Community Edition, click “Skip licensing for now” and then click Next.
For information about paid licensing options, contact Pulse Secure Technical Support.
Summary
Before your settings are applied to the virtual appliance, the Initial Configuration wizard displays a summary of the settings you have configured.
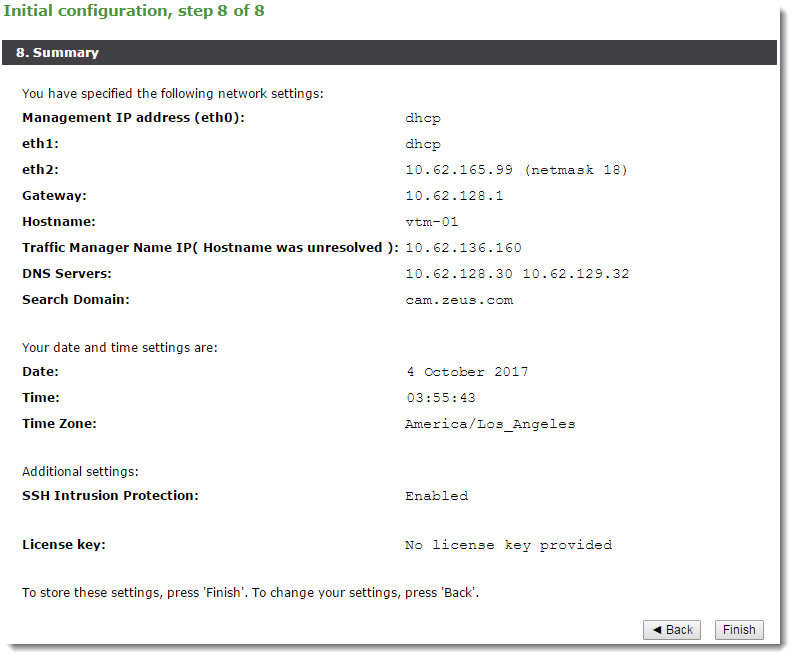
Review these settings, and in particular the specified network settings, since your virtual appliance might become uncontactable if any of the settings are incorrect. Use the Back button to go back through the wizard to make any changes.
To apply your settings, click Finish.
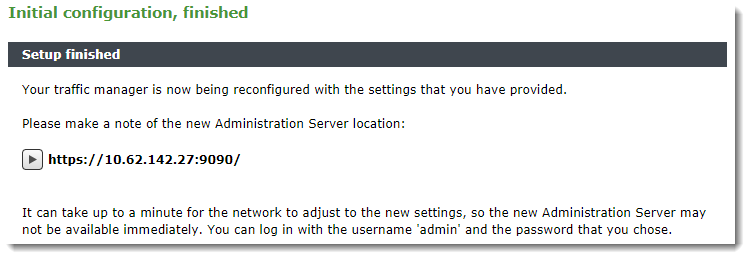
The Traffic Manager presents a page with a link to the new URL of the Admin UI. Ivanti recommends waiting a short period (typically 10 – 30 seconds) before clicking the link, to allow the virtual appliance time to reconfigure its network interfaces. You might also need to reconfigure your computer’s network settings so that it can send packets to the IP address of the virtual appliance management interface.
Click the link to view the login page of the Admin UI. Log in using the username "admin" and the password you chose during the wizard.