OAuth2.0 Overview
This feature is applicable only to version 22.3 and later.
OAuth2.0 is an authorization framework that is used to provide restricted access to an HTTP service for a third-party client by a resource owner. The use case of pure OAuth2.0 is very limited in vTM as its mostly an authorization protocol.
The real value in vTM comes when OAuth2.0 is combined with openID connect. openID provides an authentication layer on top of OAuth2.0, which provides additional security while accessing the backend services.
Deployment Use case
Any user who is hosting HTTP backend services load balanced by vTM and don’t have authentication support in the backend services or wants to offload authentication to vTM can use this feature to provide a restricted access to the services. When OAuth is configured then access to the backend service to a user can only be granted if user authenticates itself successfully with the authorization provider configured for the virtual server using the OAuth2.0 flow.
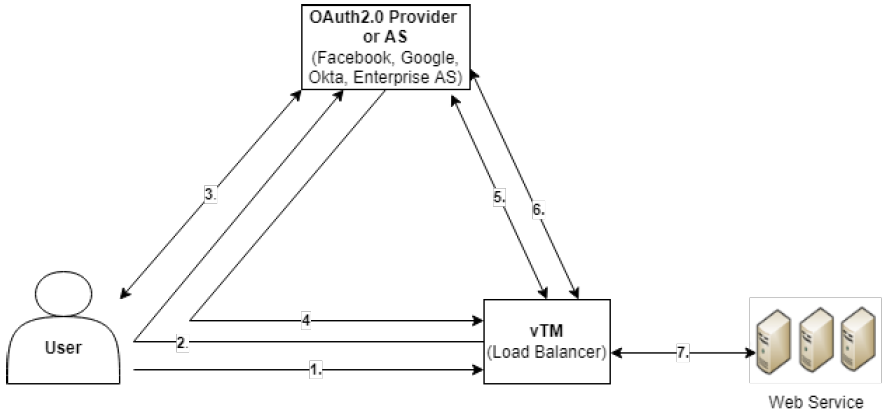
•The user accesses a resource protected by vTM (For example, Load balanced Web service).
•The vTM redirects the user to Authorization Server (AS) (or OAuth 2.0 provider), such as Facebook, Twitter, Google, or Enterprise AS (While enabling OAuth2.0 on a Virtual Server (VS) you must select AS).
•The OAuth 2.0 provider authenticates the user.
•The OAuth 2.0 provider redirects the user back to the vTM with an authorization code.
•The vTM exchanges the authorization code for an access + ID token with the OAuth provider.
•The vTM validates the ID token for its integrity and expiry and derives user information from it.
•If token is validated successfully then a location redirect is sent to user with the original resource URL and session cookie.
Configuring OAuth on Virtual Traffic Manager
The Virtual server for which we need to enable OAuth authentication needs to be registered first as an app in the authorization server to get a “client id” and “client secret”.
Every auth provider hosts an openID standard configuration endpoint in this fomat. https://<Domain-details/well-known/openid-configuration. For example, https://dev-89007074-admin.okta.com/oauth2/default/.well-known/openid-configuration).
JSON presented by accessing the “openid-configuration” endpoint has the values, which can help to fill out form data.
To configure OAuth for a virtual server follow the below steps:
1.Create an Authorization Provider
2.Configure Key lifetime and Rotation Settings
3.Configure Virtual Server with Authorization Provider
Create an Authorization Provider
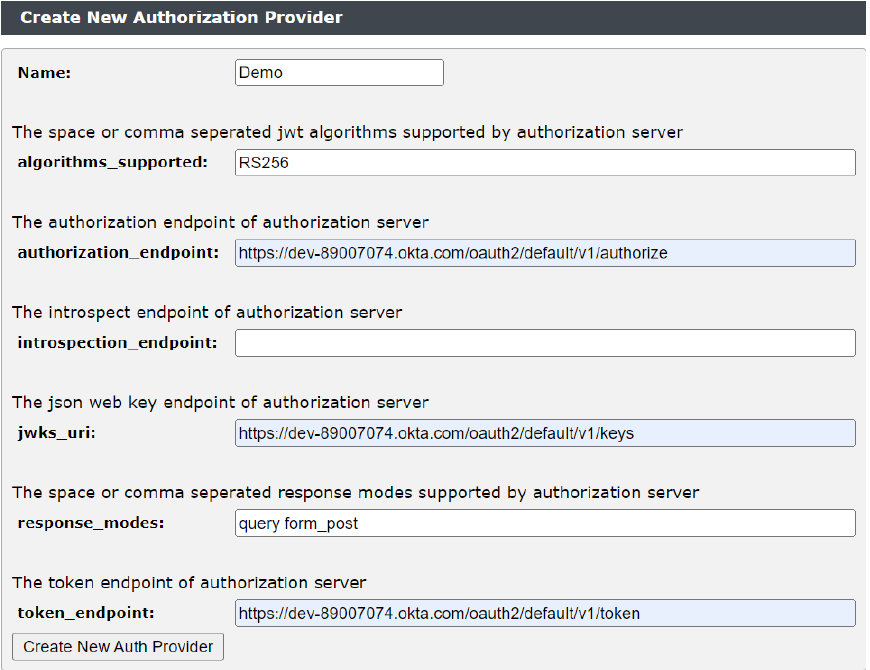
To create an authorization provider:
1.Navigate to Catalogs > OAuthv2 > Create New Authorization Provider.
2.Enter the name.
3.Enter the algorithms supported. For example, RS256.
4.Enter the Authorization endpoint of the Authorization Server.
5.Enter the JSON web key endpoint of AS.
6.Enter the response modes. For example, post
7.Enter the Token endpoint.
8.Click Create New Auth Provider.
Configure Key lifetime and Rotation Settings
The session cookies are encrypted using internally generated TLS keys. For security, the key needs to be rotated periodically and has a lifetime. The rotation period and lifetime can be configured by user and it’s global for all OAuth sessions. These settings have default values.
To configure the key lifetime and rotation Settings:
1.Navigate to System > Global Settings > Enterprise Authentication.
2.Change “auth!oauth2!key_lifetime” and “auth!oauth2!Key_rotation_interval” if needed.

Configure Virtual Server with Authorization Provider
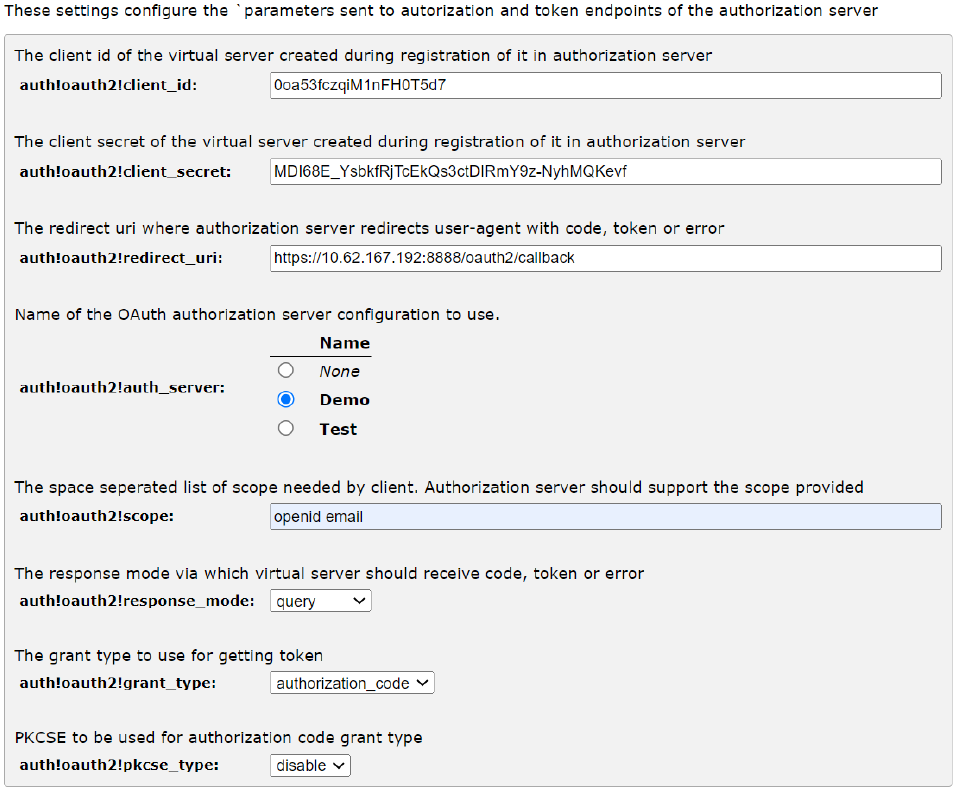
The Virtual server need to select an already created Authorization provider from step 1 and enable OAuth Authentication on it. If you have virtual server named “Demo_VS” which is HTTPS enabled then the steps to follow are like below.
1.Navigate to Services > Virtual Servers > Demo_VS > Authentication.
2.Scroll down and go to section “OAuthv2 Authorization Provider” and configure it like below:
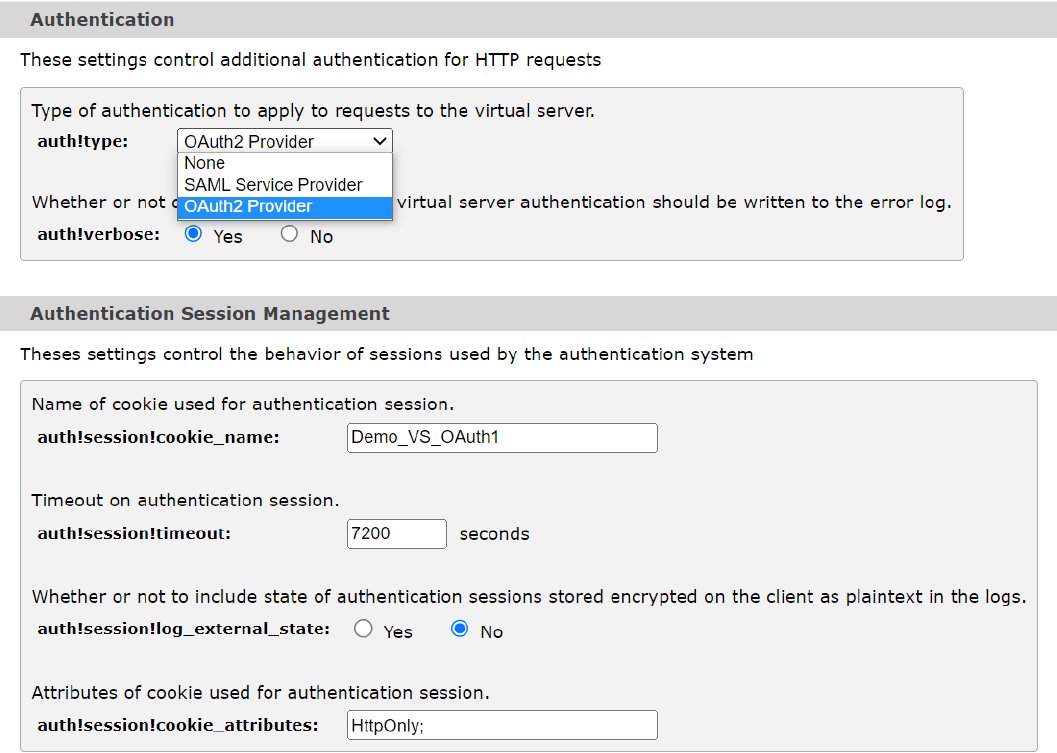
3.Scroll up and configure the sections “Authentication” and “Authentication Session Management” as below:
Once the above configurations are done, any request to backend pool served by virtual server “Demo_VS” will redirect user to authorization endpoint to authenticate itself. Post successful authentication only, access to the backend pool/services will be granted. Till the session is active, access to backend pool/services of “Demo_VS” will be granted automatically. The session time is minimum of “auth!session!timeout” and token expiry time. Post session expiry, user will be redirected to authorization server again for authentication (a silent authentication can happen if authorization server also maintains its session with browser).