Configuring SSL Certificates
To configure an SSL certificate, click Catalogs > SSL and then click SSL Server Certificates catalog or SSL Client Certificates catalog according to your requirements:
•“Server Certificates” are used to identify SSL-encrypted services hosted by the Virtual Traffic Manager.
•“Client Certificates” are used when the Virtual Traffic Manager needs to authenticate itself against an SSL node.
The following sections refer to functionality applicable to both Client and Server SSL certificates.
Creating a New Self-Signed SSL Certificate
To create a new self-signed SSL certificate
1.Click Catalogs on the top bar of the Admin UI, then click the SSL tab. From here, click the Edit button for either SSL Server Certificates Catalog (for Server certificates) or SSL Client Certificates catalog depending on your requirements.
2.The Virtual Traffic Manager lists any existing certificates that have been configured, and allows you to create or import a certificate. For testing purposes and internal use, an SSL certificate can be self-signed. This means that the certificate has not been signed by a trusted third party and should not be relied upon as a means of authenticating the server.

3.Click Create Self-Signed Certificate / Certificate Signing Request.
4.Give the certificate a descriptive Name.
5.Click the “+“ icon to add one or more Subject Alternative Names for this certificate. For each entry, use a valid DNS name or IP address that you want to be protected by this certificate.
6.Type a Common Name (CN), which should be the DNS name of the server that uses this certificate, such as “secure.yourcompany.com”. Most clients show a warning message if the CN in the certificate and the DNS address of the server do not match. If one or more subject alternative names are specified, the Common Name is not used by RFC6125 compliant client software.
7.Supply values for your Organization, Organizational Unit, and Address. These appear in the certificate.
8.Enter your Country code using the two-letter ISO country code standard1. For example, Great Britain is “GB”, and Germany is “DE”.
9.Set an Expires In date for the certificate (default, one year).
10.Select a private key size (Key type) for the certificate. Choose P256, P384, or P521 to create a certificate containing an ECDSA key, or choose 1024, 2048, 3072 or 4096 create a certificate containing an RSA key.
11.Click Create Certificate. If there are no errors the Virtual Traffic Manager will create an SSL certificate and place this in the SSL Certificates Catalog.
You can verify that the certificate has been added by clicking the expansion tab on the Catalogs page, beside SSL Certificates Catalog. Each certificate is listed in a table, and the expiry date of the certificate is also indicated.
Managing Certificate Data
To change an existing self-signed certificate, update the values in the Edit Certificate page and generate a new self-signed certificate based on the modified fields.
To do this, click Catalogs > SSL > SSL [Client | Server] Certificates Catalog. Next, click the name of an existing self-signed SSL certificate to access the Edit Certificate page. In the "Edit Certificate" section, change any of the existing fields for the certificate and then click Update Certificate.
You cannot edit a certificate signed by a Certificate Authority as the replacement certificate would be self-signed. To update a signed certificate, create a new self-signed certificate and make a new certificate signing request based upon it.
To create a copy of an SSL certificate under a new name, use the “Copy Certificate” section. Enter a new name for the copy and click Copy Certificate. The new SSL certificate is added to the relevant catalog immediately.
Creating a Certificate Signing Request
A Certificate Signing Request (CSR) is a formal request made by an individual to a certificate authority (CA) to obtain a digital identity certificate. Certificate Authorities are entities responsible for issuing certificates for use by other parties.
After you have created your self-signed certificate, you can then create a Certificate Signing Request based on the information in the self-signed certificate:
1.Go to the Catalogs > SSL > [Server|Client] Certs screen.
2.Click to edit the required certificate.
3.In the “Certificate Signing” section, click Export CSR/Update certificate.
The Virtual Traffic Manager displays the certificate request:
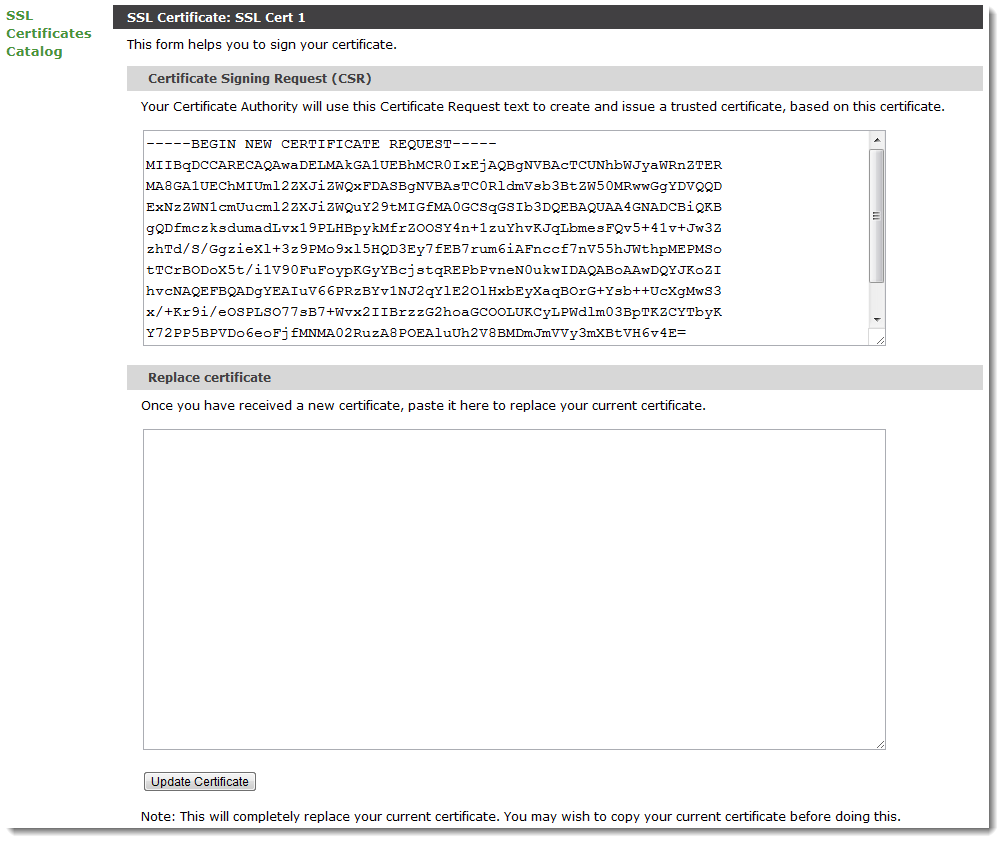
The text in the upper part of the window contains an encoding of the information in the stored certificate suitable for the CA to sign. You can copy and paste this text into the request. You may be asked to attach other credentials or extra information to your request.
The Certificate Authority returns a replacement certificate that they have digitally signed with one of their public certificates (or a certificate in a public certificate chain). Paste the textual contents of the returned certificate in the lower part of the window, and click Update certificate to complete the process.
Create a new Let's Encrypt Certificate
Let's encrypt provides the functionality to renew certificates that are near to expiry date. Validates that a client is in control of the domain names in the certificate by using “challenges” as defined by ACME standards.
you will need to provide certain information that will be validated by Let's Encrypt to ensure the ownership of the domain for which the certificate is being requested.
To create a new SSL certificate using Let's Encrypt
1.Click Catalogs on the top bar of the Admin UI, then click the SSL tab. From here, click the Edit button for either SSL Server Certificates Catalog (for Server certificates).
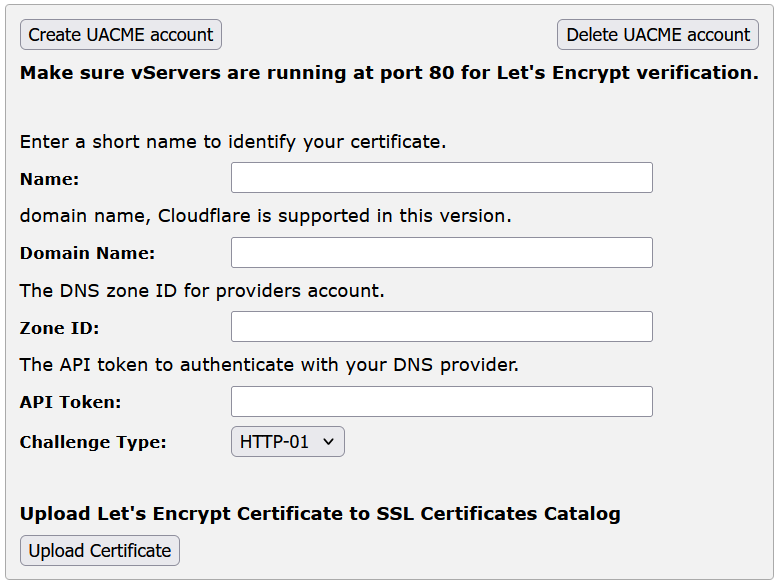
2.Click Create Let's Encrypt Certificate.
3.Give the certificate a short Name for identification.
4.Give a Domain name for which you want to create the LE certificate. Ensure the domain details are accurate and accessible.
5.Give a Zone ID to identify your DNS zone where the domain is managed.
6.Give a Valid API token for authentication with Let's Encrypt.
7.Select the Challenge Type as HTTP-01 or DNS-01.
$path = http.getPath();
if( string.startsWith( $path, "/.well-known/acme-challenge/" ) ) {
   $words = string.split($path,"/");
   $res = resource.get( $words[3] );
http.sendResponse( "200 Success", "text/plain", $res, "" );8.Click Upload Certificate to upload Let's Encrypt Certificate to SSL Certificates Catalog.
You can manage your Let's Encrypt account by creating or deleting it. Use the buttons below to perform these actions:
•Create Account: Create a new Let's Encrypt account for certificate management using Create UACME Account.
•Delete Account: Delete an existing Let's Encrypt account using Delete UACME Account.
Importing a New SSL Certificate
To import an existing certificate, you require the following items:
•The certificate file.
•The private key file.
These files are in a standard, PEM-encoded format that can be cut and pasted into a text file for uploading. PEM-encoded certificates are formatted as follows:
-----BEGIN CERTIFICATE-----
MIIBPLMAkGA1UEBhMCWkExFTATBgNVBAgTDFdlc3Rlcm4gQ2Fw
ZTESMwZSBUb3duMRQwEgYDVQQKEwtPcHBvcnR1bml0aTEYMBYG
A1UEClcnZpY2VzMRowGAYDVQQDExF3d3cuZm9yd2FyZC5jby56
YTBaMBAQUAA0kAMEYCQQDT5oxxeBWu5WLHD/G4BJ+PobiC9d7S
6pDvAtXdm2j190D1kgDoSp5ZyGSgwJh2V7diuuPlHDAgEDoAAw
DQYJKDQQBf8ZHIu4H8ik2vZQngXh8v+iGnAXD1AvUjuDPCWzFu
pReiq7UR8Z0wiJBeaqiuvTDnTFMz6oCq6htdH7/tvKhh==
-----END CERTIFICATE-----
Click the Import Certificate link in the relevant Client/Server SSL Certificate Catalog to perform the upload. Provide a name for the imported certificate, and the names of the Certificate and Private Key files. Finally, click Import Certificate to complete the process. The Virtual Traffic Manager adds the certificate to the appropriate catalog and automatically distributes the key data securely to all Virtual Traffic Managers.
ATTENTION
Do not forget to delete temporary copies of your SSL private key that you may have created during the import process. The private key is valuable and should never be stored in an insecure location.
When a certificate signed by a Certificate Authority is not signed directly by the “root certificate” it might be necessary to send clients both the signed certificate and the Certificate Authority's intermediate certificate.
Working with Intermediate Certificates
Web Browsers and other SSL clients are preconfigured with a set of root certificates from Certificate Authorities that they trust. They will allow the user to connect to an SSL service that uses an SSL Server Certificate signed by one of the trusted Certificate Authorities. Similarly, back-end SSL nodes may be pre-configured to authenticate Client SSL certificates presented by the Virtual Traffic Manager.
However, for ease of management and improved security, many certificate authorities use “certificate chains”. The SSL certificates they distribute are not signed directly by a root certificate; rather they are signed by an intermediate certificate which is itself signed by the root. This forms a chain of trust from the SSL certificate back to the trusted root certificate. In some cases, a chain of two or more intermediate certificates is used between the SSL certificate and the root.
Web clients and SSL nodes are generally not equipped with the intermediate certificates. If, for example, a Web client is presented with a server certificate, it has no way of verifying that it was signed (albeit indirectly) by a trusted root certificate. In this case, the SSL server (i.e. the Virtual Traffic Manager) must present the entire or partial SSL certificate chain so that the client can verify the SSL certificate – the certificate chain includes the SSL certificate and all intermediate certificates. It is not necessary to include the root certificate.
Your certificate authority will inform you if a chain of certificates is used. You need to upload all of the intermediate certificates to the relevant Server or Client SSL certificate catalog:

The Virtual Traffic Manager will verify that the intermediate certificate you upload has signed the current SSL certificate (or the previous intermediate certificate in the chain).