Configuring the DNS Server
This section describes how to configure your Virtual Traffic Manager as an authoritative DNS server.
Configuration Summary
Use the Admin UI, REST API, SOAP API, or command-line interface to perform the following tasks, each of which is described in detail later:
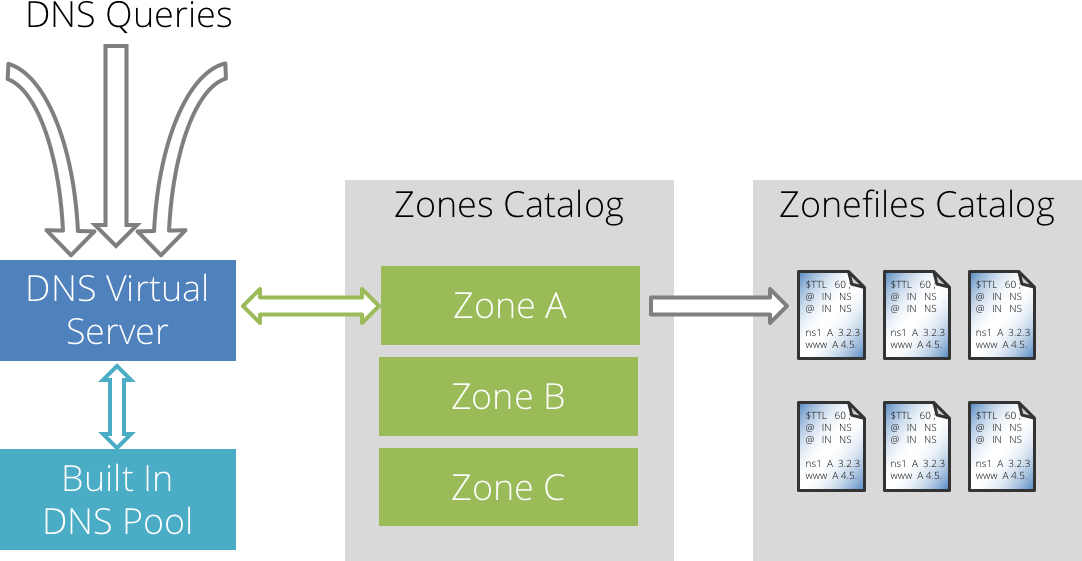
•Upload your DNS zonefile to the “Zonefiles” Catalog.
•Create a "zone" configuration to define an "origin domain" and encapsulate the uploaded DNS zonefile.
•Create a DNS-configured Virtual Server and assign to it one or more zones to serve incoming DNS requests.
Your zonefiles can be reused and associated with more than one zone configuration to enable multiple zones to advertise the same hosts under different origin domains. Furthermore, a DNS Virtual Server can utilize any number of zones in order to provide an authoritative DNS service covering many domains.
If you associate a single zonefile with more than one zone configuration, Ivanti recommends avoiding redefining the domain origin (using the $ORIGIN declaration) inside the zonefile.
Using this mechanism, the Virtual Traffic Manager itself answers DNS requests using its built-in DNS capability, rather than passing the request on to a pool of external DNS server nodes.
Uploading DNS Zonefiles to the Virtual Traffic Manager
A zonefile is a text file containing the resource records that instruct the Virtual Traffic Manager what answer to return when it receives a DNS query for a domain. Each zonefile must conform to the format prescribed in RFC 1034 and RFC 1035.
The Virtual Traffic Manager stores your zonefiles in the “DNS Zonefiles” Catalog. Choose Catalogs > DNS Server > Zone Files Catalog to upload a new zonefile.
The Virtual Traffic Manager does not validate the contents of your zonefile until you associate it with a zone configuration. Any detected anomalies are added to the event log.
Setting Up Virtual Traffic Manager Zones
The Virtual Traffic Manager does not directly access and parse uploaded zonefiles. To use a zonefile, first create a zone configuration that references a zonefile in the catalog.
Each zone also contains a domain "origin" that the Virtual Traffic Manager uses with the resource records in the attached zonefile. In other words, all domains listed in the zonefile branch off of this origin and take the form of <domain>.<origin>.
For example, if your origin is "example.com", you can specify domains "www" and "www.support" in your zonefile to create domain lookups for "www.example.com" and "www.support.example.com".
To create a zone configuration, choose Catalogs > DNS Server > Zones Catalog. Type the name and domain origin for your zone, and select a previously uploaded zonefile to use. Click Create Zone to save your zone configuration.
When you create a zone configuration with an attached zonefile, the Virtual Traffic Manager reports any syntax issues with the contents of the zonefile in the event log.
Configuring a DNS Virtual Server
You typically create a Virtual Server to handle incoming DNS requests and pass them on to a pool of back-end DNS server nodes. With the internal DNS server capability, you instead configure a DNS Virtual Server to use the built-in DNS pool "builtin_dns", and link to it the desired zone configuration to use for DNS lookups.
To ensure full service coverage, Ivanti recommends that you deploy both a DNS (UDP) and a DNS (TCP) virtual server.
To create a DNS Virtual Server
1.Choose Services > Virtual Servers.
2.In the "Create a new Virtual Server" section, enter the following:
•Virtual Server Name: The identifying name for this virtual server.
•Protocol: Select "DNS (UDP)" or "DNS (TCP)" from the drop-down list.
•Port: Choose the incoming port number that this virtual server listens on (typically "53").
•Default Traffic Pool: Choose "builtin_dns" to instruct the Virtual Traffic Manager to use its own DNS capability.
3.Click Create Virtual Server to create this virtual server.
4.On the Virtual Server edit page, click DNS Server to select one or more zone configurations you want this virtual server to use for DNS lookups.
5.To enable your Virtual Server, set Enabled to "Yes" on the Virtual Server edit page or click the play icon next to the Virtual Server name on the Virtual Traffic Manager home page.
The default traffic pool "builtin_dns" is only available for Virtual Servers that use an internal protocol of DNS (TCP) or DNS (UDP), and is not listed in, or selectable from, your normal pool list.
You can also modify the following settings on the Virtual Server > Edit > DNS Server page:
•dns!edns_udpsize: The message size advertised in UDP responses under EDNS.
•dns!max_updsize: The maximum size allowed for UDP responses.
•dns!verbose: To assist debugging efforts, enable this setting to instruct the Virtual Traffic Manager to provide a more verbose level of DNS information in the event log. For typical production use, disable this setting.
•dns!rrset_order: The DNS record response order. Set to "Fixed" to instruct the Virtual Traffic Manager to return DNS records of the same name and type in the order defined within a zone file. Set to "Cyclic" to instruct the Virtual Traffic Manager to use a rotating round-robin system. That is, for successive responses, DNS records of the same name and type are returned in a cyclical manner - with each record moving one place forward in the response. This method can facilitate more efficient load distribution.
Caching resolvers can, in some cases, preserve the order of DNS records in the answers they receive from authoritative servers.