Network Configuration
The features described in this section might vary depending on your product variant. Refer to your product specifications for further details.
Use the System > Networking page to configure your Virtual Traffic Manager hostname, network interfaces, DNS, routing, IP forwarding, and NAT settings.
The settings you configure on this page apply only to the local Virtual Traffic Manager instance whose Admin UI you are accessing. The exception to this is “Return Path Routing”, which is applied across your Virtual Traffic Manager cluster. If you want to inspect or configure the network settings for a different Virtual Traffic Manager in your cluster, use the Admin UI for that instance.
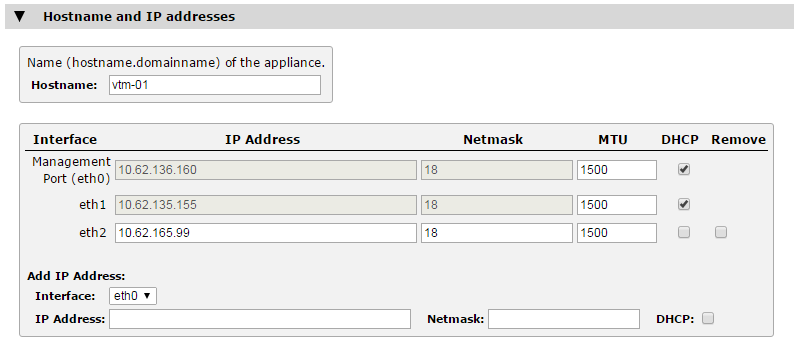
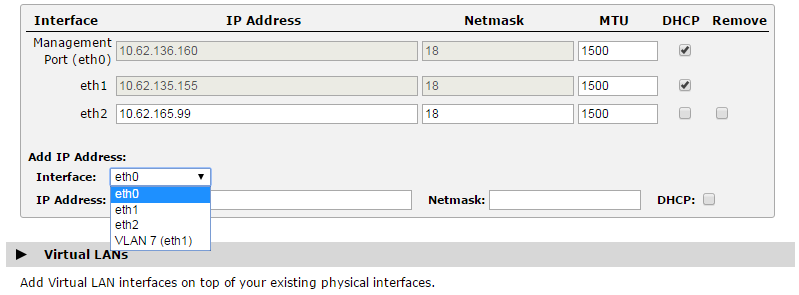
Configuring the Hostname and IP Addresses
The hostname uniquely identifies your Virtual Traffic Manager system within your cluster, and the IP addresses identify each active network interface on the system. If you do not use a management port, configure your local DNS to resolve the hostname you specify to a permanent IP address on the Virtual Traffic Manager system.
Typically, the first network interface (eth0) is designated as the management port, although the hostname you specify does not need to resolve to the IP address on that interface. The Virtual Traffic Manager only accepts and transmits management information on the management IP address, and the corresponding interface should be connected to a secure network, separate from networks that route public internal or external traffic. Additional network interfaces are used to manage external or internal traffic.
If you chose not to use a management port, the Virtual Traffic Manager accepts management traffic on all interfaces, and the hostname you specify must resolve to one of the IP addresses active on the Virtual Traffic Manager system.
The Virtual Traffic Manager: Installation and Getting Started Guide applicable to your product variant describes which interfaces are present on your Virtual Traffic Manager, and how they are numbered.
It is recommended to take a downtime for any interface related changes.
Using DHCP
This section is applicable only to virtual and hardware appliance product variants.
The Virtual Traffic Manager supports the use of DHCP (Dynamic Host Control Protocol) for managing the basic networking settings of your Virtual Traffic Manager system. You can configure each network interface to use either DHCP or the static settings you specify manually.
To use DHCP, tick the "DHCP" option against the network interfaces you want to control. Click Update to apply your changes.
Interfaces under the control of DHCP are greyed out and cannot be edited.
You cannot enable DHCP on any interface configured to host Traffic IP addresses. Nor can you change the DHCP status for the interface through which you access the Admin UI.
If you intend to use DHCP with your Virtual Traffic Manager deployment, Ivanti recommends that your network infrastructure is configured with long-life IP reservations for each interface in your system. IP address renewal after lease expiry can cause service interruption and communication issues in your Virtual Traffic Manager cluster.
If you specify one or more interfaces to use DHCP, the Virtual Traffic Manager also attempts to obtain settings automatically for your gateway, name servers, and search domain. Any settings you enter manually are overridden by DHCP-derived values, if available.
ATTENTION
Routing features such as RHI and RPR can be affected by the use of DHCP enabled interfaces. Ivanti strongly recommends that you consult your network administrator or service provider for details.
Configuring Interface Settings
This section is applicable only to certain product variants. Consult your product specifications for details.
By default, the Virtual Traffic Manager auto-negotiates network settings with the switch each interface is connected to.
It is sometimes necessary to manually specify the interface settings. For example, some switches might fail to negotiate the fastest speed they support.
To disable auto-negotiation, click System > Networking > Ethernet Speeds. For each applicable interface, set Auto-negotiate to "No". Then, use the Duplex and Speed drop-down lists to manually select the required interface settings. Click Update to save your changes.
Trunking/Bonding
If you configure the same IP address on multiple physical network interfaces, the Virtual Traffic Manager makes the interfaces members of a trunk (applicable only to virtual appliances). To use trunking, make sure your switch supports IEEE 802.3ad. Your switch documentation might refer to this feature as link aggregation, bonding or trunking.
Configuring VLANs
It is not possible to configure VLANs through the Virtual Traffic Manager Admin UI for virtual appliances running on the Microsoft Hyper-V hypervisor. If you need to enable VLANs in this scenario, you should configure them directly through the Hyper-V Manager application on your Windows Server workstation. Refer to your Hyper-V documentation or support provider for further information.
You can use the Virtual Traffic Manager Admin UI to configure VLANs on any of the network interfaces or bonded/trunked interfaces on your Virtual Traffic Manager.
To configure a VLAN
1.Access System > Networking > Virtual LANs.
2.Add a Virtual LAN interface to the appropriate physical interface:
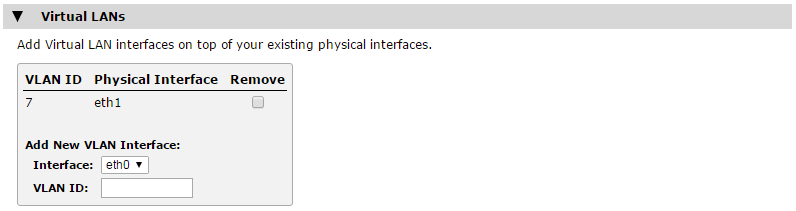
3.Configure the networking (IP address and subnet) on the new VLAN:
Any traffic that is routed out through the VLAN interface is tagged with the VLAN ID.
Configuring Your DNS Settings
The Virtual Traffic Manager will query a local DNS server for inter-cluster communications, when resolving node names to IP addresses, when communicating with external services and whenever access restrictions or other configuration required it to resolve the IP address of incoming network connections.
You will need to configure your Virtual Traffic Manager system with the IP addresses of one or more local DNS servers. These are normally configured when you first install the Virtual Traffic Manager, but you can edit this configuration and add fixed host-to-ip-address mappings using System > Networking > DNS.
Configuring Routing
Your Virtual Traffic Manager routes traffic through the most appropriate network interface according to the IP addresses you have assigned to these interfaces. Ivanti recommends you also configure a default gateway to which the Virtual Traffic Manager can forward non-local network traffic.
ATTENTION
Your default gateway is used in network connectivity tests, as described in Configuring Fault-Tolerance. It should reside on the network used for external (incoming) traffic. Do not specify a gateway that resides on the management network, or configure the flipper!frontend_check_addrs with more appropriate IP addresses.
If necessary, you can manually add additional routes to non-local networks when the default gateway is not appropriate. You must specify the non-local network (destination and netmask), the local gateway to that network (optional) and the interface to use to access the non-local network.
These settings are managed in System > Networking > Routing.
Configuring Return Path Routing
The settings in this section are not unique to a single Virtual Traffic Manager and are replicated to all other Virtual Traffic Manager instances in your cluster.
Typically, you do not care which route data packets take to get to their destination after leaving your network, as long as they arrive.
Traditional routing algorithms examine the destination address of a data packet and send it to the router that is believed to be the lowest-cost path to that destination. In cases in which two or more routes exist between your Virtual Traffic Manager and the Internet, the route from client to server can be different from the route from server to client. Normally this does not matter, provided that both are still receiving the packets they expected.
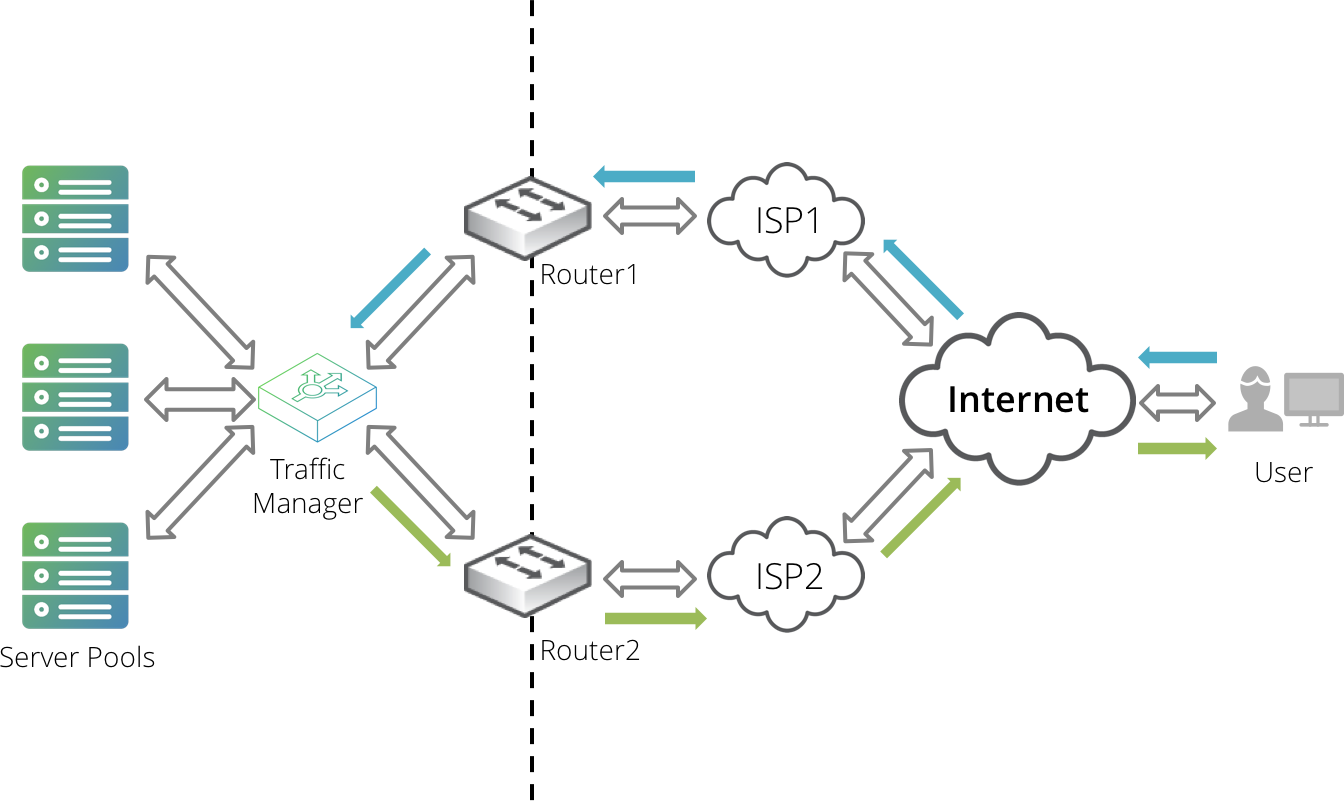
However, in some cases you might need the outbound path to correspond to the inbound path. For example, if there is a stateful firewall or NAT router in the path, the device needs to handle packets in both directions; otherwise, it drops packets that do not belong to a connection it knows about. Alternatively, you could be using two ISPs for load balancing (in addition to redundancy). If all server-to-client traffic flows through the same ISP, it can cause an unbalanced load.
One solution to this problem is to install a gateway router as the default gateway for the Virtual Traffic Manager. The gateway router forwards packets to the correct ISP using its own connection tracking.
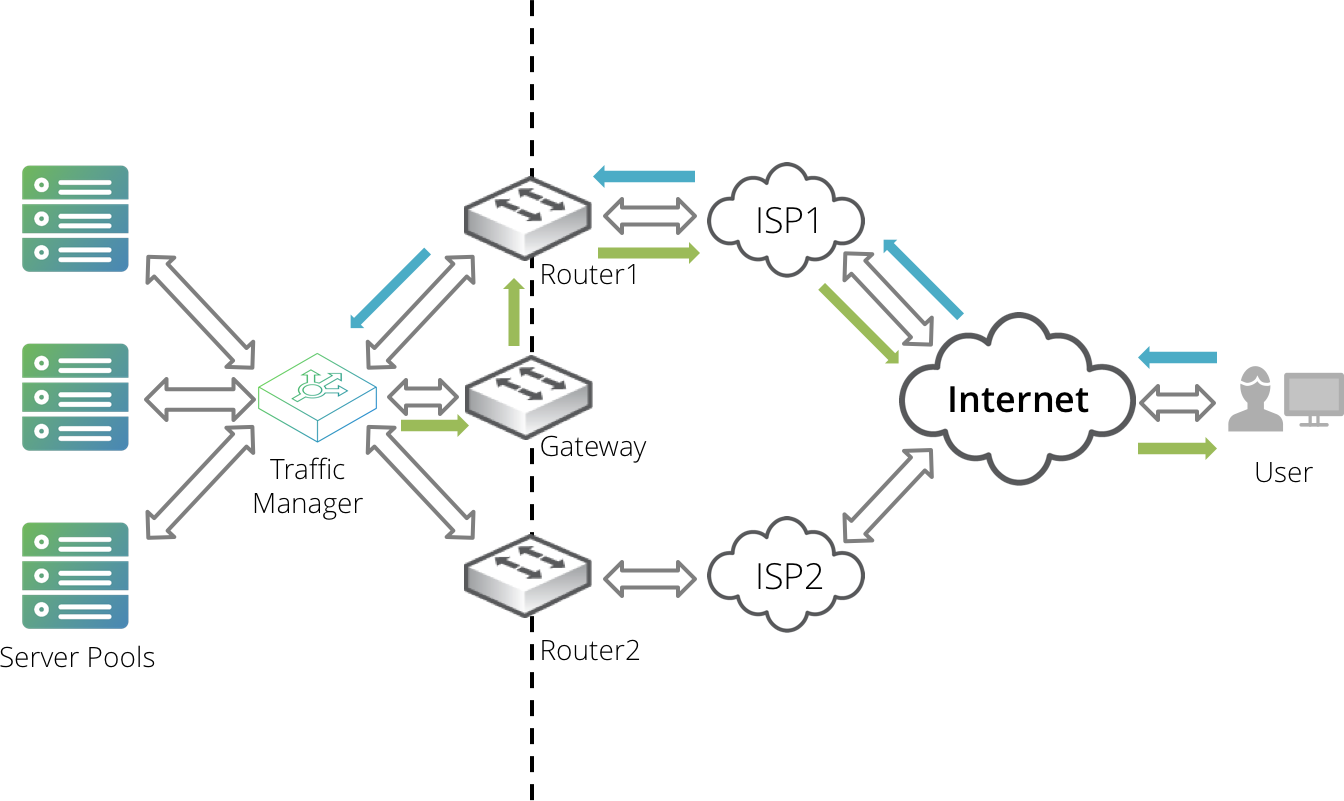
If this solution is unachievable in your network infrastructure, you can use the Return Path Routing feature of the Virtual Traffic Manager appliance to assist in providing the correct return route.
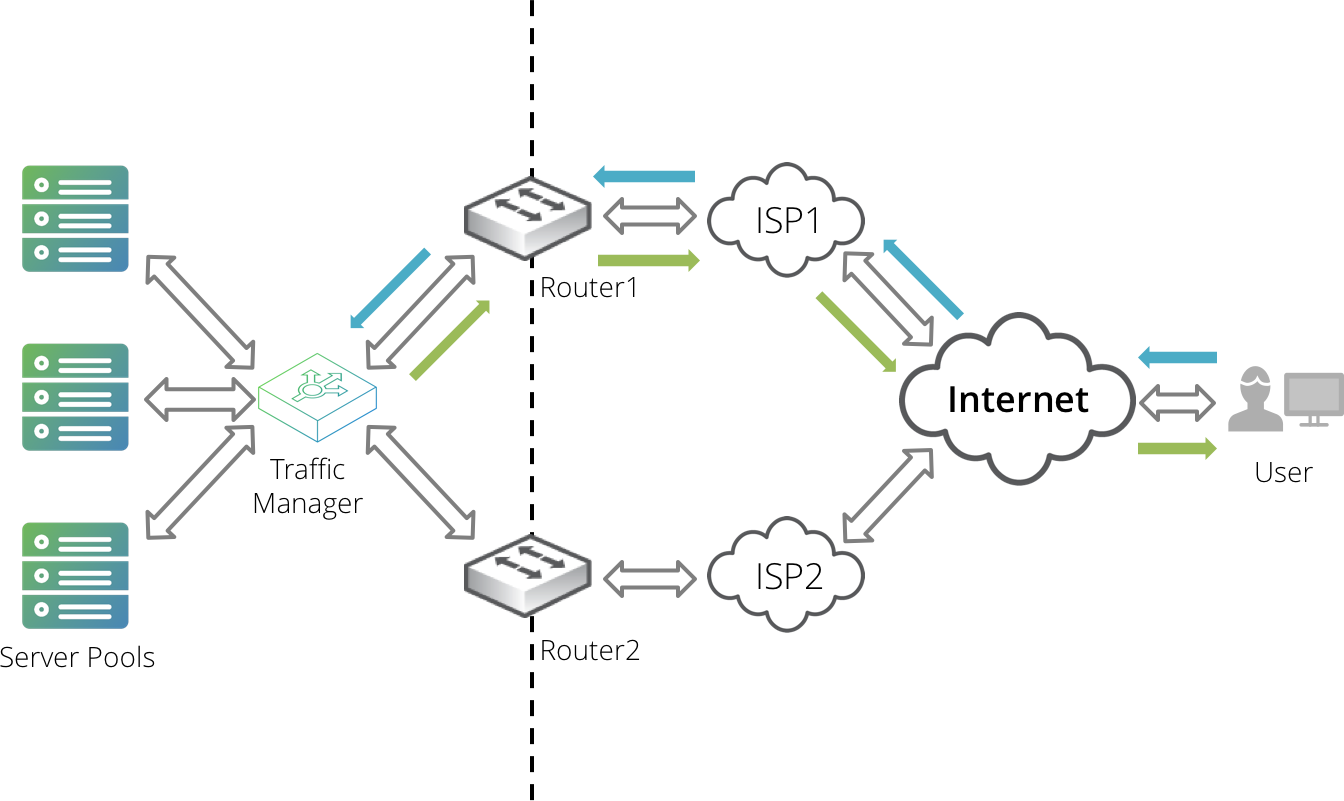
The Virtual Traffic Manager can provide only return path routing back through an initial router hop. You are responsible for ensuring that your network is capable of providing the necessary onward routing back to the client.
The Virtual Traffic Manager uses the connection tracking features of "netfilter" to route return packets through the required router. When the Virtual Traffic Manager receives a new connection, it uses the MAC address in the Ethernet packet header to identify which router the client connected through. The Virtual Traffic Manager uses this address to label all packets belonging to the connection with a tracking mark.
When the Virtual Traffic Manager sends response packets back to the client, the existence of the tracking mark triggers an IP forwarding rule that sends the packet to the correct router instead of the default gateway or static route.
The Virtual Traffic Manager applies Return Path Routing to the following outgoing data packets:
•Packets in TCP connections initiated by a client.
•Packets in auxiliary TCP connections initiated by the Virtual Traffic Manager in respect of a TCP connection initiated by a client for certain protocols, such as FTP.
•UDP responses associated with a UDP request from a client.
To ensure correct return path routing of all FTP connections, configure the virtual server handling the traffic to listen on the default FTP port (21).
The following are excluded:
•Other TCP connections initiated by the Virtual Traffic Manager.
•Other UDP packets.
•All data handled by virtual servers operating with the SIP (UDP) or SIP (TCP) protocols.
ATTENTION
Connection tracking has a significant performance overhead; therefore, you should enable return path routing only if your network infrastructure requires it.
To use this feature, identify the routers in your network infrastructure that you want to use for return path routing. For each, determine the IPv4 (and IPv6, if applicable) address and MAC address of the interface that the IP is raised on. Your router configuration interface might display this information. Alternatively, use network tools such as "ping," "arp," and "tcpdump."
If the Virtual Traffic Manageris connected to the router via multiple VLANs, a specific network interface corresponding to a VLAN can be selected to distinguish the return paths for the different VLANs. The network interface "any" means any network interface on the Virtual Traffic Manager. If there are multiple return path routings with the same MAC address but one has "any" interface and the others have a specific network interface, the routing with a specific network interface is a higher priority match.
Add this information to the configuration table in System > Networking > Return Path Routing. This table is replicated to every Virtual Traffic Manager instance in your cluster.
To enable Return Path Routing, click the Yes radio button and then click Update.
You can find errors and warnings due to problems with validation or communication in the event log. However, beyond the initial router connection, the Virtual Traffic Manager is unable to detect whether data packets were received through the expected return route. Ivanti recommends performing additional network testing to ensure that packets are being received per your requirements.
Configuring IP Forwarding and Network Address Translation (NAT)
Depending on your network topology, the Virtual Traffic Manager can function as a network gateway for your back-end nodes or other devices on your network. For example, if you use IP Transparency, you must configure your back-end nodes to route outbound traffic through the Virtual Traffic Manager (see Routing Configuration).
When the Virtual Traffic Manager (or any other network device) acts as a gateway, it forwards traffic from the source nodes to their destination, and forwards responses back to the source nodes.
If all of the traffic forwarded by the Virtual Traffic Manager originates from sources with publicly routable IP addresses, there are no complications. All hops in the link between the source and destination know how to route the responses back to the source IP addresses.
However, it is quite common to locate your back-end nodes on a private network that is not routable from the public Internet. With this arrangement, external Internet clients cannot send network traffic to your nodes directly, which conserves public IP addresses and adds a degree of security. A technique called NAT is employed by a gateway device to transparently substitute the unroutable source IP address with the publicly routable IP address of the gateway.
In some network topographies, your downstream router might perform NAT and your internal systems might then all know how to route internal traffic through the Virtual Traffic Manager correctly. However, if this is not the case, you configure the Virtual Traffic Manager to perform NAT on forwarded packets to ensure that the responses are routed back through the Virtual Traffic Manager gateway.
The Virtual Traffic Manager's NAT capability is limited to IPv4 only.
To configure NAT, click the Manage NAT Settings link in the “NAT” section of the System > Networking page in the Admin UI. Use this page to define rules that govern the behavior of NAT on your Virtual Traffic Manager.
In some cases, you might want to use IP Forwarding without configuring NAT: for example, to use the Virtual Traffic Manager as a simple IPv4 or IPv6 gateway for your internal network traffic. To do this, tick Enable IPv4 Forwarding or Enable IPv6 Forwarding as applicable in the “NAT” section of the System > Networking page in the Admin UI.
If you enable one or more IP Mapping NAT rules, or if you select any of the Virtual Traffic Manager's interfaces to perform NAT, IPv4 forwarding is enabled by default. Therefore, the Enable IPv4 Forwarding control is disabled. IPv6 forwarding remains unaffected in these circumstances.
IP Mapping Rules
The Virtual Traffic Manager supports three types of outgoing IP NAT rules. Each replaces the source IP address of the traffic that it handles with the primary IP address of the specified traffic IP group.
These rules are applied in the following order of precedence:
|
Rule Type |
Description |
|
Many to One: Port Locked |
NAT is applied to traffic that originates from members of the specified pool, using the specified protocol, and targeting the specified destination port. The protocols valid for this rule type are icmp, sctp, tcp, udp, and udplite. |
|
One to One |
NAT is applied to traffic that originates from a single specified IP address. If Add Inbound Rule? is ticked, traffic addressed to the primary IP address of the selected Traffic IP Group is forwarded to the specified IP address too, making this rule bidirectional. The source IP address remains unchanged in this case. |
|
Many to One: All Ports |
These rules operate similarly to "Many to One: Port Locked" rules, except that they cover all outgoing traffic for the specified pool, regardless of the target port number. Therefore, you can use these as fallback rules for traffic initiated from a pool to any port numbers not covered by your "Many to One: Port Locked" rules. |
Port Mapping Rules
The Virtual Traffic Manager supports the following inbound NAT rules with your virtual servers:
|
Rule Type |
Description |
|
Virtual Server Port Forwarding |
Incoming traffic targeting a specified port range has its destination port replaced with the port that the selected virtual server listens on. This creates the effect of a virtual server listening on a range of ports instead of one. Port Forwarding does not interact with outbound IP NAT rules. |
Default Rules on Interfaces
Use this section to select an entire Virtual Traffic Manager interface on which to perform NAT on the network traffic that is forwarded on behalf of an internal source. Typically, these interfaces have publicly routable IP addresses and are located on the external side of your network (for outgoing traffic).
NAT does not work if the private and public IP addresses are configured on the same NAT-enabled network interface. You must have at least two network interfaces, or more specific rules defined on this page, to create a working NAT configuration.
Enabling this option has the following effect:
•Any traffic that is forwarded by this interface is NAT-enabled: the Virtual Traffic Manager replaces the source IP address in the traffic with the IP address of the gateway interface (the Virtual Traffic Manager might also replace the source port number with an arbitrary port number).
•From the destination node’s perspective, the traffic appears to originate from the Virtual Traffic Manager’s gateway IP address. The destination node (and all intermediate hops) must know how to route traffic back to that IP address.
•When the destination node replies, the Virtual Traffic Manager receives the reply on the interface with NAT enabled. The original source IP address and port is then inserted into the reply and forwarded to the back-end node that originated the connection.