Network Configurations
This section provides a number of scenarios showing how you can deploy the Traffic Manager into your network.
Scenario 1: Simple Network
This scenario demonstrates how you can place a single Traffic Manager into an existing network to handle traffic for a Web site. All IP addresses run on a publicly addressable network (represented by xx.xx.xx in the diagram, with a netmask of 255.255.255.0).
Without the Traffic Manager, clients connecting to the Web site are directed, through the gateway, to one of the Web servers hosting the site (for example, “web1” on the IP address xx.xx.xx.20).
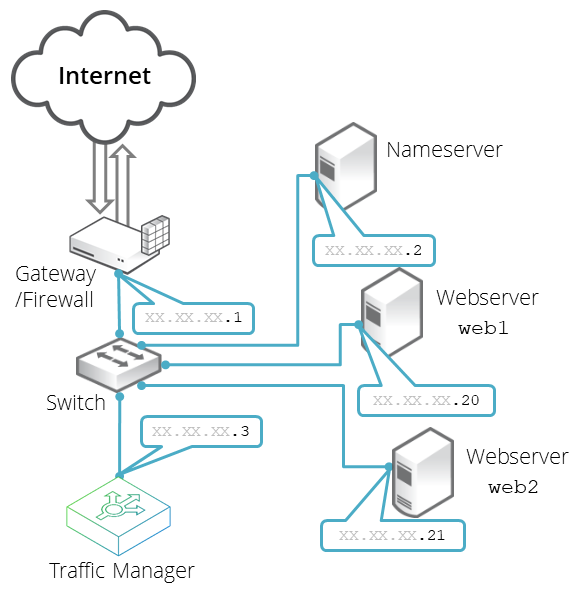
By installing a Traffic Manager, configured to receive traffic over a single network port and IP address xx.xx.xx.3, you can alter your DNS record to instead direct clients to xx.xx.xx.3. In this way, the Traffic Manager receives the Web page requests and responds with content from one of the available Web servers.
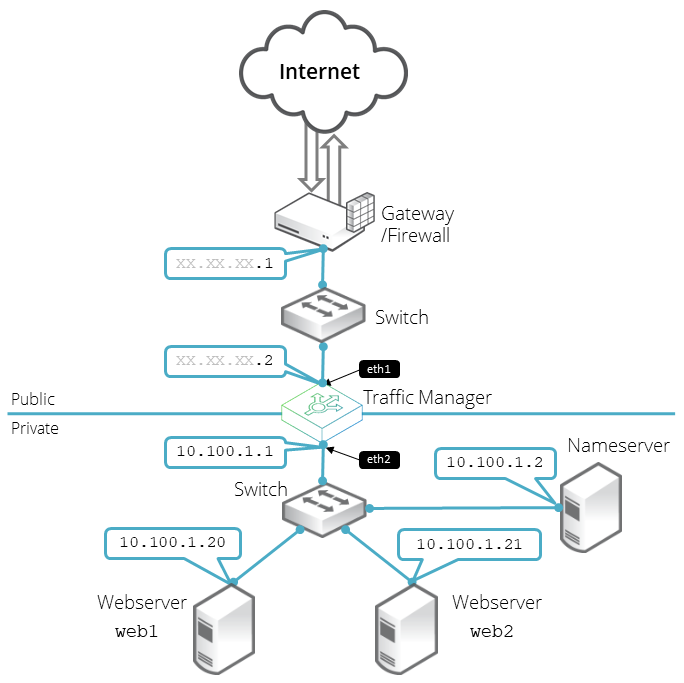
Scenario 2: Public/Private Networks
This scenario splits your network infrastructure into separate public and private networks. This offers greater security as the private network hides the internal back-end services from the outside world. Access is only permitted through the Traffic Manager. Using more network interfaces also gives higher performance as there is greater bandwidth capacity.
The diagram shows how you can configure the network gateway and the Traffic Manager’s front-end (eth1) interface with publicly routable IP addresses (the xx.xx.xx network, netmask 255.255.255.0). You then configure the Traffic Manager’s back-end interface (eth2) on the internal network (10.100.xx.xx, netmask 255.255.0.0).
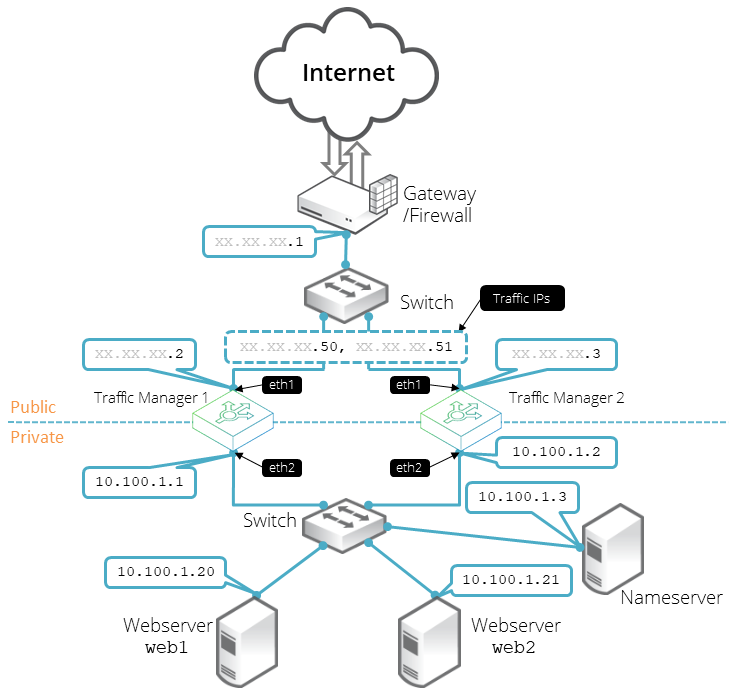
Scenario 3: Multiple Traffic Managers
This scenario deploys two Traffic Managers in a public/private network. The Traffic Managers make use of Traffic IP Addresses to provide a fault tolerant service. Traffic IP addresses are additional IP addresses that are distributed across the front-end network interfaces. If one Traffic Manager becomes uncontactable, the other Traffic Manager is able to adopt the Traffic IP address and continue handling requests.
You define and manage your Traffic IP addresses through the Traffic Manager’s Web-based Admin UI, and you set them up after the initial low-level networking is complete. For more information, see the Virtual Traffic Manager: User’s Guide.