WebEx Configuration
WebEx should be enabled as SAML Service Provider for supporting Single Sign-On. For Cloud Secure solution:
•Register with WebEx and enable SSO privileges for the WebEx domain
•Configure SAML
Steps to Configure
To configure WebEx as Service Provider, do the following:
1.Register with WebEx and create a new domain. Enable SSO privileges for the domain.
2.Log in to WebEx domain as admin at https://<WebEx Domain>/admin.
3.Navigate to Configuration > Common Site Settings > SSO Configuration. Configure with the below details:
- Federation Protocol = SAML 2.0
- SSO Profile = SP Initiated
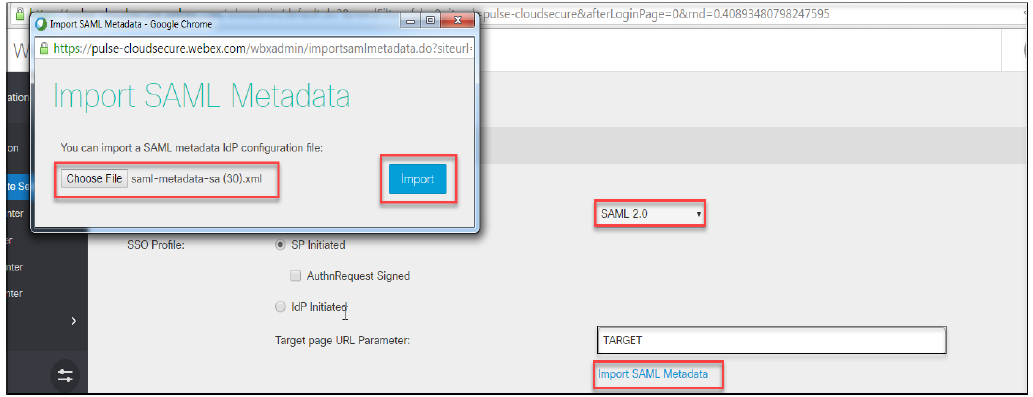
- Click Import SAML Metadata.
- Choose PCS SAML Metadata file and click Import (To download PCS Metadata file, navigate to Authentication > Signing-in > Sign-in SAML > Metadata Provider and click Download Metadata on ICS admin console).
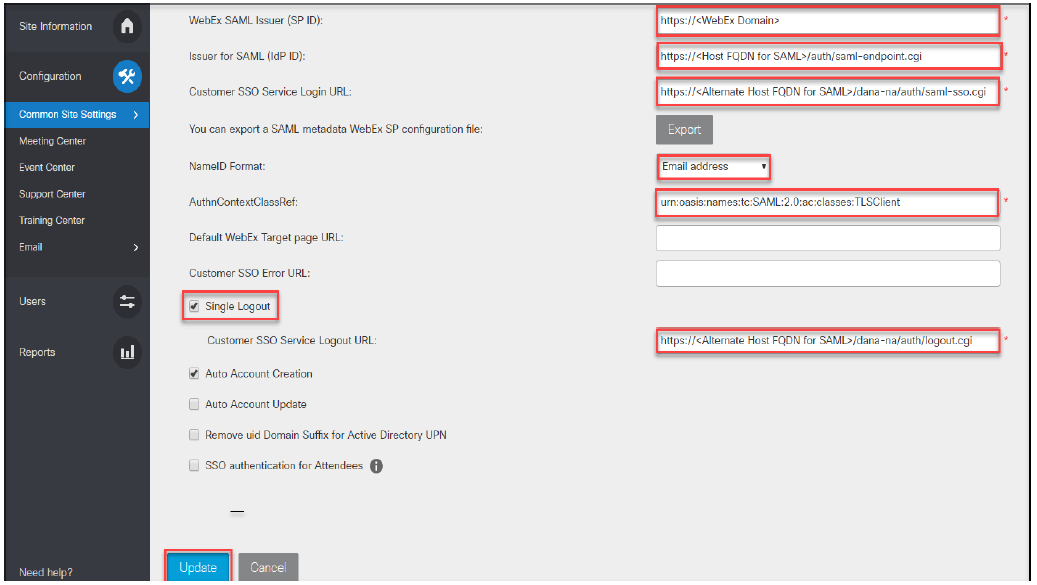
- The Issuer for SAML (IdP ID) and Customer SSO Service Login URL will get populated automatically.
- To configure the values manually, provide following details:
•Issuer for SAML (IdP ID) = https://<Host FQDN for SAML>/dana-na/auth/saml-endpoint.cgi
•Customer SSO Service Login URL = https://<Alternate Host FQDN for SAML>/dana-na/auth/saml-sso.cgi
- Configure following values in rest of the mandatory fields:
•WebEx SAML Issuer (SP ID) = https://<WebEx Domain> (Example: https://pulsesecure.webex.com)
•NameID Format = Email address
•AuthnContextClassRef = urn:oasis:names:tc:SAML:2.0:ac:classes:TLSClient
•Select ‘Single Logout’. Configure Customer SSO Service Logout URL = https://<Alternate Host FQDN for SAML>/dana-na/auth/logout.cgi. This is an optional configuration.
•Click Update.
- Once the configuration is saved, click Export to export WebEx SP Metadata file and save the file.