Creating User Authentication Services
Ivanti Neurons for Zero Trust Access (nZTA) provides user authentication through authentication policies. Policies define the application of an authentication method for a specified access URL.
nZTA facilitates Multi-Factor Authentication (MFA) through the configuration of an optional secondary authentication method in a policy. MFA-based policies can use Local authentication or Time-based One Time Password (TOTP) as the secondary method.
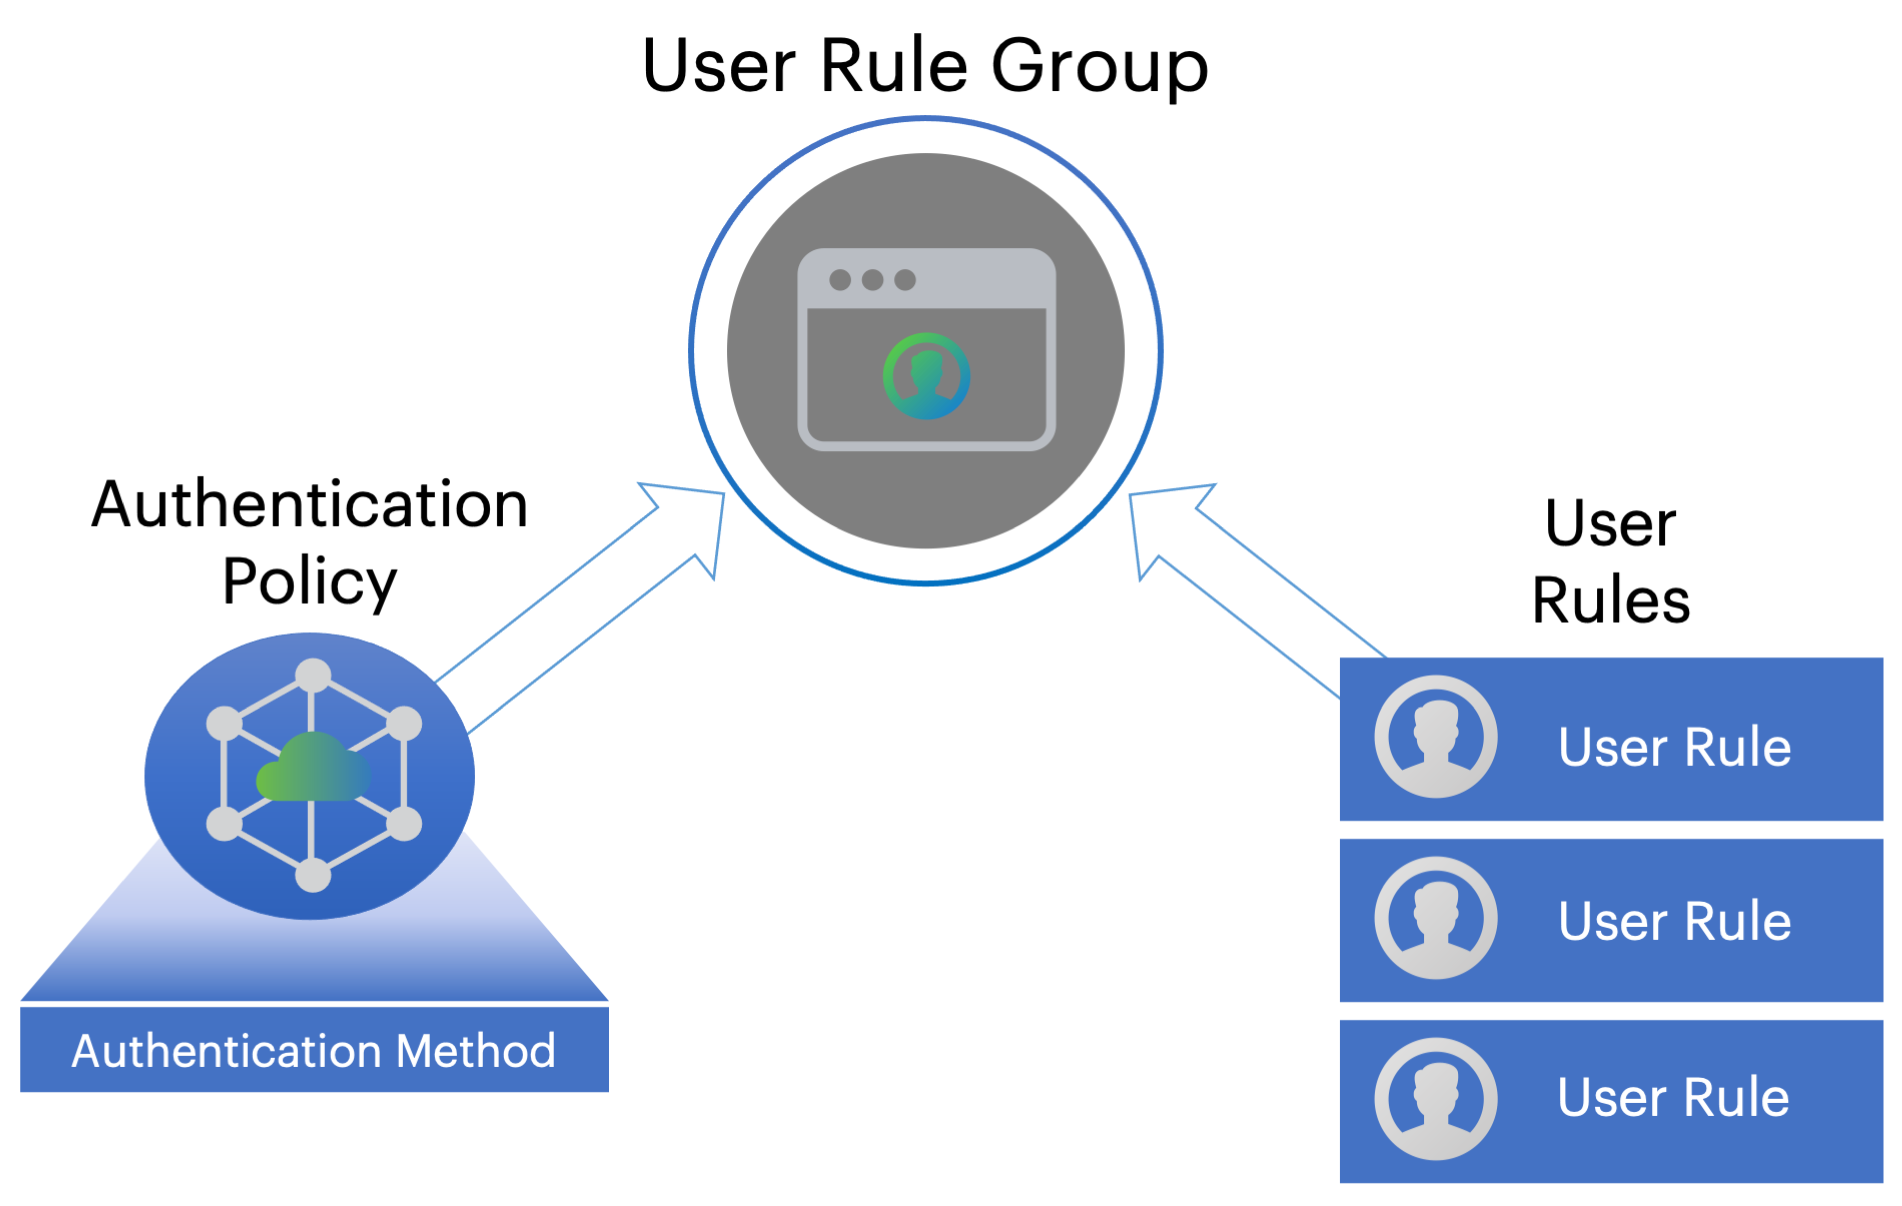
nZTA also provides for the definition of user rules and
user groups. Rules act as filters and define the basic
criteria by which users’ credentials must match in order for
authentication to proceed. Groups encapsulate an authentication policy
with one or more user rules to provide a complete user authentication
definition for your secure access policy. To learn more about creating
user rules and user groups, see Creating User Rules and User Groups.
nZTA provides three default/built-in authentication policies, suitable for the primary use-cases of administrative sign-in, user enrollment, and user sign-in:
- Admin SignIn. This policy is used whenever admin users log in. That is, for connection requests to the */login/admin/ URL. It is referenced by the ALLADMINUSERS user rule, which associates it with the ADMINISTRATORS user rule group.
- User SignIn. This policy can be used as the primary connection endpoint for all user device sign-in and enrollment requests. That is, for connection requests to the */login/ URL. It is referenced by the ALLUSERS user rule, which associates it with the USERS user rule group. As mentioned above, users connecting an un-enrolled device to this policy are automatically redirected to the Enrollment SignIn policy.
These policies are fixed and cannot be deleted. However, you can edit them to reference specific authentication methods.
MFA is supported for Admin SignIn and User SignIn policies only. To learn more, see the Tenant Admin Guide.
Furthermore, you can create additional custom authentication policies to enable bespoke authentication for specific groups of users or parts of your organization. Each policy should contain a unique access URL to which your users connect, and each should then be configured to link to authentication methods applicable for that purpose.
nZTA supports creating authentication services based on the following methods:
- Local authentication: An authentication system that
is internal to the Controller. You must create all users manually on the Controller, and
configure any required authentication policies. See
Workflow: Creating a Local Authentication Policy. - Azure AD SAML authentication: An existing remote
SAML authentication system based on an Azure AD server. See
Workflow: Creating a SAML Authentication Policy with Azure AD. - On-prem ICS SAML authentication:
An existing remote SAML authentication system based on an On-Prem
ICS server. See
Workflow: Creating a SAML Authentication Policy with On-Prem ICS. - Time-based One Time Password (TOTP) authentication:
A one-time use password authenticator whereby a password (also known as
a token) is generated by the Controller and the client from a shared secret key and
the current time. TOTP is used as a secondary authentication method as
part of a Multi-Factor Authentication deployment. See
Workflow: Adding TOTP to an Authentication
		Policy
.
For further supported SAML authentication services, see the Tenant Admin Guide.
In each of the scenarios listed in this guide, to ensure that your users can access the authentication mechanism defined through this process, make sure your Secure Access Policies are configured with a User Group in which your newly-configured authentication policies are defined.
Workflow: Creating a Local Authentication Policy
This process involves creating a local user authentication method and defining within it all user credentials necessary to identify and authenticate your end-users. You then configure this method as the primary authentication method in your authentication policies. If you are configuring Multi-Factor Authentication (MFA) in your deployment, you can configure local user authentication as either the primary or secondary authentication method.
Before you begin, make sure you have all user details (name and password) ready.
To configure a new local authentication method:
-
Log into the Controller as a Tenant Admin, see Logging in as a Tenant Administrator.
-
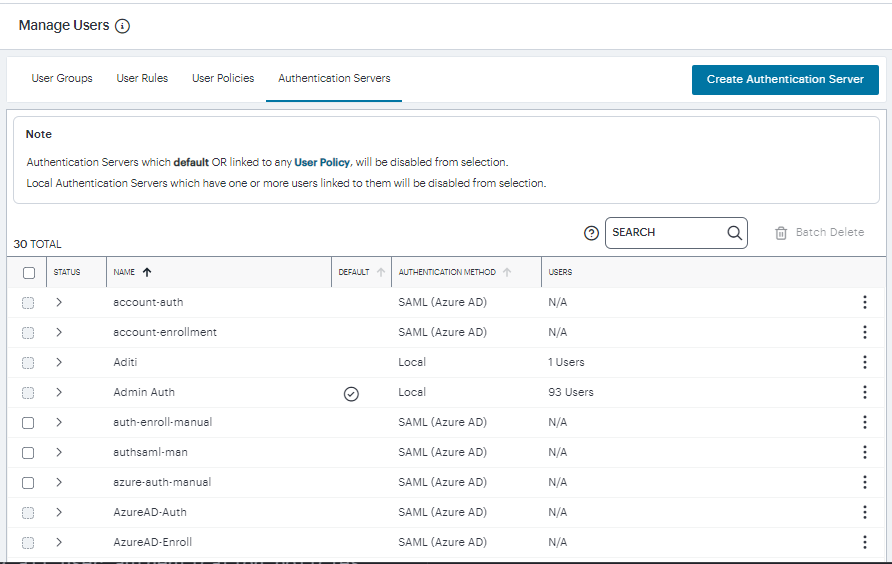
From the nZTA menu, select the Secure Access icon, then select Manage Users > Authentication Servers.
The Authentication Servers page appears. This page lists all existing user authentication methods. For example:
-
Select Create Authentication Server.
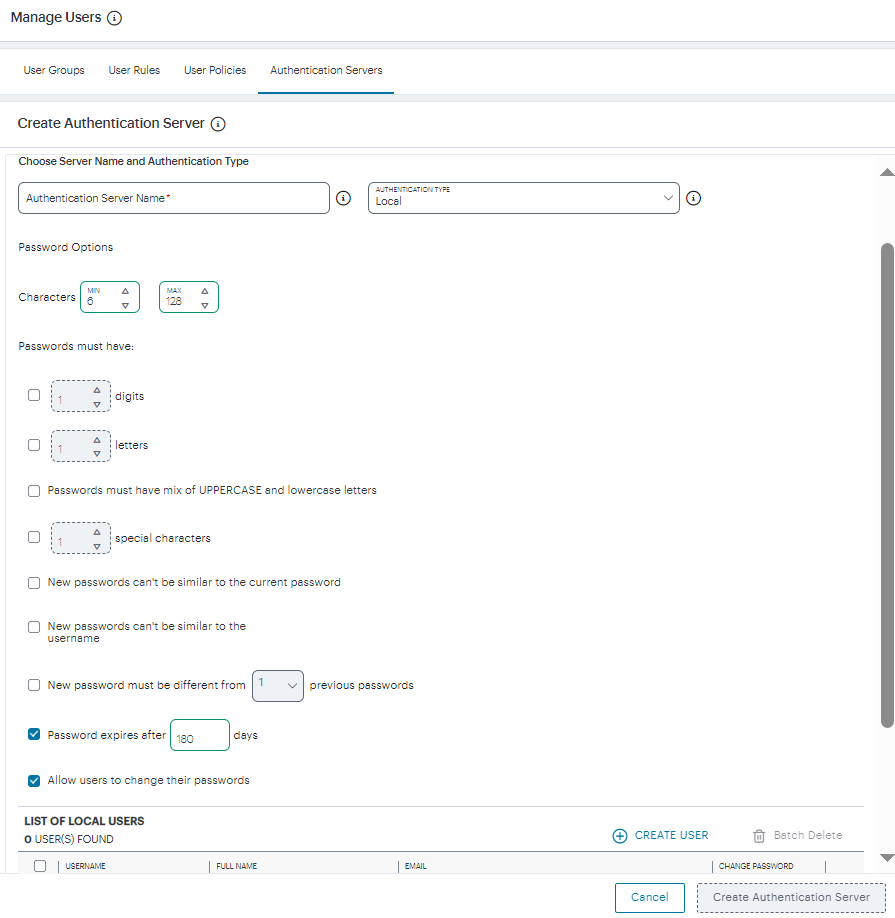
A form appears that enables you to define the authentication method.
-
Under Choose name and type:
- Specify an Authentication Server Name.
- Select the Authorization Type of Local.
-
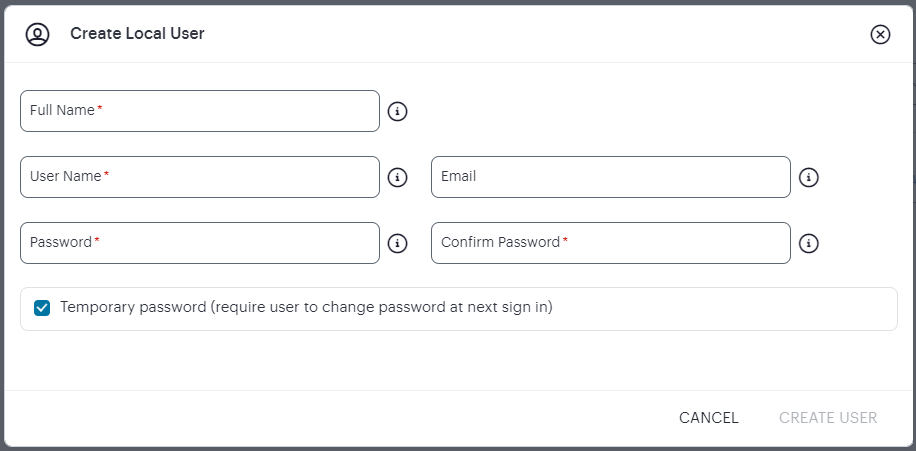
Click Create User. The Create Local User dialog appears to show additional local authentication settings:
-
Enter the following settings:
- Specify a User Name, Full Name, and Email for the user.
- Specify a Password and Confirm Password for the user.
- (Optional) Select the Temporary Password check box if you want the user to change their password when they first log in.
- Click Create User.
The user is added to the list of users.
-
Repeat the previous step for each required user.
-
Click Create Authentication Server.
The new local user authentication method is added to the list of methods and the process is complete.
After you have created your local authentication method, create or update your authentication policies with the new authentication method.
nZTA provides built-in policies to cover both basic cases. In addition, nZTA allows for the definition of custom policies to facilitate separate authentication endpoints for specific groups of users. To learn more, see Using User Authentication Policies.
Repeat the following steps for each policy, starting with enrollment:
-
From the nZTA menu, select the Secure Access icon, then select Manage Users > User Policies.
The User Policies page appears. This page lists all existing user authentication policies.
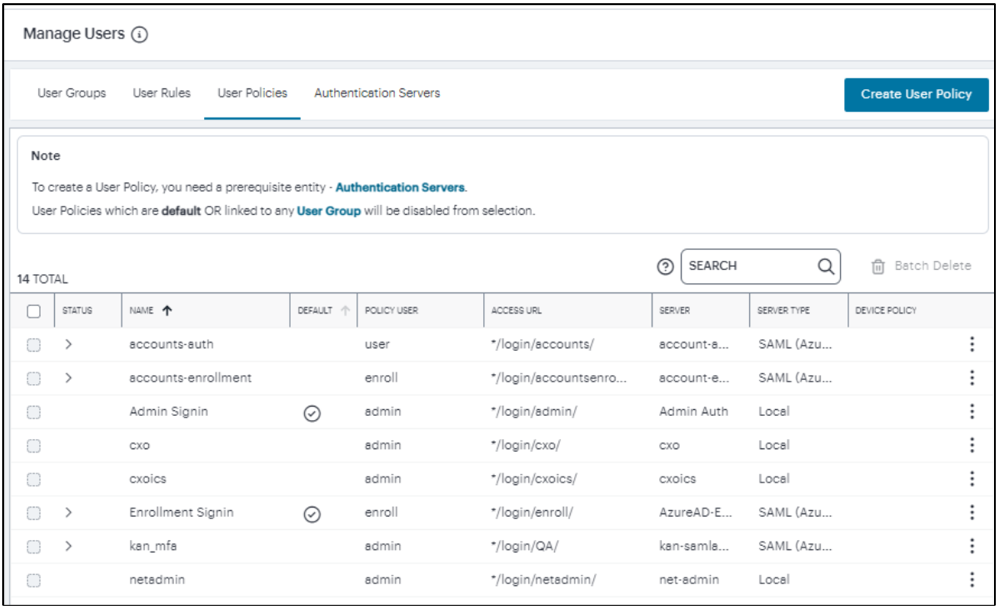
To learn more about the policies on this page, see Viewing User Authentication Policies.
From this page, either create a new custom policy or edit an existing policy.
-
To add a new custom policy, click Create User Policy.
The Create Authentication Policy form appears.
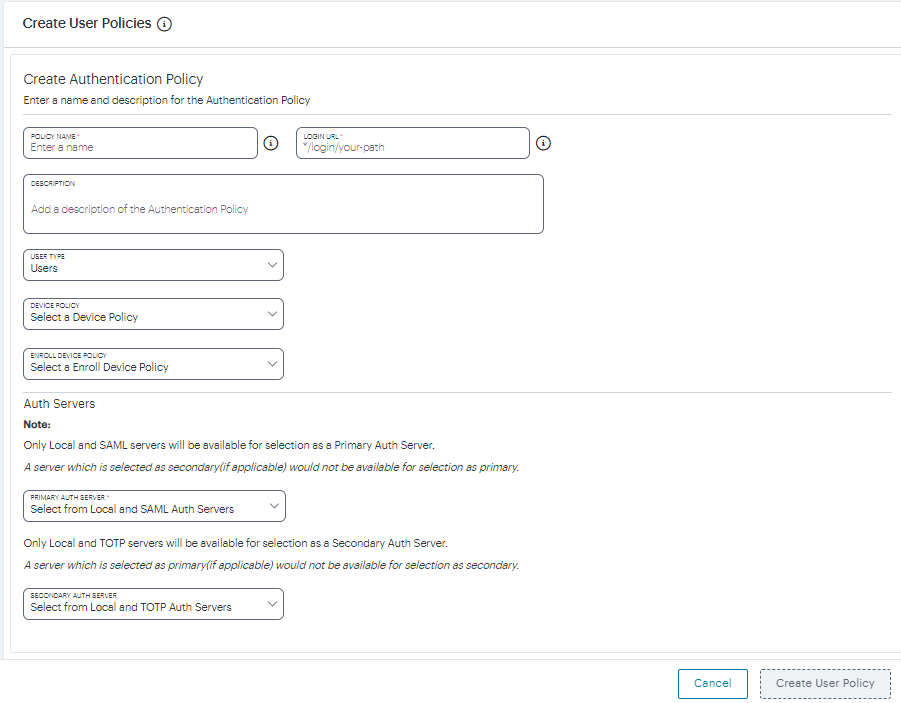
Create Authentication Policy
To learn more about how custom policies are used for user login and enrollment, see Adding Custom Authentication Policies.
-
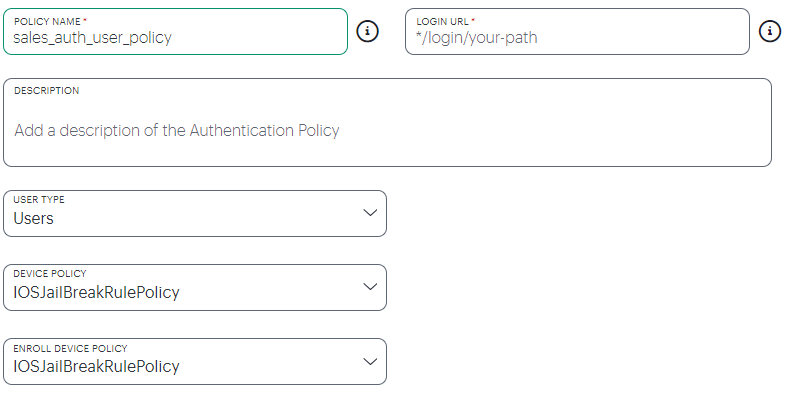
Enter a Policy Name.
-
Enter a Login URL using the format */login/<path>/.
The URL must start with "*/login/" and cannot contain any special characters. <path> should be set to a unique value reflecting the endpoint URL you want to define for this authentication policy (appended with a backslash):
- In the case of user sign-in policies, this is the URL endpoint (appended to the tenant FQDN) to which new users are invited to connect to enroll or sign-in a device with the Controller. Example value: "*/login/saleslogin/".
- In the case of user enrollment policies, this endpoint identifies the enrollment URL to which users are redirected if they attempt to connect to the equivalent sign-in policy with an un-enrolled device. In most cases, you do not advertise this endpoint to your users. Example value: "*/login/salesenroll/".
In some enrollment circumstances, such as when using a device pre-installed with an older version of Ivanti Secure Access Client, you connect directly to the enrollment policy endpoint to enroll the device. For more details, see Using User Authentication Policies.
-
(Optional) Enter a description for the authentication policy.
-
Select a User Type based on the intended authentication activity for this policy. Choose from:
- Users: Select this option to define the user sign-in endpoint for enrolled devices. This is the endpoint that you provide to your users to access the service (regardless of enrollment status).
- Administrators: Select this option to define the authentication endpoint for administrator-level sign-in. This endpoint is used for administrator login to the Controller only.
-
(for policies with a User Type of "Users" only): Select an Enroll Device Policy from the drop-down list to be linked to this sign-in policy (as indicated):
Linking an enrollment policy to a user sign-in policy
This is the enrollment policy to which a user is redirected if it is determined that the device is not yet enrolled. To learn more, see Using User Authentication Policies.
-
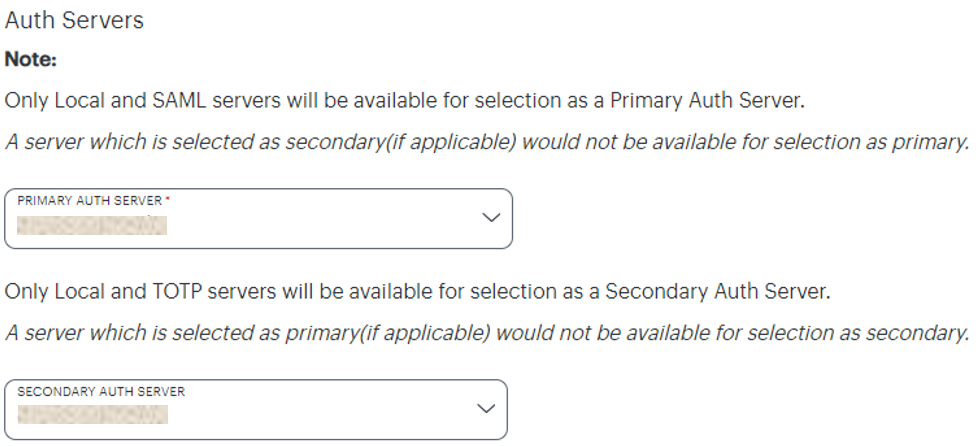
Under Policy Server Details, select Primary Auth Server from the drop-down list:
-
(Optional) Where a secondary method is required for Multi-Factor Authentication, select Secondary Auth Server from the drop-down list.
Secondary authentication methods do not apply to Enrollment User type policies. The relevant field is hidden in this case.
-
Click Create User Policy to create the new policy.
The new policy is added to the list of authentication policies.
If you instead elect to update an existing custom or built-in policy:
-
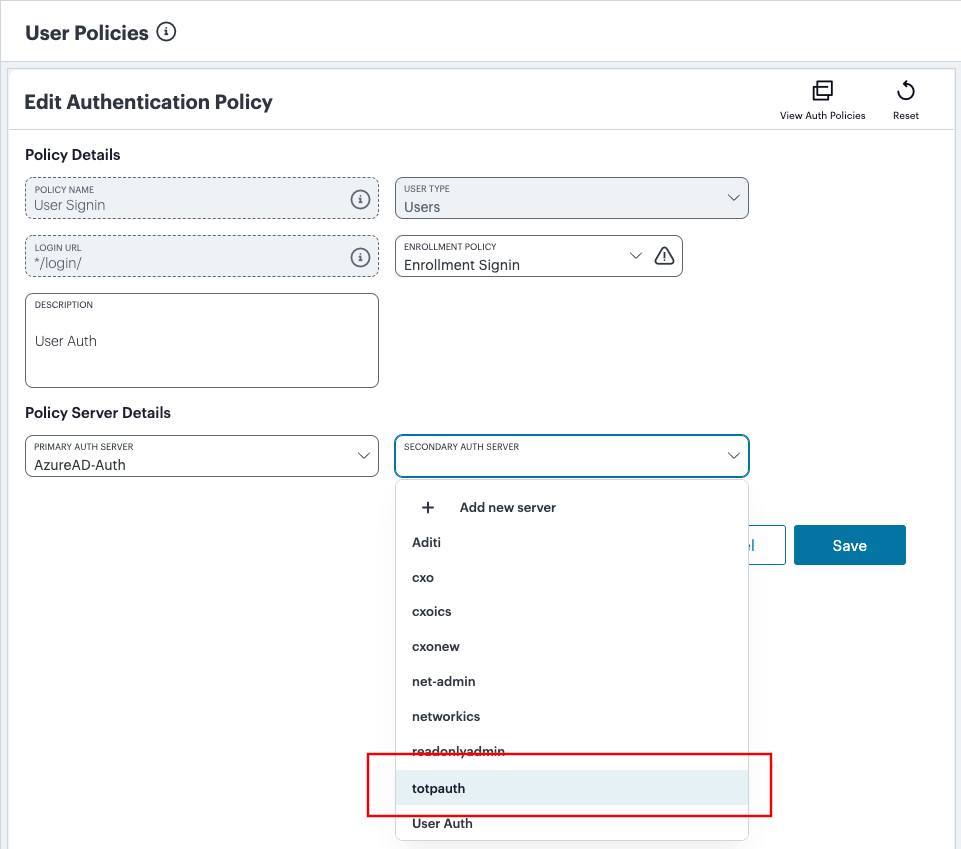
Click the three dots adjacent to the relevant policy, then select Edit.
The Edit authentication policy form appears.
For built-in authentication policies, all properties except Primary Auth Server and Secondary Auth Server (where applicable) are read-only.
-
Configure the primary and/or secondary authentication methods, as required:
-
Set the Primary Auth Server to be the new local user authentication method (indicated):

-
If you are configuring a policy for MFA, set the Secondary Auth Server to be the new local user authentication method (indicated):
If you configure a secondary authentication method in a policy that is currently in use, any active user sessions must be disconnected and reconnected for the changes to take effect.
-
-
Click Update User Policy.
The list of authentication policies updates.
-
Repeat until all required authentication policies are updated.
To ensure that your users can access the authentication mechanism defined in the policies you configure through this process, make sure your Secure Access Policies are configured with a User Group in which these authentication policies are defined. To learn more, see Creating/Editing Secure Access Policies.
For more information, see the Tenant Admin Guide.
Workflow: Creating a SAML Authentication Policy with Azure AD
nZTA supports the use of a cloud-based Active Directory (AD) SAML service to provide authentication for your users.
If you choose to use AD as a SAML Identity Provider (IdP), you do not create any users locally on the Controller. All users will already be present in your remote SAML service.
Configuring nZTA to use SAML authentication requires you to create separate SAML apps on the Azure AD platform for the following primary activities:
- User sign-in
- User enrollment
As part of hardening custom sign-in policies and login URLs, the following changes are implemented:
- Instead of requiring administrators to configure enrollment policies, administrators will only need to configure user policies. As a default, all configured user policies support enrollment.
- Single SAML authentication server for user authentication and enrollment.
The Controller includes built-in default authentication policies for each of these purposes, and also includes the ability to create your own custom policies for separate authentication of specific user groups. You create an authentication method referencing one of the Azure AD SAML apps described above and then assign the method to an authentication policy of the same type (either the built-in policy, or one you create).
Configuring nZTA to Use SAML Authentication
Configure nZTA by performing the following steps:
-
Log into the Controller as a Tenant Admin, see Logging in as a Tenant Administrator.
-
From the nZTA menu, select the Secure Access icon, then select Manage Users > Authentication Servers.
The Authentication Servers page appears. This page lists all existing user authentication methods:
-
Click Create Authentication Server.
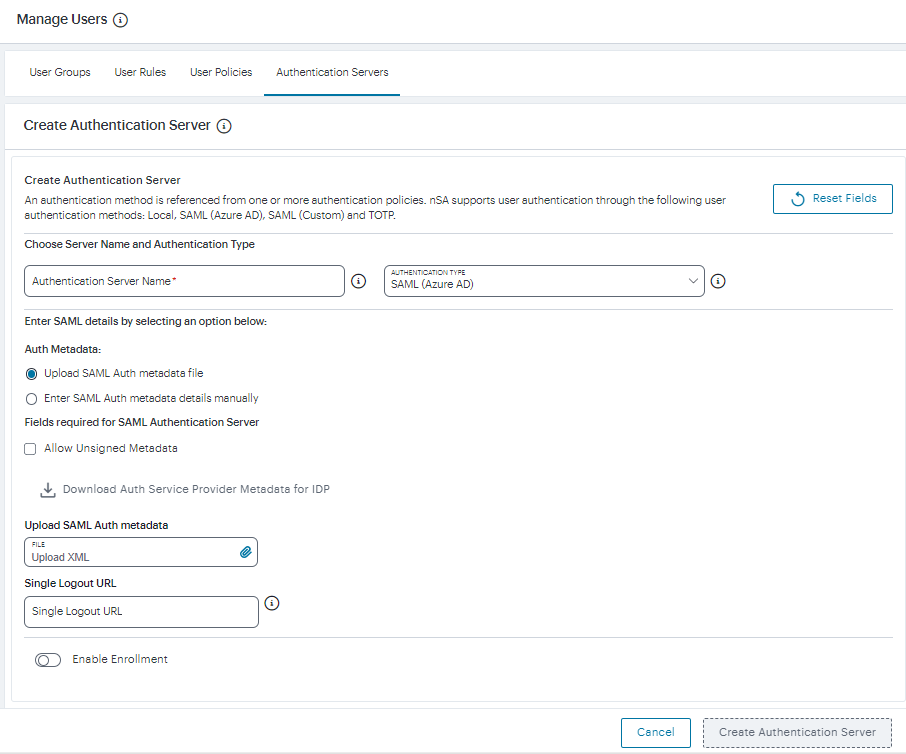
A form appears that enables you to define the authentication method:
At any point during this process, you can reset the form data by selecting Reset Fields.
-
Under Choose Server Name and Authentication Type:
-
Select the Authentication Type as SAML (Azure AD).
The form expands to show additional settings.
-
Specify an Authentication Server Name.
-
-
To provide your SAML IdP settings, select one of the following:
-
Select Upload SAML Auth metadata file if not selected already. This is selected by default.
The Download Auth Service Provider Metadata for IDP link is enabled.
-
(Optional) Specify a Single Logout URL. For more information, see Using SAML Single Logout to Force User Authentication.
- Click the Download Auth Service Provider Metadata for IDP link. Retain the downloaded file for later use.
By default, the Controller expects a signed metadata definition file. To allow an unsigned metadata file, select Allow Unsigned Metadata.
-
-
Select Enter SAML Auth metada details manually to manually enter the required IdP SAML settings. Use this option in scenarios where a SAML federation metadata file is not available or incomplete.
Then, enter the following details:
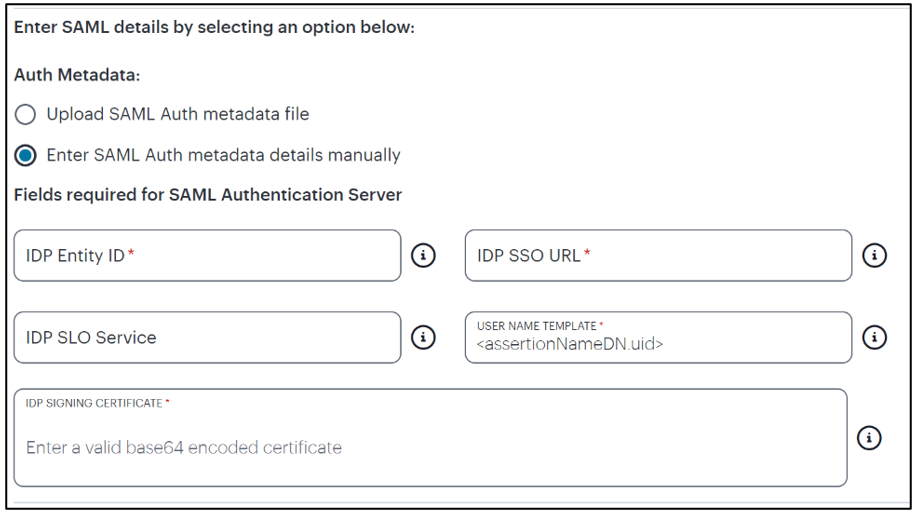
The following minimum settings are required for your SAML authentication service to function correctly. Each setting relates to a value configured in the SAML application on your IdP. Contact your IdP administrator to obtain the relevant details:
- IDP Entity ID: The entity ID is sent as the Issuer value in the SAML assertion generated by the IdP. Specify the Issuer value in assertions generated by the SAML identity provider.
- IDP SSO URL: A URL provisioned by the SAML IdP to
support service-provider-initiated Single Sign-On. Use the format
https://<FQDN>. - IDP SLO Service: (Optional) A URL to specify the
Single Log-Out/sign out endpoint if you want to force re-authentication
for increased security. Use the format
https://<FQDN>. For more information, see Using SAML Single Logout to Force User Authentication. - User Name Template: Specify how the system is to
derive the username from the SAML assertion. The default value can be
used, or replaced with an alternative specifier that the
Controller uses from the incoming assertion. For example:
<assertionNameDN.uid>, the NameID value where ICS is the IdP, the UID from X509SubjectName,<userAttr.attr>, attr from AttributeStatement attributes. - IDP Signing Certificate: The signing certificate to be used with the SAML app on the IdP. Type or paste in the contents of your Base-64 encoded public key.
-
-
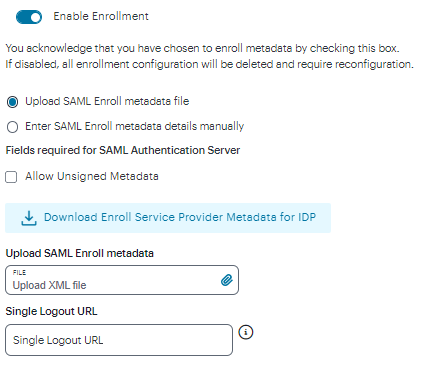
If this Auth server is used with User Policy of type “User”, then click Enable Enrollment.
-
To provide your SAML IdP settings, select one of the following:
-
Select Upload SAML Enroll metadata file if not selected already. This is selected by default.
-
(Optional) Specify a Single Logout URL. For more information, see Using SAML Single Logout to Force User Authentication.
- Click the Download Enroll Service Provider Metadata for IDP link.
By default, the Controller expects a signed metadata definition file. To allow an unsigned metadata file, select Allow Unsigned Metadata.
-
-
Select Enter SAML Enroll metada details manually to manually enter the required IdP SAML settings. Use this option in scenarios where a SAML federation metadata file is not available or incomplete.
Then, enter the following details:
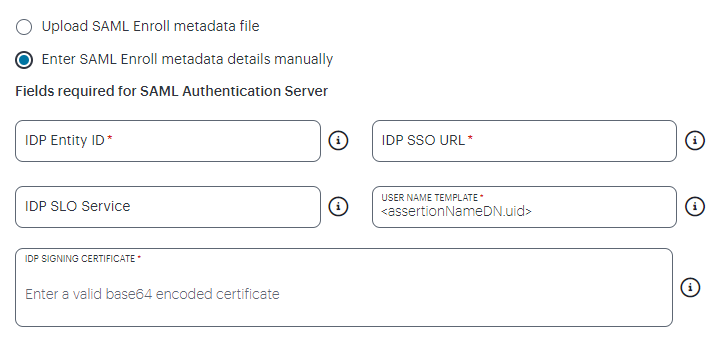
The following minimum settings are required for your SAML authentication service to function correctly. Each setting relates to a value configured in the SAML application on your IdP. Contact your IdP administrator to obtain the relevant details:
- IDP Entity ID: The entity ID is sent as the Issuer value in the SAML assertion generated by the IdP. Specify the Issuer value in assertions generated by the SAML identity provider.
- IDP SSO URL: A URL provisioned by the SAML IdP to
support service-provider-initiated Single Sign-On. Use the format
https://<FQDN>. - IDP SLO Service: (Optional) A URL to specify the
Single Log-Out/sign out endpoint if you want to force re-authentication
for increased security. Use the format
https://<FQDN>. For more information, see Using SAML Single Logout to Force User Authentication. - User Name Template: Specify how the system is to
derive the username from the SAML assertion. The default value can be
used, or replaced with an alternative specifier that the
Controller uses from the incoming assertion. For example:
<assertionNameDN.uid>, the NameID value where ICS is the IdP, the UID from X509SubjectName,<userAttr.attr>, attr from AttributeStatement attributes. - IDP Signing Certificate: The signing certificate to be used with the SAML app on the IdP. Type or paste in the contents of your Base-64 encoded public key.
- When editing an existing SAML Auth server, the 'Enable Enrollment' option can be enabled or disabled if the SAML Auth server is not being used in any ‘User Policy’. If the SAML Auth server is being used in a ‘User Policy’, then Enable Enrollment button will be grayed out.
- If 'Enable Enrollment' is not selected, then while creation of 'User Policy' of type 'User', the server you have created (without Enable Enrollment) will not be listed.
- When Enrollment is disabled, the enrollment SAML configuration will be deleted. To enable enrollment, you have to again provide enroll SAML auth server configuration. -
- Use the downloaded User Authentication and Enrollment SP Metadata files to create Sign-In and Enrollment SAML Apps in Azure AD. For details, see Creating Enrollment/Sign-in SAML App in Azure AD.
- Browse and upload the digitally-signed (or unsigned) federation metadata XML definition files downloaded from Azure AD.
-
Confirm that your settings are correct, then select Create Authentication Server to create the authentication method.
-
(Optional) To edit a listed authentication method, click the adjacent three dots, then select Edit. Make any required updates and confirm.
-
(Optional) To delete one (or more) an unused authentication methods, select the check box for each, then select Delete. You must confirm the deletion.
The new SAML user authentication method is added to the list of methods displayed in the User Authentication page, and the process completes.
Creating Enrollment/Sign-in SAML App in Azure AD
Perform the following steps in Azure AD:
-
Create a SAML app for the required activity (sign-in or enrollment).
-
Click Upload Metadata File and select the file from your download.
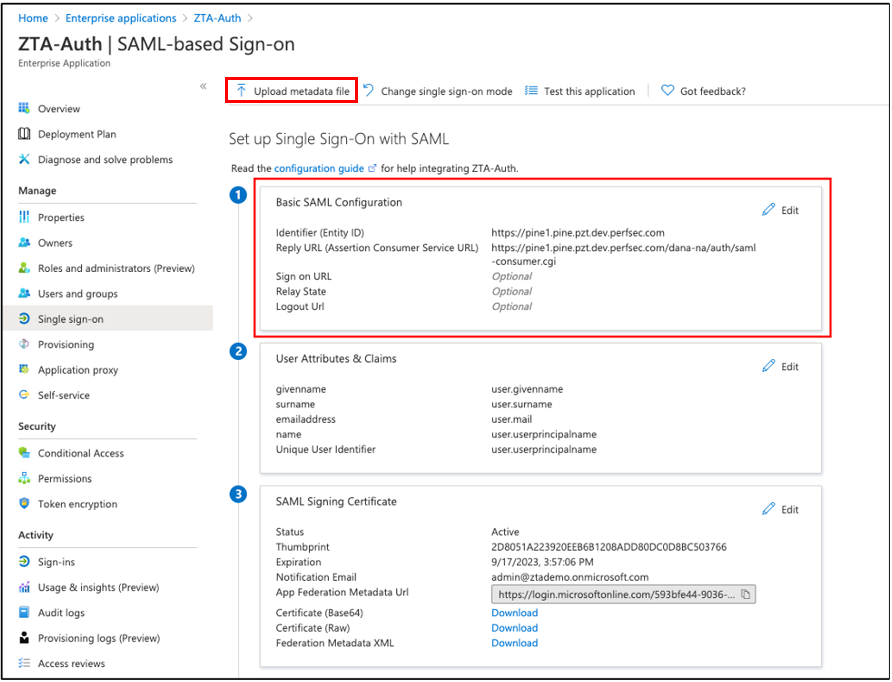
This defines at least the following Basic SAML Configuration fields:
- Identifier (Entity ID). This is the URL of the SAML endpoint on the Controller. This is the audience of the SAML response for IdP-initiated SSO. This cannot be left blank.
- Reply URL (Assertion Consumer Service URL). This is the URL of the SAML consumer on the Controller. This is the destination URL in the SAML response for IdP-initiated SSO. This cannot be left blank.
-
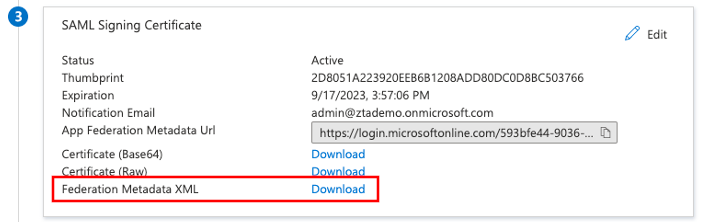
Download the Federation metadata XML definition for the SAML app to your local workstation. Retain this file for later use.
-
Repeat these steps for each activity.
For details on how to create SAML apps in Azure AD, see the Azure AD SAML documentation.
Creating/Updating Authentication Policies
After you have created your SAML authentication method, create or update your authentication policies with the new authentication method.
-
From the nZTA menu, select the Secure Access icon, then select Manage Users > User Policies.
The User Policies page appears. This page lists all existing user authentication policies.
To learn more about the policies on this page, see Viewing User Authentication Policies.
From this page, either create a new custom policy or edit an existing policy.
-
To add a new custom policy, select Create User Policy.
The Create Authentication Policy form appears.
At any point during this process, you can reset the form data by selecting Reset Fields.
To learn more about how custom policies are used for user login and enrollment, see Adding Custom Authentication Policies.
-
Enter a Policy Name.
-
Enter a Login URL using the format */login/<path>/.
The URL must start with "*/login/" and cannot contain any special characters. <path> should be set to a unique value reflecting the endpoint URL you want to define for this authentication policy (appended with a backslash):
- In the case of user sign-in policies, this is the URL endpoint (appended to the tenant FQDN) to which new users are invited to connect to enroll or sign-in a device with the Controller. Example value: "*/login/saleslogin/".
- In the case of user enrollment policies, this endpoint identifies the enrollment URL to which users are redirected if they attempt to connect to the equivalent sign-in policy with an un-enrolled device. In most cases, you do not advertise this endpoint to your users. Example value: "*/login/salesenroll/".
In some enrollment circumstances, such as when using a device pre-installed with an older version of Ivanti Secure Access Client, you connect directly to the enrollment policy endpoint to enroll the device. For more details, see Using User Authentication Policies.
-
(Optional) Enter a description for the authentication policy.
-
Select a User Type based on the intended authentication activity for this policy. Choose from:
- Users: Select this option to define the user sign-in endpoint for enrolled devices. This is the endpoint that you provide to your users to access the service (regardless of enrollment status).
- Administrators: Select this option to define the authentication endpoint for administrator-level sign-in. This endpoint is used for administrator login to the Controller only.
- From the Device Policy list, select a device policy.
-
(for policies with a User Type of "Users" only): Select an Enroll Device Policy from the drop-down list to be linked to this sign-in policy (as indicated):
This is the enrollment policy to which a user is redirected if it is determined that the device is not yet enrolled. To learn more, see Using User Authentication Policies.
-
Under Auth Servers, select Primary Auth Server and choose the required authentication method from the drop-down list. Only Local and SAML servers will be available for selection as a Primary Auth Server.
-
(Optional) Where a secondary method is required for Multi-Factor Authentication, select Secondary Auth Server and choose the required authentication method from the drop-down list. Only Local and TOTP servers will be available for selection as a Secondary Auth Server.
-
Click Create User Policy to create the new policy.
The new policy is added to the list of authentication policies.
Existing User Policies
-
For existing default user policies, admin can select either existing or new SAML or Local Auth Server.
Note: The Auth Server for enrollment will be added automatically.
- For existing custom user policies, user can update existing SAML Auth Server.
If you intend to update an existing custom or built-in policy:
-
Click the three dots adjacent to the relevant policy, then select Edit.
The Update Authentication Policy form appears.
For built-in authentication policies, all properties except Primary Auth Server and Secondary Auth Server (where applicable) are read-only.
-
Set the Primary Auth Server to be the new SAML user authentication method (indicated):
SAML authentication can be used only as a Primary Auth Server. If you are using MFA, specify either a local authentiction or TOTP method as the Secondary Auth Server.
If you configure a secondary authentication method in a policy that is currently in use, any active user sessions must be disconnected and reconnected for the changes to take effect.
-
Select Update User Policy.
The list of authentication policies updates.
-
Repeat until all required authentication policies are updated.
At this point, the Controller uses the uploaded Federation Metadata to contact the SAML service. After this process completes, a Download function becomes available for each relevant policy. This metadata file is required to configure trusted communication with the remote SAML service.
- Refresh your browser until the Download action is visible for the relevant policies.
- Select the check box for the policy metadata you want to download and clear all other check boxes.
- Select Download and save the metadata file.
As mentioned previously, make sure you repeat this procedure for each required SAML app on your Azure AD platform. That is, you require separate XML metadata files for the enrollment authentication policy and the login authentication policy.
After the User Authentication workflow is complete, you can configure the Azure AD platform with the XML configuration of the Controller. For details on how to configure Azure AD, see Configuring Azure AD with Service Provider Metadata from the Controller.
Finally, to ensure that your users can access the authentication mechanism defined in the policies you configure through this process, make sure your Secure Access Policies are configured with a User Group in which these authentication policies are defined. To learn more, see Creating/Editing Secure Access Policies.
For more information, see the Tenant Admin Guide.
Workflow: Creating a SAML Authentication Policy with On-Prem ICS
You can choose to use a configured ICS server (either remote or local) as an on-premises SAML AD authentication server for your Controller.
If you choose to use SAML authentication on your Controller, you do not create any users manually. All users will already be present on your remote SAML server.
Configuring nZTA to use SAML authentication requires you to create separate SAML apps on the on-premises ICS server for the following primary activities:
- User enrollment
- User sign-in
The Controller includes built-in default authentication policies for each of these purposes and includes the ability to create your own custom policies for separate authentication of specific groups. You create an authentication method referencing one of the SAML apps described above and then assign the method to an authentication policy of the same type (either the built-in policy, or one you create). Begin with enrollment, and then repeat the process for user sign-in.
To configure nZTA to use SAML authentication through ICS, perform the following steps:
- Configure your on-premises ICS to act as a SAML AD authentication server:
- Define an on-premises SAML authentication method, see Defining an On-Premises SAML Authentication Method.
- Configure an on-premises SAML authentication policy, see Defining Authentication Policies for On-Premises SAML Authentication.
- After you complete the User Authentication workflow, configure the SAML apps on the on-premises ICS server with the XML metadata configuration from the matching nZTA authentication policy, see Configuring ICS with Controller Metadata.
You will need to repeat this process for each required SAML app on your ICS server.
To ensure that your users can access the authentication mechanism defined in the policies you configure through this process, make sure your Secure Access Policies are configured with a User Group in which these authentication policies are defined. To learn more, see Creating/Editing Secure Access Policies.
Configuring Secondary Authentication for On-Premises ICS (Optional)
This section describes an optional configuration activity for SAML User Authentication on an on-premises ICS server.
Multi-Factor Authentication (MFA) is an authentication method by which a computer user is granted access only after successfully presenting two (or more) pieces of evidence (or factors) to an authentication mechanism. The ICS platform supports a number of secondary authentication solutions, and can be configured so that two authentication factors are required by users using a single nZTA user authentication method. Before you configure the on-premises ICS server and Controller for SAML User Authentication, you can choose to configure MFA (secondary) support to ICS.
Before you start this procedure, you must have fully configured a secondary authentication server. For example, Google OTP (One Time Password) or NAS OTP. For the purposes of this example, an existing local Google OTP server is used, but different established secondary authentication methods are also supported.
To configure ICS for secondary authentication:
-
Log in to the on-premises Ivanti Connect Secure server.
-
On the Authentication menu, select Auth. Servers.
The Authentication Servers page appears.
-
Under New, select the required authentication server type. For example, select Time based One Time Password (TOTP) Server.
-
Select New Server.
The New Time based One Time Password (TOTP) Server page appears.
-
Enter the following parameters for the new server:
- Add a Name for the server, for example Google OTP.
- Select the Allow Auto Unlock check box, and set Auto unlock period. For example, 10 minutes.
- Select the Allow new TOTP user registration to happen via External Port check box.
- Select the Allow TOTP authentication from Remote Pulse Secure Devices check box.
- Leave all other parameters as their default settings.
-
Select Save Changes.
The new server (Google OTP) is added to the list of Authentication Servers.
-
You must now add a new user to the local system. To do this:
- In the Authentication Servers list, select the hyperlink for the System Local entry.
- The Settings page for System Local appears.
- Select the Users tab.
- Select New to create a user.
- The New Local User page appears.
- Enter details for the user, and ensure that the Enabled check box is selected, and that other check boxes are clear.
- Select Save Changes to create the user.
-
Select the Users menu, then select User Realms.
The User Authentication Realms page appears.
-
You must now enable secondary authentication. To do this:
-
In the User Authentication Realms list, select the hyperlink for the Users entry.
The General page for the Users realm appears.
-
Under Additional authentication server, select the Enable additional authentication server check box.
-
Set Authentication #2 to Google OTP.
-
At the bottom of the page, select Save Changes.
-
You can now configure an Identity Provider in ICS, see Configuring a SAML Identity Provider in Ivanti Connect Secure.
Configuring a SAML Identity Provider in Ivanti Connect Secure
This section describes the steps to configure a SAML Identity Provider (IdP) on an on-premises Ivanti Connect Secure (ICS) server. The metadata for the IdP is required by each SAML user method on nZTA.
To configure SAML IdP on the Ivanti Connect Secure server:
-
Log in to the on-premises Ivanti Connect Secure server that is identified as an Identity Provider.
-
Navigate to System > Configuration > SAML > Settings.
-
Configure the following Metadata Server Configuration:
- Timeout value for metadata fetch request to 300.
- Host FQDN for SAML to the Fully Qualified Domain Name, noting the host FQDN guidance below.
The host FQDN specified here is used in the SAML entity ID, used by browsers to connect to ICS, and used in the URLs for SAML services. Typically:
- If the ICS is standalone, the FQDN should resolve to the IP address of the external interface / internal interface, whichever is chosen.
- If the ICS is an Active-Passive cluster, the FQDN should resolve to the external VIP / Internal VIP, whichever is chosen.
- If the ICS is an Active-Active cluster behind an in-line load balancer, the FQDN should resolve to the load balancer's external VIP / Internal VIP, whichever is chosen.
-
Select Save Changes.
-
Select Update Entity IDs and confirm this action on the warning page by selecting Update Entity IDs.
-
Navigate to System > Configuration > Certificates > Device Certificate, create a new CSR, and import certificate and keys. Skip this step if the ICS external interface / internal interface (whichever is chosen) already provides a certificate that matches the host’s Fully Qualified Domain Name.
-
Navigate to Authentication > Signing In > Sign In SAML > Identity Provider.
-
Locate the the Basic Identity Provider (IdP) Configuration section.
-
Under Protocol Binding to use for SAML Response:
- Select the Post check box.
- Clear the Artifact check box.
- Select the required Signing Certificate.
-
Under Other Configurations:
- Select the Accept unsigned AuthnRequest check box.
-
Select sha-256 for Signature Algorithm, if ICS is using 22.x version onwards.
-
Under Service-Provider-related IDP Configuration:
- For SignIn Policy, select the */ policy.
-
Under User Identity:
- For Subject Name Format, select Email Address.
- For Subject Name, enter <USERNAME>.
- At the bottom of the page, select Save Changes.
You can now configure a Metadata Provider in ICS, see Configuring a Metadata Provider in Ivanti Connect Secure.
Configuring a Metadata Provider in Ivanti Connect Secure
This section describes the steps to configure Ivanti Connect Secure to be a Metadata Provider, and to download metadata for use on the Controller.
To configure a Metadata Provider in the on-premises ICS server:
-
Log in to Ivanti Connect Secure server.
-
Navigate to Authentication > Signing-In > Sign In SAML > Metadata Provider.
The SAML Metadata Provider Entity Id property is pre-populated. It is generated by the system, based on the value for the Host FQDN for SAML setting on the System > Configuration > SAML > Settings page.
-
Set Metadata Validity to 365 days.
-
Clear the Do Not Publish IdP in Metadata check box.
-
Select Save Metadata Provider.
-
Select Download Metadata and save the file to your computer.
This definition file is required to enable on-premises SAML apps on the Controller.
You can then configure the Controller to use an on-premises SAML Server, see Defining an On-Premises SAML Authentication Method.
Defining an On-Premises SAML Authentication Method
A minimum of two authentication methods are required:
- An authentication method for a SAML enrollment sign-in app.
- An authentication method for a SAML user sign-in app.
To create an on-premises SAML server authentication method for a specific activity, for example, device enrollment:
-
Log into the Controller as a Tenant Admin, see Logging in as a Tenant Administrator.
-
From the nZTA menu, select the Secure Access icon, then select Manage Users > Authentication Servers.
The Authentication Servers page appears. This page lists all existing user authentication methods:
-
Select Create Authentication Server.
A form appears that enables you to define the authentication method:
At any point during this process, you can reset the form data by selecting Reset Vields.
-
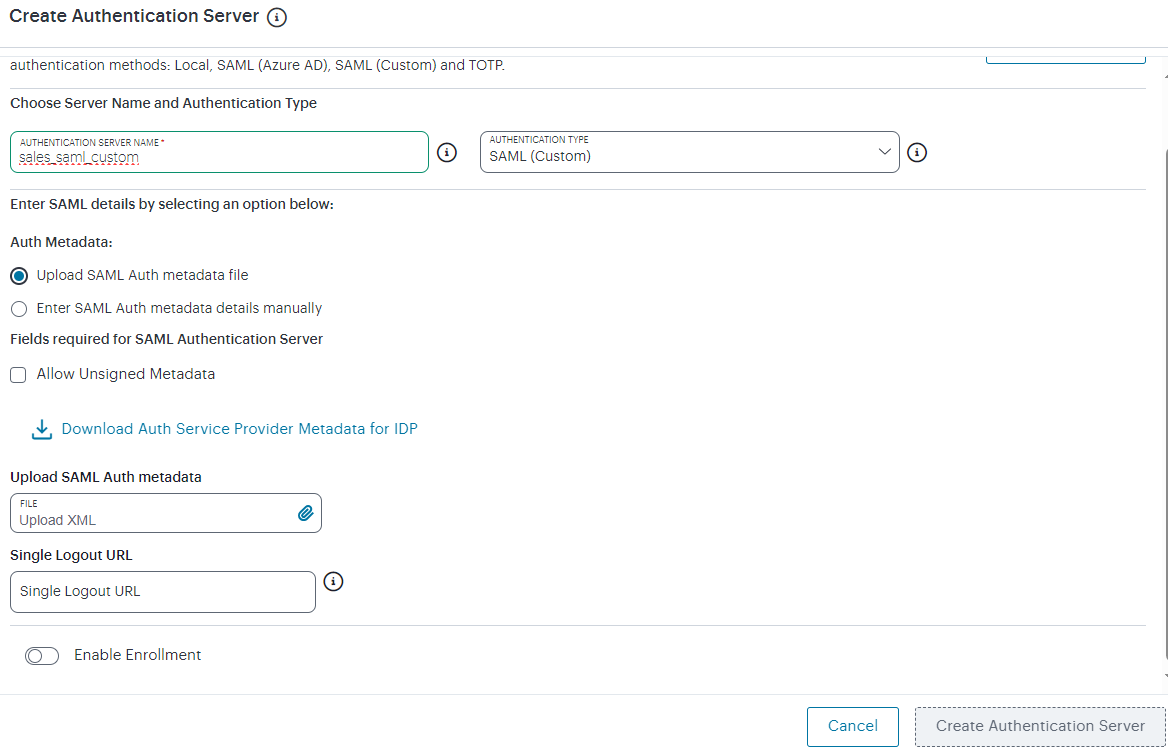
Under Choose Server Name and Authentication Type:
- Select the Authentication Type of SAML (Custom).
- Specify an Authentication Server Name. For example: Enrollment or SignIn.
The form expands to show additional settings:
-
To provide your SAML IdP settings, select one of the following:
-
Select Upload SAML Auth metadata file if not selected already. This is selected by default.
The Download Auth Service Provider Metadata for IDP link is enabled.
-
(Optional) Specify a Single Logout URL. For more information, see Using SAML Single Logout to Force User Authentication.
- Click the Download Auth Service Provider Metadata for IDP link. Retain the downloaded file for later use.
By default, the Controller expects a signed metadata definition file. To allow an unsigned metadata file, select Allow Unsigned Metadata.
-
-
Select Enter SAML Auth metada details manually to manually enter the required IdP SAML settings. Use this option in scenarios where a SAML federation metadata file is not available or incomplete.
Then, enter the following details:
The following minimum settings are required for your SAML authentication service to function correctly. Each setting relates to a value configured in the SAML application on your IdP. Contact your IdP administrator to obtain the relevant details:
- IDP Entity ID: The entity ID is sent as the Issuer value in the SAML assertion generated by the IdP. Specify the Issuer value in assertions generated by the SAML identity provider.
- IDP SSO URL: A URL provisioned by the SAML IdP to
support service-provider-initiated Single Sign-On. Use the format
https://<FQDN>. - IDP SLO Service: (Optional) A URL to specify the
Single Log-Out/sign out endpoint if you want to force re-authentication
for increased security. Use the format
https://<FQDN>. For more information, see Using SAML Single Logout to Force User Authentication. - User Name Template: Specify how the system is to
derive the username from the SAML assertion. The default value can be
used, or replaced with an alternative specifier that the
Controller uses from the incoming assertion. For example:
<assertionNameDN.uid>, the NameID value where ICS is the IdP, the UID from X509SubjectName,<userAttr.attr>, attr from AttributeStatement attributes. - IDP Signing Certificate: The signing certificate to be used with the SAML app on the IdP. Type or paste in the contents of your Base-64 encoded public key.
- When editing an existing SAML Auth server, the 'Enable Enrollment' option can be enabled or disabled if the SAML Auth server is not being used in any ‘User Policy’. If the SAML Auth server is being used in a ‘User Policy’, then Enable Enrollment button will be grayed out.
- If 'Enable Enrollment' is not selected, then while creation of 'User Policy' of type 'User', the server you have created (without Enable Enrollment) will not be listed.
- When Enrollment is disabled, the enrollment SAML configuration will be deleted. To enable enrollment, you have to again provide enroll SAML auth server configuration. -
-
Confirm that your settings are correct, then select Create Authentication Server to create the authentication method.
The new SAML authentication method is added to the list of methods and the process is complete.
-
(Optional) To edit a listed authentication method, click the adjacent three dots, then select Edit. Make any required updates and confirm.
-
(Optional) To delete one (or more) an unused authentication methods, select the check box for each, then select Delete. You must confirm the deletion.
You can now proceed to update the required authentication policy, see Defining Authentication Policies for On-Premises SAML Authentication.
Defining Authentication Policies for On-Premises SAML Authentication
After you have created your SAML authentication method, create or update your authentication policies with the new authentication method.
From the nZTA menu, select the Secure Access icon, then select Manage Users > User Policies.
The User Policies page appears. This page lists all existing user authentication policies.
User Authentication Policies
To learn more about the policies on this page, see Viewing User Authentication Policies.
From this page, either create a new custom policy or edit an existing policy. To add a new custom policy:
-
Select Create User Policy.
The Create Authentication Policy form appears.
At any point during this process, you can reset the form data by selecting Reset Fields.
To learn more about how custom policies are used for user login and enrollment, see Adding Custom Authentication Policies.
-
Enter a Policy Name.
-
Enter a Login URL using the format */login/<path>/.
The URL must start with "*/login/" and cannot contain any special characters. <path> should be set to a unique value reflecting the endpoint URL you want to define for this authentication policy (appended with a backslash):
- In the case of user sign-in policies, this is the URL endpoint (appended to the tenant FQDN) to which new users are invited to connect to enroll or sign-in a device with the Controller. Example value: "*/login/saleslogin/".
- In the case of user enrollment policies, this endpoint identifies the enrollment URL to which users are redirected if they attempt to connect to the equivalent sign-in policy with an un-enrolled device. In most cases, you do not advertise this endpoint to your users. Example value: "*/login/salesenroll/".
In some enrollment circumstances, such as when using a device pre-installed with an older version of Ivanti Secure Access Client, you connect directly to the enrollment policy endpoint to enroll the device. For more details, see Using User Authentication Policies.
-
(Optional) Enter a description for the authentication policy.
-
Select a User Type based on the intended authentication activity for this policy. Choose from:
- Users: Select this option to define the user sign-in endpoint for enrolled devices. This is the endpoint that you provide to your users to access the service (regardless of enrollment status).
- Administrators: Select this option to define the authentication endpoint for administrator-level sign-in. This endpoint is used for administrator login to the Controller only.
-
(for policies with a User Type of "Users" only): Select an Enroll Device Policy from the drop-down list to be linked to this sign-in policy (as indicated):
This is the enrollment policy to which a user is redirected if it is determined that the device is not yet enrolled. To learn more, see Using User Authentication Policies.
-
Under Policy Server Details, select Primary Auth Server and choose the required authentication method from the drop-down list:
Alternatively, select Create Authentication Server and create a new authentication method as per the steps described earlier in this section.
-
(Optional) Where a secondary method is required for Multi-Factor Authentication, repeat the previous step for Secondary Auth Server.
Secondary authentication methods do not apply to Enrollment User type policies. The relevant field is hidden in this case.
-
Select Add to create the new policy.
The new policy is added to the list of authentication policies.
If you instead elect to update an existing custom or built-in policy:
-
Click the three dots adjacent to the relevant policy, then select Edit.
The Edit authentication policy form appears.
For built-in authentication policies, all properties except Primary Auth Server and Secondary Auth Server (where applicable) are read-only.
-
Set the Primary Auth Server to be the new SAML user authentication method (indicated):
SAML authentication can be used only as a Primary Auth Server. If you are using MFA, specify either a local authentication or TOTP method as the Secondary Auth Server.
If you configure a secondary authentication method in a policy that is currently in use, any active user sessions must be disconnected and reconnected for the changes to take effect.
-
Select Update User Policy.
The list of authentication policies updates.
At this point, the Controller uses the uploaded metadata to contact the SAML service. After this process completes, a Download function becomes available for the policy. This metadata file is required to configure trusted communication with the remote SAML service. Perform the following steps:
- Refresh your browser until the Download action is visible for the relevant policy.
- Select the check box for the policy and clear all other check boxes.
- Select Download and save the metadata file.
Repeat these procedures for each required SAML app on your On-Prem ICS server. That is, you require separate XML metadata files for your enrollment authentication policy and your sign-in authentication policy.
After you have configured a user authentication policy, you can configure your ICS SAML app with the SP Metadata configuration of the Controller, see Configuring ICS with Controller Metadata.
Configuring ICS with Controller Metadata
Before the Controller can use a SAML server on an on-premises ICS server, you must enable communication between each separate SAML app on the ICS server and the Controller.
To do this, you must configure the SAML apps on the on-premises ICS server with the XML metadata configuration file for the Controller.
There are a minimum of two SAML apps:
- A SAML app for user enrollment. For example, called Enrollment.
- A SAML app during user sign-in. For example, called Signin.
You download the Controller XML configuration file when you selected an authentication policy. Alternatively, select the policy, then select Download on the User authentication policies page, see Viewing User Authentication Policies.
To configure a SAML app on ICS with XML from the Controller:
-
Log into your ICS platform.
-
Navigate to System > Configuration > SAML.
-
Select New Metadata Provider.
-
Enter a Name for the metadata provider.
-
Under Metadata Provider Location Configuration:
- For Location, select Local.
- For Upload Metadata File, select Browse and select the metadata that you saved on your computer in the previous process (see above).
-
Under Metadata Provider Verification Configuration:
- Select the Accept Unsigned Metadata check box.
-
Under Metadata Provider Filter Configuration:
- For Roles, select the Service Provider check box.
-
Select Save Changes.
-
Navigate to Authentication > Signing In > Sign-In SAML > Identity Provider.
-
In the Configuration section, select Add SP.
The New Peer Service Provider page appears.
-
In the Service Provider Configuration and Certificate Status Checking Configuration sections, make the necessary service provider specific settings. For more details, refer to the "Configuring Sign-in SAML Identity Provider Settings" section in the "Ivanti Connect Secure Administration Guide".
-
In the Customize IdP Behavior section, select the Override Default Configuration check box.
-
Clear the Reuse Existing NC (Pulse) Session check box.
-
Select the Accept unsigned AuthnRequest check box.
-
At the bottom of the page, select Save Changes.
After the on-premises ICS SAML service is configured to connect to the Controller, you can then create a user group to apply the newly created authentication policy to your secure applications, see Creating User Rules and User Groups.
For more information, see the Tenant Admin Guide.
Workflow: Adding TOTP to an Authentication Policy
This feature is supported for client and gateway versions applicable to release 22.2R1 and later only.
nZTA supports the use of Time-based One Time Password (TOTP) as a secondary authentication method in Multi-Factor Authentication deployments.
To use TOTP, first create a TOTP authentication method in nZTA and then associate it with your user sign-in authentication policies.
To ensure that your users can access the authentication mechanism
defined in the policies you configure through this process, make sure
your Secure Access Policies are configured with a User
Group in which these authentication policies are defined. To
learn more, see Creating a Secure Access Policy.
To configure a new TOTP authentication method:
-
Log into the Controller as a Tenant Admin.
-
From the nZTA menu, select the Secure Access icon, then select Manage Users > Authentication Servers.
The Authentication Servers page appears. This page lists all existing user authentication methods. For example:
-
Select Create Authentication Server.
A form appears that enables you to define the authentication method.
At any point during this process, you can reset the form data by selecting Reset. You can also view existing authentication methods in a pop-up dialog by selecting View Auth Methods.
-
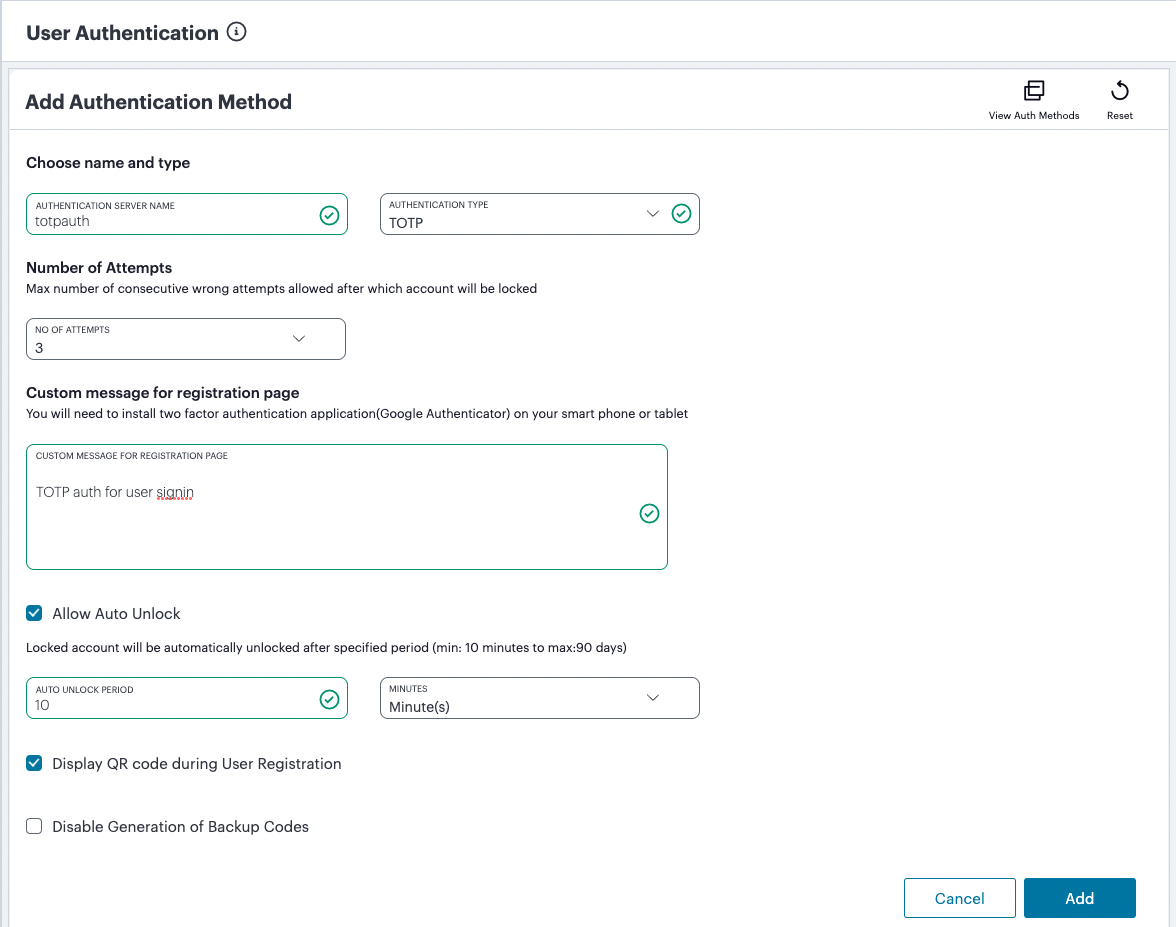
Under Choose name and type:
- Specify an Authentication Server Name.
- Select the Authorization Type of TOTP.
The form expands to show additional TOTP authentication settings:
-
Enter the following settings:
This release supports a Server Type of local only. This field is read-only.
- No of Attempts: The maximum number of consecutive
wrong attempts allowed before which the account is locked (minimum: 1
attempt, maximum: 5 attempts). To view user attempts and to unlock
locked accounts, see
Unlocking Locked User Accounts. - Custom message for registration page: A custom message to be shown on the new TOTP-user registration web page.
- Allow Auto Unlock: When selected, a locked account is automatically unlocked after the specified Auto Unlock Period. (minimum: 10 minutes, maximum: 90 days).
- Display QR code during User Registration: When selected, a QR code is displayed during user registration.
- Disable Generation of Backup Codes: When selected, the Controller does not generate TOTP backup codes.
- No of Attempts: The maximum number of consecutive
wrong attempts allowed before which the account is locked (minimum: 1
attempt, maximum: 5 attempts). To view user attempts and to unlock
locked accounts, see
-
To create an authentication method based on these settings, select Add.
The new TOTP user authentication method is added to the list of methods and the process is complete.
After you have created your TOTP authentication method, create or update your user sign-in authentication policies with the new method. nZTA supports using TOTP only as secondary authentication, so make sure you have previously configured a primary authentication method before continuing this process.
Secondary authentication methods do not apply to Enrollment User type policies. The relevant field is hidden in this case.
Complete the following steps for your user sign-in authentication policy:
-
From the nZTA menu, select the Secure Access icon, then select Manage Users > User Policies.
The User Policies page appears. This page lists all existing user authentication policies.
To learn more about the policies on this page, see the Tenant Admin Guide.
-
Click the three dots adjacent to your desired user sign-in policy, then select Edit.
The Edit Authentication Policy form appears.
-
For Secondary Auth Server, select your new TOTP authentication method from the drop-down list (as indicated).
Alternatively, select Add New Server and create a new authentication method as per the steps described earlier in this section.
-
Select Save to update the policy.
If you configure a secondary authentication method in a policy that is currently in use, any active user sessions must be disconnected and reconnected for the changes to take effect.
Unlocking Locked User Accounts
After you have created a TOTP authentication method and assigned it to an active user authentication policy, you can use the authentication method configuration page to view users that have attempted authentication through TOTP. This information enables you to unlock locked user accounts, if required.
To access user attempt information, perform the following steps:
-
Select Secure Access > Manage Users > Authentication Servers.
-
Click the three dots adjacent to your TOTP authentication method, then select Edit.
At the bottom of the page, a Users table is presented:

This table lists each user who has attempted to authenticate a device through TOTP, including the last attempt and last successful login times.
-
(Optional) If a user account is locked through too many consecutive failed authentication attempts (that exceed the value configured in No of Attempts), unlock the account by selecting the checkbox adjacent to the user entry and selecting UNLOCK. The user is then free to re-attempt authentication using valid authentication codes.
-
(Optional) To remove a user from the list, select the checkbox adjacent to the user entry and select RESET. This means a user must then re-register their device with the TOTP policy.
Reset and unlock operations of individual users are supported only when the TOTP authentication method is associated with a user authentication policy. To reset or unlock all users in a disassociated TOTP authentication method, delete the TOTP authentication method itself.
Creating User Rules and User Groups
After your authentication policies and methods are established, you can set up any required user rules.
Each user rule identifies one or more users, either from a local authentication service or from an external SAML service.
You associate one or more user rules with an authentication policy to form a user group.
Creating User Rules
nSA includes three default user rules:
- ALLADMINUSERS. This matches all users, and is referenced by the default ADMINISTRATORS user group, which associates it with the built-in Admin Signin authentication policy.
- ALLUSERS. This matches all users, and is referenced by the default USERS user group, which associates it with the built-in User Signin authentication policy.
To read more about default user groups or built-in authentication policies, see the Tenant Admin Guide.
This preset configuration of rules, groups, and policies is suitable for typical use cases involving whole-organization authorization needs. In other words, where you require only a single user authorization path that matches all users. For scenarios where you require more specific user authorization checks, you can create additional rules to match specific types of users.
When you create a rule, you select the user attribute with which you want this rule to test. nSA provides the following rule attribute types:
- username: For local authentication methods, choose this attribute type to match against locally-defined user names.
- SAML (Azure AD): For SAML authentication methods, choose this attribute type to match against user names or groups provided by the SAML service.
- Custom: For SAML authentication methods, choose this attribute type to match against a custom SAML attribute expression.
To create a user rule:
-
From the nZTA menu, select the Secure Access icon, then select Manage Users > User Rules.
The User Rules page appears. This page lists all user rules.
-
Click Create User Rule.
The Create User Rule form appears.
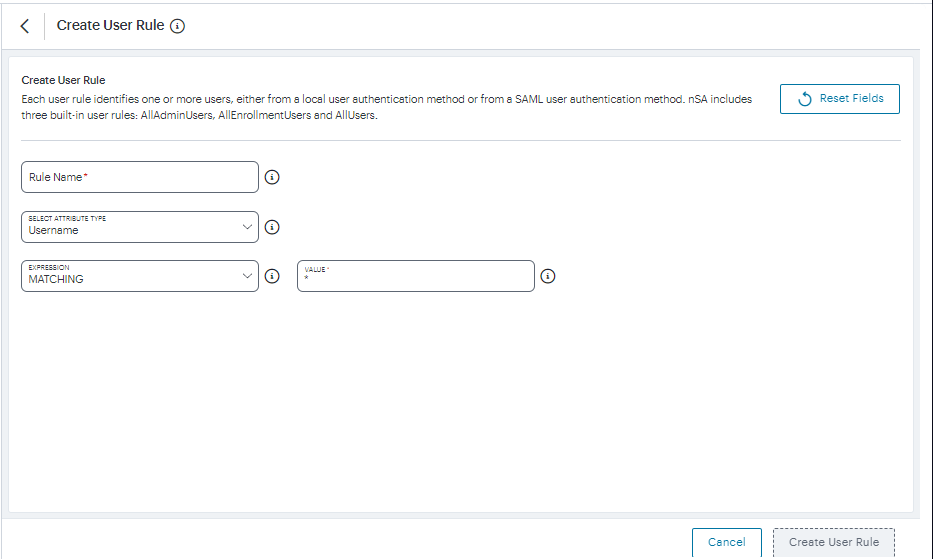
At any point during this process, you can reset the form data by clicking Reset Fields.
-
Enter a Rule Name.
-
Click Select Attribute Type and select one of the available options:
-
Username: Matches user names in a local authentication method. When you select this option, you must then:
- Select an Expression type, either Matching or Not Matching.
- For the User value, enter a match expression for
the selected Expression type. For the value:
- A comma-separated list of items is supported where required.
- Wildcard matches are supported.
- Special characters are supported.
- Single and double quotes are not supported.
Ivanti recommends that a basic asterisk wildcard is not used when you intend to associate admin roles with user groups. Instead, a more-specific wildcard that only includes admin users is required in this case to prevent all users having total access rights.
-
SAML (Azure AD): Matches user names or groups in a SAML authentication method. When you select this option, you must then:
- Select a SAML Attribute Type, either Username or Group.
- For Attribute Value, enter a match expression for the selected SAML Attribute Type as a SAML expression.
-
Custom. Matches against a custom SAML attribute expression. When you select this option, use the Type or Create an Expression property to enter an attribute expression. Supported formats include:
-
For simple user attribute key-value matching, use the syntax
userAttr.<attr-key> [=|!=] <attr-value>. For example:- userAttr.memberOf = "CN=sales,DC=example,DC=com" - userAttr.mail = "[email protected]" - userAttr.realm = "Users" - userAttr.department != "example_department" -
To match against attributes that can have multiple values associated with a single attribute key, use the syntax
samlMultiValAttr.<attr-key> [=|!=] (<list>). For example:- samlMultiValAttr.memberOf = ("CN=Employee,CN=Users,DC=example_demo,DC=com") - samlMultiValAttr.memberOf = ("CN=Users,DC=example_demo,DC=com") -
Use brackets and AND/OR operators to construct logical compound expressions:
- userAttr.groups = ("Group1" or "Group2")
- userAttr.realm = ("ztaqa") and samlMultiValAttr.memberOf = ("CN=sales,DC=uisdp,DC=com")
- userAttr.realm = ("ztaqa") or samlMultiValAttr.memberOf = ("CN=sales,DC=uisdp,DC=com")
- userAttr.realm != ("ztaqa") and samlMultiValAttr.memberOf = ("CN=sales,DC=uisdp,DC=com")
-
-
-
Click Create User Rule.
The new user rule is added to the list of user rules.
-
Repeat steps 3-6 for each required user rule.
After you have created all required user rules, you can create user
groups, see Creating User Groups.
Creating User Groups
After you have created user rules (see Creating User Rules), you associate one or more user rules with an authentication policy to form a user group.
nSA includes three default user groups:
- ADMINISTRATORS. This user group associates the default ALLADMINUSERS user rule with the built-in Admin Signin authentication policy.
- USERS. This user group associates the default ALLUSERS user rule with the built-in User Signin authentication policy.
To read more about built-in authentication policies, see the Tenant Admin Guide.
This preset configuration of rules, groups, and policies is suitable for typical use cases involving whole-organization authorization needs. In other words, where you require only a single user authorization path that matches all users. For scenarios where you require more specific user authorization checks, you can create additional user groups to make different associations of user rules and custom authentication policies.
To create a user group:
-
From the nZTA menu, click the Secure Access icon, then select Manage Users > User Groups.
The User Groups page appears. This page lists all user rule groups.
-
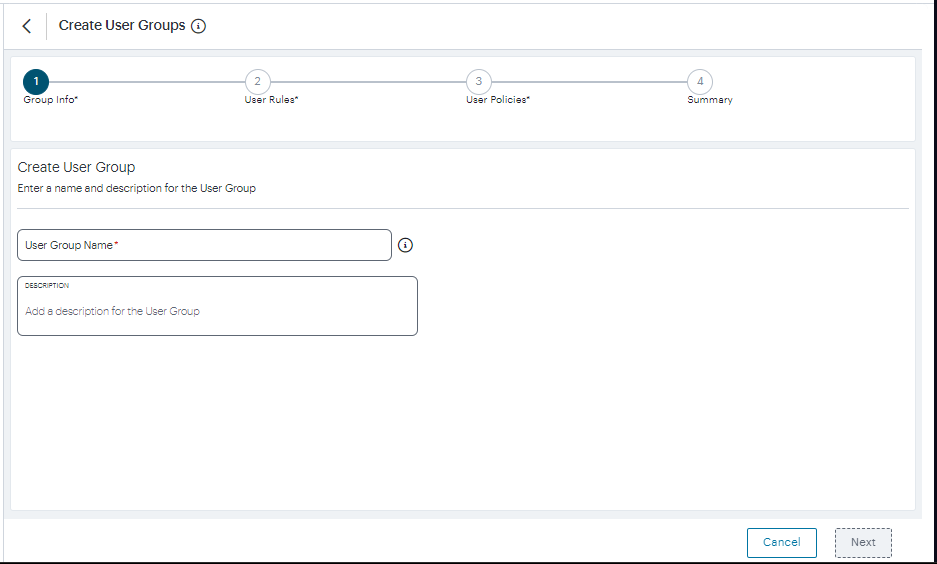
Click Create User Group.
A form appears to enable you to create the user group.
-
Enter a User Group Name and an optional Description, then click Next.
-
Select each of the listed User Rules that are required in the user group, then click Next.
-
Select required authentication policy from the list, then click Next.
-
Review the summary and click Create.
The new user group appears in the User Groups list.
-
Repeat steps 2-7 to create all required user groups.
Associating User Groups with Admin Roles
An admin role defines the elements of the user interface that an associated user group can access.
The current user can only access an individual user interface page/workflow if their user group is associated with an admin role that permits it. The tasks they can perform within that displayed element depends on the permissions set within the admin role.
When you are using admin roles, Ivanti recommends that any user rules for administrators does not use a basic asterisk wildcard, see Creating User Rules. Instead, a more-specific wildcard that only includes admin users is required in this case to prevent all users having total access rights.
The default admin roles are not created by the tenant admin using the nZTA user interface. Rather, they are set up by the Ivanti DevOps team.
For example, the DevOps team might define the following admin roles:
- The .Administrators admin role has access to all user interface elements (full read, create, update, delete rights).
- The .Read-Only Administrators admin role has access to all user interface elements except workflows (read only).
- The .Network Administrators admin role has access to ZTA Gateways and Insights (read only).
- The .CxOs admin role has access to Insights only (read only).
For more information about your assigned admin roles, please contact Ivanti DevOps.
The Tenant Admin can view admin roles in the Administration > Admin Roles page, and associate each role with a single user group.
To associate a user group with an admin role:
-
Log into the Controller as a Tenant Admin.
-
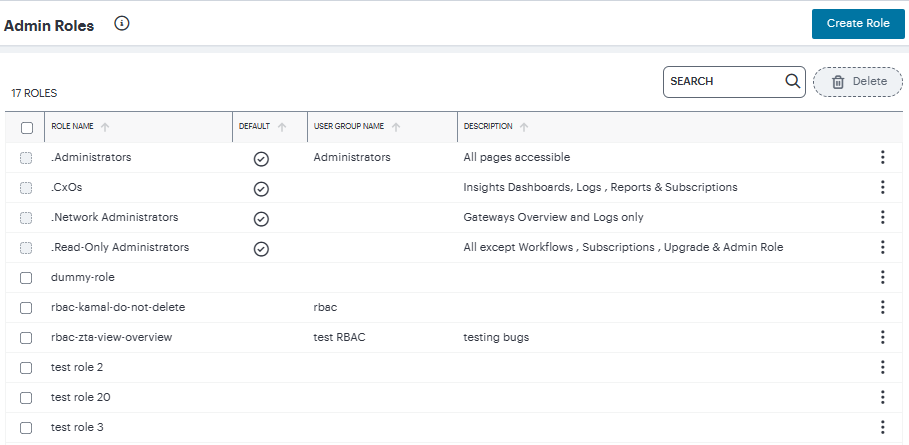
From the nZTA menu, select Administration, then select Admin Roles.
A list of Admin Roles appears. This includes default admin roles and custom admin roles (RBAC). For example:
-
Click the three dots adjacent to the role you want to update, then select Edit Role.
A dialog appears. For example:
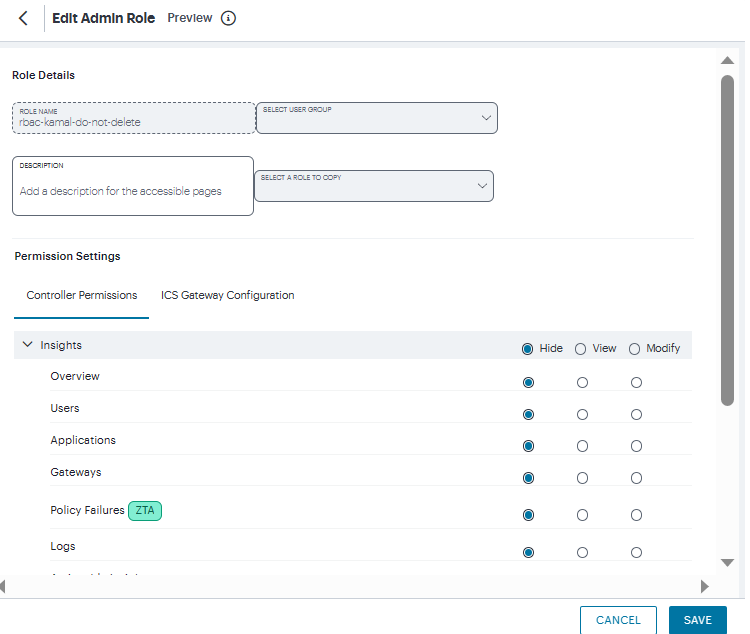
-
Under Choose group, select the user group that you want the admin group to be associated with.
-
Select Save Changes.
-
(Optional) Repeat steps 3 to 5 for each admin role.
Role-based Access Control for Admin Users
With Role-based access control (RBAC), organizations can easily add admins and assign them specific roles, with differing levels of access to the nSA Admin Portal. In addition to an existing set of default roles, Administrators can now create custom granular roles for specific functions within the nSA admin portal.
The following examples illustrate how an organization can leverage role-based administration for a variety of scenarios.
To create a custom admin role:
1.Log into the Controller as a Tenant Admin, see Logging in as a Tenant Administrator.
2.From the nZTA menu, select Administration, then select Admin Roles.
3.In the Admin Roles page, click Create Role. The Create Admin Role page appears.
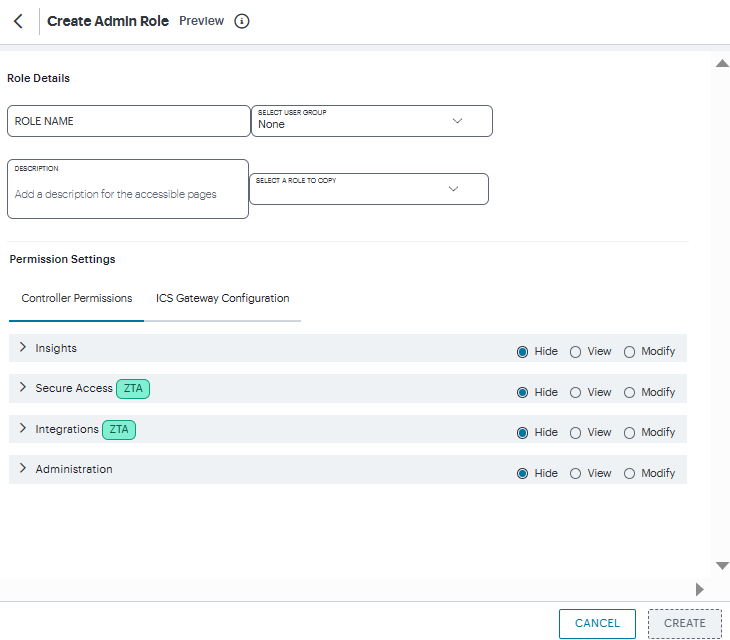
4.Enter a unique name for the role.
5.From the drop-down list, select the User Group that you want to associate with this role. For details, see Associating User Groups with Admin Roles.
6.Optionally, enter a Description.
7.From the drop-down list, select an existing role that suits your requirements.
8.Under Permission Settings, the Controller Permissions list shows the list of resources. The resources specific to nZTA are tagged with ZTA and resources specific to ICS are tagged with ICS.
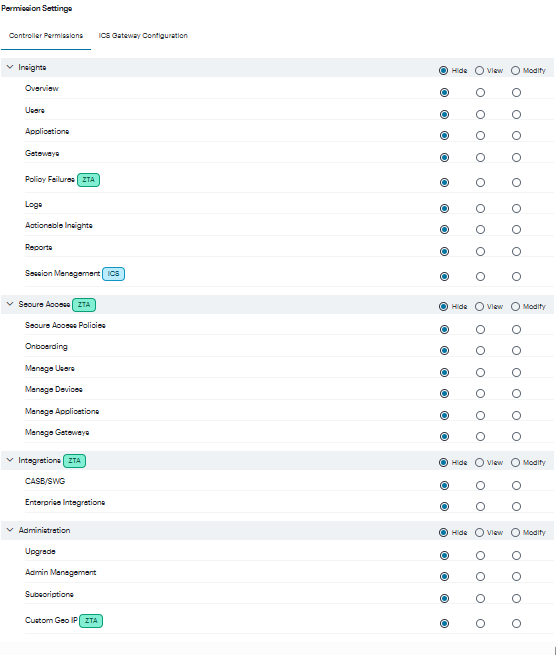
9.Select the Hide, View only, or Modify permissions for each resource and its attributes. This determines which pages to show and which actions to allow.
10. Under Permission Settings, the ICS Gateway Configuration list shows the list of ICS Gateway resources.

11. Click Select Gateways. In the Select Gateways dialog, select one or more Gateways / Clusters from the list and click Apply.
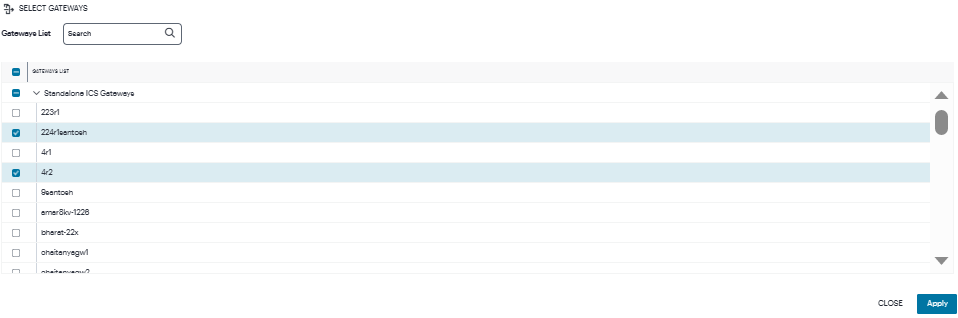
12. Select the Hide, View only, or Modify permissions for each resource and its attributes. This determines which pages to show and which actions to allow.
13. Click Create. The newly created custom admin role is displayed in the Admin Roles page.
14. (Optional) Edit an existing admin role by clicking the adjacent three dots, and then selecting Edit. Make any required updates and save the changes.
15. (Optional) Delete an unused custom admin rule by clicking the adjacent three dots, and then selecting Delete. You must confirm the deletion.
Next Steps
After you have configured your authentication methods and policies,
and added them to your user groups, proceed to configure your nZTA Gateways,
see Configuring Gateways.