WDS Configuration
WDS interacts closely with DHCP, PXE, DNS and Active Directory. As all of these functions are part of the Windows Server platform, it is cost-effective to use them. DHCP can also be offered by a non-Windows server.
For more information about Microsoft Windows Deployment Services, please refer to the Windows Deployment Services Getting Started Guide, available at http://technet.microsoft.com/en-us/library/cc771670(WS.10).aspx.
Active Directory configuration
- Configure WDS to respond only to "known" computers. To make a new computer known to WDS, it must be added to Active Directory.
- Configure the Active Directory attribute "netbootMachineFilePath" to determine the response of PXE to the request. This attribute can be edited with ADSI Edit. On servers running Microsoft Windows Server 2008 R2, ADSI Edit is installed when you install the Active Directory Domain Services (AD DS) role to make the server a domain controller. For more information about ADSI Edit, see http://technet.microsoft.com/en-us/library/cc773354%28WS.10%29.aspx#BKMK_InstallingADSIEdit.
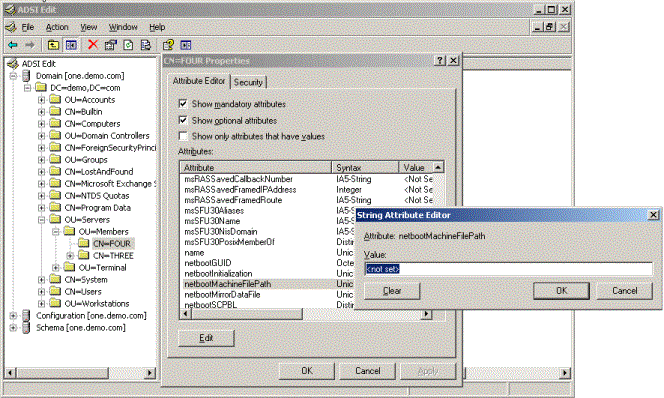
Some values that you can use are:
- \boot\x64\PXEBoot.com (requires users to press F12 for PXE boot)
- \boot\x64\PXEBoot.n12 (no user interaction required)
- \boot\x64\abortPXE.com (boots next device, probably hard disk)
Use corresponding values for 32-bit computers.
WDS configuration
- Make sure DNS, AD and DHCP are working correctly (not necessarily on the same server).
- On the Start menu, click Administrative Tools > Server Manager.
- Click Add Roles.
- Add Windows Deployment Services with Deployment Server and Transport Server as server roles.
- In the Server Manager, expand the server list.
- Right-click the server that you want to manage, and click Configure Server. This starts the Windows Deployment Services Configuration Wizard.
DHCP option 60
If DHCP and PXE (part of WDS) are running on the same server, both processes must receive the DHCP request packet from the clients.
- Open the properties of the WDS server.
- On the DHCP tab, select Configure DHCP option 60 to indicate that this server is also a PXE Server. This redirects PXE requests to port 4011. Do NOT select this option if PXE and DHCP are running on separate servers.
PXE server initial settings
- On the PXE Response tab, select either Respond only to known client computers or Respond to all client computers, depending on what you want to achieve. In a tightly managed environment, we recommend to select Respond only to known client computers. Ivanti Automation will take care of the rest.
- Do NOT select Require administrative approval.
Images
WDS makes use of images in 2 stages: a pre-boot Operating System and an installed Operating System.
- First add a pre-boot OS. On the Start menu, click Administrative Tools > Server Manager > Windows Deployment Services.
- In the WDS administration tool, browse to the server that you are configuring, right-click the folder Boot Images and click Add Boot Image.
- Browse to the Sources folder on the Windows 2008R2 installation DVD and select boot.wim. You can add multiple boot Operating Systems for different platforms (x86 and x64).
- After adding the pre-boot OS, add the OS that is intended to be installed on the target computers: in the WDS administration tool, browse to the server that you are configuring, right-click the folder Install Images and click Add Install Image.
- When prompted, browse to the Sources folder on the Windows 2008R2 installation DVD and select install.wim. You can also find this file on the Windows 7 installation DVD.
- You may create different Image Groups for Workstation and Server Operating Systems. In this document we assume 2 Image Groups: Workstations and Servers.
- Add the Ivanti Automation Agent manually to the Windows 7 or Windows 2008 image using the DISM command.
- Mount the image, add a c:\temp folder and copy the MSI file into this folder.
- Unmount the image and do not forget to use the /commit option.
Boot menu configuration
- In the WDS administration tool, right-click the server that you are configuring and click Properties.
- Click the Boot tab.
- Select Always continue the PXE boot. This allows the boot procedure to be independent from user interaction. If you allow for user interaction (by pressing F12), the success of the boot procedure depends on the user reading the instructions on the screen and acting accordingly. Because this rarely happens, it is better to bypass user interaction.
Boot loop
We assume the NIC to be the first in priority in the boot order. This can cause a boot loop: WDS deploys the image and the setup starts. During setup, the machine reboots and everything starts from the beginning. To avoid this situation, WDS can change the boot program during deployment if the following registry key is set:
[HKEY_LOCAL_MACHINE\SYSTEM\CurrentControlSet\services\WDSServer\Providers\WDSPXE\Providers\BINLSVC]
"ResetBootProgram"=dword:00000001
Unattend.xml
In the process, we need two unattend.txt files: one that is used in WinPE phase (WinPE.xml) and one that is associated with the image and is needed after WinPE phase (PostPE.xml).
- Right-click the imported images and click Properties.
- Select Allow to install in unattended mode, select the "PostPE.xml" file and click OK.
- Leave the WinPE.xml in the WdsClientUnattend folder in the RemoteInstall install folder.