Configure Registry Settings
Configuration
- Click New Registry, this will open the New registry settings window.
- Click the Properties tab.
- Enter the name of the registry setting in the Name field.
- Optionally enter a note in the Administrative note field. This is useful to differentiate the registry settings that you configured.
- To enable the registry setting, select Enabled.
- Select Run once to limit implementation of the registry setting to a user's first startup.
- Select Ignore registry redirection (on 64-bit operating systems) to map the registry value (new or modified) to the path specified by the user. If this option is not selected, the registry value may be mapped to a location under Wow6432Node on a 64-bit operating system.
- In the Required connection state field, select the required connection state that allows the setting to be applied. For example, this allows you to configure a setting that will only be applied if a computer has an online connection state. See Connection State Settings.
- Right-click HKEY_CURRENT_USER or HKEY_LOCAL_MACHINE and select an action from the Registry section. The first five actions are explained based on an example where HKEY_CURRENT_USER is the subtree, SOFTWARE is the key and Demo is the subkey (HKEY_CURRENT_USER\SOFTWARE\Demo).
How to add a registry subkey
- Right-click HKEY_CURRENT_USER.
- Click Open HKEY_CURRENT_USER. This will open the Pick keys/values from registry window.
- Expand HKEY_CURRENT_USER and SOFTWARE.
- Select Demo and click New.
- Click Close to close the Pick keys/values from registry window.
How to add a new subkey to an existing subkey
- In the New registry setting window, expand HKEY_CURRENT_USER and SOFTWARE.
- Right-click the Demo subkey.
- Point to New and click Key.
- Enter TestSubkey in the folder that is added and press ENTER.
How to add or change a registry subkey value
How to add a new string value
- In the New registry setting window, expand HKEY_CURRENT_USER, SOFTWARE and Demo.
- Right-click the TestSubkey subkey.
- Point to New and click String Value.
- Enter TestString and press ENTER.
How to edit the value of a subkey
- Right-click the value that you just added.
- Click Modify. This opens the Edit String window.
- Enter 1 in the Value data field.
- Enter "This is a test value" in the Administrative Note field. This field can be used to describe the function of the registry value. If you create an Instant Report of the registry setting, any annotations will be included.
- Click OK.
You can add the following registry subkey values:
|
Value |
Function |
|
String Value |
Adds a string value. Most information about hardware components is stored as binary data and shown in hexadecimal format. |
|
Expandable String Value |
Adds a variable-length string value. This data type includes variables that will be resolved when an application or service uses the data. |
|
Multiple String Value |
Adds a multiple string value. In general, this type is used for values that contain lists or multiple values in a form. Separate multiple values with spaces, commas or other marks. |
|
Binary Value |
Adds a binary value. This data type is generated by hardware device drivers and the physical devices it controls. It is shown in hexadecimal format as a binary value. |
|
DWORD Value |
Adds a DWORD value. This data type is a number of 4 bytes long (32-bit integer). Many parameters for device drivers and services are this type and are shown in binary, hexadecimal or decimal format. |
|
QWORD Value |
Adds a QWORD value. This data type is a number that is a 64-bit integer. It is shown as a binary value. |
|
NONE Value |
Adds a value without any particular type. It is written to the registry by the system or applications and is displayed in hexadecimal format as a binary value. |
How to rename a registry subkey or value
- Expand HKEY_CURRENT_USER, SOFTWARE and Demo.
- Right-click the TestSubkey key.
- Click Rename.
- Enter Renamed and press ENTER.
How to convert a registry value to a registry value of a different type
- In the New registry setting window, right-click the TestSubkey subkey.
- Point to Convert to and click Expandable String Value. This will convert the TestSubkey from a string value to an expandable string value. You can only convert string values, expandable string values and multiple string values to values of these types.
How to remove a registry subkey or value
How to remove the value from a subkey in the registry
- Expand HKEY_CURRENT_USER, SOFTWARE and Demo.
- Select the Renamed subkey.
- Right-click the TestString value and click Toggle "remove this value". This will remove the value from the registry subkey in the registry.
How to remove a subkey from the registry
- Expand HKEY_CURRENT_USER, SOFTWARE and Demo.
- Right-click the Renamed subkey and click Toggle "remove this value". This will remove the registry subkey and its underlying values from the registry.
How to delete a subkey
- Expand HKEY_CURRENT_USER, SOFTWARE and Demo.
- Select the Renamed subkey.
- Right-click the TestString value and click Delete.
- Click Yes to confirm that you want to delete the value.
Registry Tracing
When you make changes to the preferences of an application, these are usually stored as a registry setting in HKEY_CURRENT_USER. If you want to add these registry settings to Composition > Actions By Type > User Registry manually, you need to know the exact location of these settings in the registry. With the functionality Trace registry changes (available from the Action menu when adding a new User Registry setting), this is not necessary. When tracing the registry changes that are made by an application's process, you can choose the relevant registry setting(s) from a list of logged registry changes and convert them to a User Registry setting. This makes it easier to add registry settings.
You can use registry tracing to configure global User Registry settings, as well as User Registry settings that are set when a user starts an application.
To use Trace registry changes:
- Add or edit a User Registry item (in an application's Configuration section on the Action tab, or at Composition > Actions By type >User Registry).
- Go to Action > Registry > Trace registry changes.
- In the Trace registry changes window, the Process field shows the application's command line. You can change this if necessary, either by typing a process yourself, or by selecting a process that is currently running.
- For processes traced from an application's Configuration section on the Action tab, the button Run now opens the application with the full Workspace Control configuration, including settings, etc. For example, if a command is configured as a setting for the application, then this command will also be executed if you start the application with the Run now button in the Trace registry changes window.
- For processes traced from Composition > Actions By Type >User Registry, the Run now button starts the selected process as if from the command prompt.
- After clicking Start trace, you can go to the application and make the changes to the preferences you wish to store. The Trace registry changes window will reflect all the registry changes made by the application.
- Click Stop trace when you have changed all the settings you needed to change. Select the check boxes of the changes that you want to set as a User Registry and click Add.
How to import and export registry settings
How to import registry or policy files
To import Windows Registry (.reg) files or Group Policy (.pol) files, follow these steps:
-
Create a new registry setting or edit an existing registry setting.
-
Right-click the folder where to import the file.
-
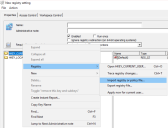
Select Registry > Import registry or policy file.

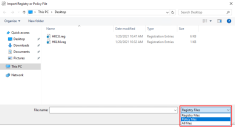
(click the image to enlarge it)This opens the Import Registry or Policy File window.
-
By default, the file type is set to Registry Files.
To import policy files, select from the drop-down menu Policy Files as the file type.
-
Select the registry or policy file and click Open.
-
When creating a new registry setting, the imported file is added to the registry setting.
When editing a new registry setting, the imported file must be merge with the existing setting.

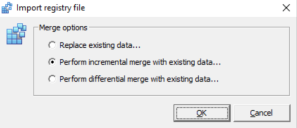
(click the image to enlarge it)Select one of the following merge options:
Item
Function
Replace existing data
The imported registry file replaces the existing registry file.
Perform incremental merge with existing data
The settings from the imported registry file are appended to the existing registry file. If the existing registry file contains settings that are also present in the imported file, these settings are overwritten with the settings from the imported registry file.
Perform differential merge with existing data
The settings from the imported registry file are appended to the existing registry file only if they differ from the settings present in the existing registry file.
-
Click OK to save the registry setting and the changes made.
How to export registry files
- Select the registry file that you want to export and click Registry in the menu bar.
- Click Export registry file. This opens the Export Registry File window.
- Select the location, enter a name for the file and click Save.
Saving the configuration
In the New Registry Setting window, click OK to save the Registry Setting configuration, or Cancel to discard the changes. When selecting Cancel, a prompt appears to confirm for changes to be saved or not.

