This is not the latest version of Ivanti Workspace Control documentation.View available documentation.
Integrate Microsoft RemoteApp
This section covers the options available in the Workspace Control Console for integrating Microsoft RemoteApp.
Settings
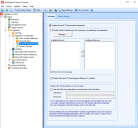
In the right-side pane, under the Settings tab, there are various options for configuring the Microsoft RemoteApp integration.
The following options are available:
Select this option to enable the Microsoft RemoteApp integration for Workspace Control.
This provides access to standard Windows-based application from virtually any location to users of any Windows Remote Desktop (RD) Services computers.
Select this option to create Instant Passthrough shortcuts to Microsoft RemoteApp applications located on one or more RD Connection Broker servers. When the shortcuts are accessed, user are automatically redirected to the specified server(s).
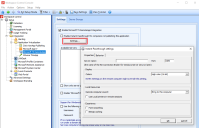
To configure the RD Connection Broker servers, follow these steps:
-
Select the Settings button.
The Instant Passthrough settings windows appears. -
Under the Properties tab, enter the name of up to two RD Connection Broker servers in the Server name field.
Separate multiple RD Connection Broker servers with a semicolon (;)
CONNECTIONBROKER1.DOMAIN.LOCAL;CONNECTIONBROKER2.DOMAIN.LOCAL -
(Optional) If different than the default, specify the port number in the Port field.
-
(Optional) Specify any additional settings, if necessary:
-
Colors
-
Remote computer sound
-
Use Local printer in remote sessions
-
Font smoothing
-
Bitmap caching
-
-
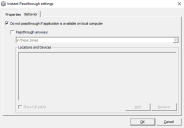
If it is possible to start the application locally, select the Do not passthrough if application is available on local computer option, from the Behavior tab.
-
Click OK.
This option shows what servers or server groups can be used for Microsoft RemoteApp applications. The Available Servers list contains all servers that meet the following criteria:
-
The servers are running Microsoft Windows Server.
-
The servers have Workspace Control installed.
-
The servers are connected to the current Datastore.
To set a server or server group to be used for Microsoft RemoteApp applications, move the desired server or server group from the Available Servers list to the Configured Servers list using the  button.
To display only server groups and no single servers, select the Show only server groups option.
Select this option to automatically deploy an application as a Microsoft RemoteApp deployment when the application is added as a new Workspace Control managed application.
Domain administrator credentials are required for communicating with the TS Connection Broker.
Configure this option to enable the Workspace Control Agent Service to run on Microsoft RD Connection Broker servers under Local System or under a Windows account without needing to add domain administrator privileges to the specified Windows account.
If no credentials are provided, the Workspace Control Agent Service must run under a domain administrator account on Windows RD Services computers that have the RD Connection Broker or the host role.
Server Groups
Server groups are typically used to represent silos. If your workspace contains existing server groups (e.g. server farms), these are listed automatically. Server groups can then be used to deploy a Microsoft RemoteApp application. The list of available servers is automatically populated with computers that are running Microsoft Windows Server with Remote Desktop Services enabled.
Link a Windows Server with Remote Desktop Session Host enabled to a Session Broker and include it in a server farm to facilitate load balancing between several identical RD Session Hosts. When a Windows Server machine is configured to communicate with a Session Broker and it is added to a server farm, a server group is automatically created for the server farm.
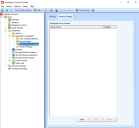
In the right-side pane, under the Server Groups tab, configure server groups for the Microsoft RemoteApp integration.
Server Groups can be added using the New button.
To modify an already configured server groups, use the Edit button.
To delete a server group, use the Delete button.


