This is not the latest version of Ivanti Workspace Control documentation.View available documentation.
Workspace Preferences Customization
After logging into their Workspace Control session, end users can customize their Workspace by accessing the Workspace Preferences menu. It can be found in the Windows Start Menu, under Ivanti Workspace Control Settings > Workspace Preferences.
Options available to end users are configurable from the Workspace Control Console under the following menu options:
The Workspace Preferences menu includes the following options:
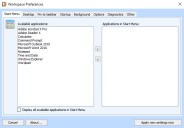
Under the Start Menu tab, end users can configure what application shortcuts are visible in their Windows Start Menu.
Applications under the Available applications pane are visible under the end user Start Menu.
To configure Start Menu application shortcuts, select the desired applications from the Available applications pane and then click on  to move them to the Application in Start Menu pane.
To delete Start Menu application shortcuts, select the applications from the Applications in Start Menu pane and then click on  to move them to the Available applications pane.
Check the box next to Display all available applications in Start Menu to configure all applications in the Available applications pane as Start Menu shortcuts.
Click on Apply new settings now to apply the current configuration and initiate a Workspace refresh.
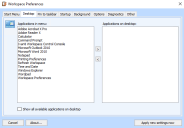
Under the Desktop tab, end users can configure what application shortcuts are visible on their desktops.
Applications under the Applications on desktop pane are visible on the end user desktop.
To configure desktop application shortcuts, select the desired applications from the Applications in menu pane and then click on  to move them to the Application on desktop pane.
To delete desktop application shortcuts, select the applications from the Applications on desktop pane and then click on  to move them to the Application in menu pane.
Check the box next to Show all available applications on desktop to configure all applications in the Available applications pane as Start Menu shortcuts.
Click on Apply new settings now to apply the current configuration and initiate a Workspace refresh.
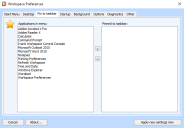
Under the Pin to taskbar tab, end users can configure what application shortcuts are visible on their Windows taskbars.
Applications under the Pinned to taskbar pane are visible on the end user taskbar.
To configure taskbar application shortcuts, select the desired applications from the Applications in menu pane and then click on  to move them to the Pinned to desktop pane.
To delete taskbar application shortcuts, select the applications from the Pinned to desktop pane and then click on  to move them to the Application in menu pane.
Click on Apply new settings now to apply the current configuration and initiate a Workspace refresh.
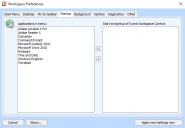
Under the Startup tab, end users can configure what applications are automatically launched when the Workspace Control session starts.
Applications under the Start at startup of Ivanti Workspace Control pane are automatically launched at the start of the Workspace Control session.
To configure applications to automatically start, select the desired applications from the Applications in menu pane and then click on  to move them to the Start at startup of Ivanti Workspace Control pane.
To stop applications from automatically starting, select the applications from the Start at startup of Ivanti Workspace Control pane and then click on  to move them to the Application in menu pane.
Click on Apply new settings now to apply the current configuration and initiate a Workspace refresh.
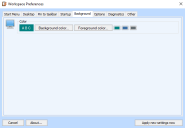
Under the Background tab, end users can configure the color of their desktop background.
Desktop background color
To configure the color of the desktop background, click on Background color, select a new color from the menu and then click OK.
Desktop font color
To configure the font color used for desktop application shortcuts, click on Foreground color, select a new color from the menu and then click OK.
End users can also select one of the predefined color setting schemes found to the left of the Foreground color button.
Click on Apply new settings now to apply the current configuration and initiate a Workspace refresh.
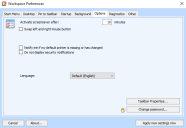
Under the Options tab, end user can configure various Windows settings.
These settings include:
-
Screen saver wait time
Enter a number in the field to the left of Activate screensaver after option to configure the idle time, in minutes, to wait before the screen saver starts.
By default, the screen saver wait time is set to 10 minutes. -
Mouse button configuration
Check the Swap left and right mouse button option to switch around the functionality of the primary and secondary mouse buttons.
-
Default printer notification
Check the Notify me if my default printer is missing or has changed option to enable default printer event notifications.
-
Security notifications
Check the Do not display security notifications option to disable Windows security events notifications.
-
Workspace Control language
From the Language drop-down menu, select the language Workspace Control uses for the Workspace Preferences menu, Workspace notifications and other Workspace Control related settings.
This setting does not overwrite the Windows system language configuration.
-
Taskbar configuration
Click on Taskbar Properties to configure the Windows taskbar.
-
Password configuration
Click on Change password to modify the password for the currently logged user.
Click on Apply new settings now to apply the current configuration and initiate a Workspace refresh.
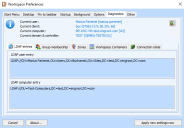
Under the Diagnostics tab, end users can view the following:
-
Session information.
-
LDAP user and computer entries.
-
Group membership for the logged user.
-
Workspace Control zone membership for the logged user.
-
Workspace Container membership for the logged user.
-
Network connection state.
Click on  to copy the diagnostics information to the clipboard. This can prove useful when troubleshooting.
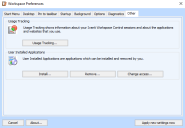
Under the Other tab, end users can view their Usage Tracking information. This includes information about Workspace Control sessions and application or website use.
For more details, see Usage Tracking Viewer.
Under User Installed Applications, end users can manage applications they install:
-
Click on Install to launch a wizard to install local applications.
-
Click on Remove to uninstall local applications.
-
Click on Change access to modify who can access the application:
-
Allow all users logging onto the local machine to access the application.
-
Allow only to the currently logged in user to access the application.
-
For more details, see User Installed Applications.
