Agents
At Administration > Agents, you can view and configure settings for all the Agents in your environment.
Agents are computers on which users can start Workspace Control sessions. Agents get configuration data from the Datastore, either directly or through Relay Servers.
Agents Settings
At the Agents node, you can change the following settings:
All configuration data in the Datastore is cached to the Agent. Because most Workspace Control components use this cached data instead of directly connecting to the Datastore, this significantly reduces the load on the central Datastore and eliminates it as a single point of failure in a Workspace Control environment.
The local cache is kept up-to-date by the Workspace Control Agent Service, which is also responsible for uploading log and Usage Tracking information to the Datastore/Relay Server. If a connection to the Datastore/Relay Server is not available, all log and Usage Tracking information will be cached locally until the connection is re-established.
The setting Fetch change information determines the interval at which Agents check whether they need to download any configuration changes, but also whether they need to execute any tasks. A longer polling interval means that it takes longer before Agents execute tasks, such as remote publishing to Citrix XenApp servers, forcing a session refresh, restoring User Settings from the Workspace Control Console, sending messages to users, and disconnect, log off and reset users.
- Select Push change information to push change notifications to the Agents that are connected through a Relay Server. These Agents then check for change notifications every 5 seconds. After the Agent has processed the change notification, configuration changes, for example adding a printer, are fetched and applied according to the interval specified for the option Update agent cache on change. Tasks, such as the tasks mentioned for the option Fetch change information, are fetched and applied immediately.
The settings Fetch change information and Push change information can be configured at global level (applies to all Agents) and for individual Agents (by editing the Settings of an Agent):
- Every <period>: checking the database will occur at the selected interval. A longer interval decreases the traffic on your network, but delays the execution of tasks and lengthens the time during which Agents are not aware they need to update their cache to reflect any changes in the Datastore.
The time span set at Update agent cache on change determines the timing for Agents to download data and update their cache. A short interval may result in many Agents starting to download data simultaneously. A long interval will spread the network load more evenly, but as a result it will take longer before all Agents reflect the necessary changes.
Update agent cache on change can be configured at global level (applies to all Agents) and for individual Agents (by editing the Settings of an Agent):
- Immediately: each Agent will update its local cache as soon as it the fetch change information mechanism detects a relevant change in the Datastore. If many Agents detect changes at the same time, they may all start downloading data at the same time.
With the option Push change information enabled, it is recommended to set the option Update agent cache on change to any other value than Immediately. Setting this option to Immediately will cause all Agents in your environment to immediately connect to the Relay Server and fetch the configuration changes. - Within <period>: the update of the local caches will be randomized and spread out over the selected period. Although this decreases the traffic on your network, it also means that the local caches on your Agents will not immediately reflect any changes in the Datastore.
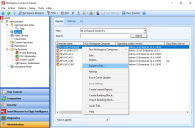
You can also update Agent caches immediately from the context menu.
The synchronization policy of Workspace Control determines what should happen if the synchronization of an Agent fails. The policy that you select will first be applied when you click Save Settings (global level) / OK (Agent level). The setting Synchronization policy can be configured at global level (applies to all Agents) and for individual Agents (by editing the Settings of an Agent):
- Abort on error: the synchronization process will be aborted if the synchronization of an Agent fails (for example, because it is not possible to update the local cache or because an error occurs). If this happens, you first have to correct the cause of the failure before the synchronization of the Agent will be successful again. This option is selected by default.
- Continue on error: the synchronization process will continue, even if an error occurs.
If a synchronization fails, Workspace Control will attempt a new synchronization after minimally one hour, irrespective of the synchronization policy that you specified.
By default, Agents are identified by Computer domain name and NetBIOS name. At Identify Workspace Control Agents, select a different method of identification if:
- the operating system is re-installed on Agents.
- several virtual machines use the same image.
- several computers are deployed using imaging.
- None: inactive Agents will not be removed automatically.
- After 45 / 60 / 90 / 120 days of inactivity: the RES Service or Relay Server will remove inactive Agents after the specified number of days of inactivity (45, 60, 90, or 120)
Please note that automatically removing inactive Agents will not remove Agents on Citrix XenApp servers, as they may be used for application publishing.
You can configure the default behavior of Agents: Connect directly to the Datastore or Connect through Relay Server. If they should connect to relay servers, you can select the Connection method(s):
- Discover (using multicast): Relay Servers in the environment will be discovered automatically
- Preconfigured (using list): Relay Servers will be selected according to the provided list. The Relay Servers can be entered manually, or previously discovered Relay Servers can be selected from the list.
- Resolve name (using DNS): The FQDN of a Relay Server will be resolved through DNS.
These connection options do not exclude one another and can be used in combination.
For Linux and Apple Mac OS X Agents, the connection options are limited to Inherited and Connect through Relay Server.
See also Check the connection settings of an Agent to a Datastore or Relay Server
You can configure Agents to run the Workspace Composer automatically from the context menu, and by editing the Settings of an Agent:
- Automatic: the Workspace Composer will run automatically when users log on.
- Manual: users need to start the Workspace Composer manually (for example, from the Start Menu).
These settings are reflected in the Run Workspace Composer column in the Agents list. If the column shows the value Automatic (pending) or Manual (pending), the Agent cache has not been updated yet.
- This option is not available for Terminal Servers that are not Citrix XenApp/XenDesktop servers.
- For Agents running on Citrix XenApp special considerations apply. See the document Migrating Existing Citrix XenApp Published Applications to Workspace Control, where various scenarios are explained, depending on whether you want to republish your existing Citrix published applications or want to manage them using the Intercept option If managed shortcut was not used. The setting Run Workspace Composer of the Agent must be configured according to the scenario you choose. The workings of the Intercept option are discussed in the section Composition, Application Properties, General of this Administration Guide.
You can configure membership of Workspace Containers of Agents at User Context > Workspace Containers, but also by editing the Settings of an Agent.
You can use the following wildcards in the Search field of Administration > Agent > Agents tab :
|
Wildcard Characters |
Description |
|---|---|
| * | Represents zero or more characters |
| ? | Represents a single character |
| [] | Represents any single character within the brackets |
| ! | Represents any character not in the brackets |
| - | Represents any single character within the specified range |
| # | Represents any single numeric character |
A full string search is not possible.
Export Agent information to CSV file
To export the information found under the Agents tab as a CSV file, follow these steps:
-
Open the Workspace Control Console and navigate to Administration > Agents > Agents tab.
-
Populate the overview with the list of configured Agents using one of the following methods:
-
Press F5.
-
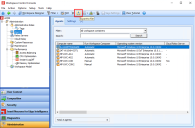
Select the Search button.
-
Right-click in the right-side pane and select Refresh from the context-menu
-
-
Export the Agent information to a CSV file using one of the following methods:
-
In the Export to file window, select a location where to save the CSV file, enter an appropriate name for the file and then select Save.


 (
(