New installation of components
For a new installation of Ivanti Workspace Control components version 10.18.99.0 (Early Access) and higher, follow the following steps.
Step 1: Install the Workspace Control Shield API
Follow these steps to install and configure the Workspace Control Shield API on both Primary Shield API server and Secondary Shield API server (optional), and where IIS (Internet Information Services) is already configured according to the Prerequisites:
-
Execute the installer file named IWCShieldAPI [version].msi on the server.
-
In the installation wizard:
-
Accept the EULA and click Next.
-
Accept or change the installation folder, and click Next.
-
Click Install to start the installation.
-
-
Once the installation completes, click Finish.
The Configuration Window opens. -
In the wizard, select the appropriate port and certificate for the Shield API bindings.
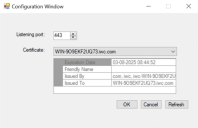
-
Click OK to apply the settings.
-
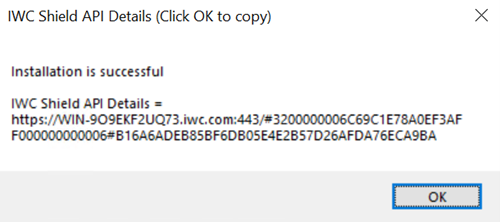
Once the setup is complete, a dialogue will display the ShieldAPI URL.
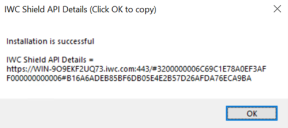
Click OK to automatically copy the URL to your clipboard.
Save this URL in an accessible location, you will need this URL for the setup of other Workspace Control components. Follow Step 1 to configure the Secondary Shield API server for the Active-Passive Shield API setup, and save the Secondary Shield API details for further configuration

After you have installed the Shield API, start either a full installation (Step 2, option A) or a Console-only installation (Step 2, option B) of Workspace Control version 10.18.99.0 (Early Access) or higher.
The steps described below MUST be executed on a system that does not contain the Shield API installation.
Step 2, option A: Install Workspace Control (full installation)
-
Execute the Ivanti Workspace Control [version].msi.
The Ivanti Workspace Control Setup dialog appears.-
In the Welcome stage click Next.
-
Accept the EULA and click Next.
-
Accept or change the installation folder and click Next.
-
Configure where the installer creates shortcuts to Workspace Control and click Next.
-
Click Install to start the installation.
-
-
After the installation has completed, click Finish.
The Configuration Wizard opens.-
In the Welcome stage click Next.
- In the next stage select what you want to do:
- Connect to an existing environment
- Create a new environment
Enter the Primary and Secondary (optional) Shield API URLs that you saved in step 6 of the Shield API installation. Clicking Next will prompt the Wizard to verify the connection, which may take a moment.
-
In the steps that follow, provide the details to connect to the existing environment, or create a new environment.
-
After you have completed the Wizard, Workspace Control and the ShieldAPI are configured to connect to the datastore.
Step 2, option B: Install Workspace Control Console-only
-
Execute the Ivanti Workspace Control Console [version].msi.
The Ivanti Workspace Control Console Setup dialog appears.-
In the Welcome stage click Next.
-
Accept the EULA and click Next.
-
Accept or change the installation folder and click Next.
-
Configure where the installer creates shortcuts to Workspace Control and click Next.
-
Click Install to start the installation.
-
-
After the installation has completed, click Finish.
By default, the Workspace Control Console opens, with the Datastore Connection Wizard.-
In the initial window, select what you want to do: Create (new Datastore) or Connect (existing Datastore).
-
In the next step, enter both Primary Shield API URL and Secondary Shield API URL (optional) that you saved in step 6 of the Shield API installation.
When you click Next, the Wizard verifies the connection. This may take a moment. -
In the steps that follow, provide the details to connect to an existing Datastore, or create a new Datastore.
For more information, see Connections in the Workspace Control Administration Guide.
-
After you have completed the Wizard, the Workspace Control Console and the ShieldAPI are configured to connect to the datastore.
Step 3: Install more Workspace Control Agents
After you have completed installing a Workspace Control Console (see above), continue by installing the Workspace Control Agent on other systems:
-
Launch the Ivanti Workspace Control Agent [version].msi installer to begin installation of the Workspace Control Agent.
-
During the installation process, you will be prompted to enter the Shield API URL.
Provide both the Primary and Secondary (optional) Shield API URLs that you saved in step 6 of the Shield API installation. -
After you enter the Shield API URLs, click Next to verify the connection. This process may take a moment. Then, follow the remaining prompts to complete the installation of the Agent.
See also: