Configuring WLANs and EAP Settings for Aruba Devices
Aruba devices require specific configuration for applying EAP settings and using composite profiles. This section provides information on the additional steps for managing Aruba devices. If you are configuring a composite profile for infrastructure devices other than Aruba devices, see Configuring WLANs.
EAP settings for Aruba devices must be configured through the Advanced Properties of an infrastructure profile. You should configure the WLAN before configuring EAP settings.
When you create a composite profile (or WLAN) for Aruba devices, you must use the Advanced Properties of an infrastructure profile to ensure the settings are sent to the device.
Note: The Aruba controller uses multiple profiles that get tied together to form dependent relationships. These relationships complicate the process of deleting the profile properties, as profiles that are tied to other profiles cannot be deleted. Because of this, the Aruba controller may require multiple queries before the device fully conforms to Avalanche’s infrastructure profile, as it removes the link after the initial query, and then removes the profile property following the subsequent query. Also note that before a Virtual AP profile can be removed, it must first be disassociated from the AP Group that employed it.
To configure a WLAN that binds an infrastructure profile and a network profile:
|
1
|
From the Profiles tab, select the infrastructure profile you want to configure. |
|
3
|
In the Infrastructure Profile tab, click Add WLAN. |
The Add WLAN dialog box appears.
|
4
|
Configure the WLAN settings as desired. |
The new WLAN appears in the WLAN Configuration list.
|
6
|
Click Edit Advanced Properties. |
The Advanced Properties dialog box appears.
|
7
|
In the Properties list, expand AP Configuration and then select AP Group. |
|
8
|
Enable the Include this property in the profile check box, type a name for the group in the AP Group text box, and click Add. |
|
9
|
From the items that appear in the Properties list, select a Virtual AP. |
|
10
|
Enable the Include this property in the profile check box and select a virtual AP from the drop-down list. |
To configure an Aruba infrastructure profile for EAP authentication:
|
1
|
From the Profiles tab, select the Aruba infrastructure profile. |
|
3
|
In the Infrastructure Profile tab, click Edit Advanced Properties. |
|
4
|
In the Properties list, expand Profiles and select 802.1X Authentication Profile. |
|
5
|
Enable the Include this property in the profile check box, type a name for the profile in the 802.1X Authentication Profile text box, and click Add. |
|
6
|
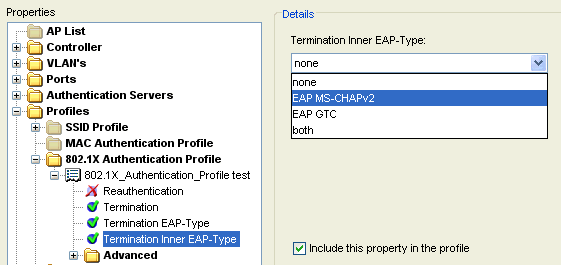
The new item appears in the Properties list. Configure the options as desired by selecting them in the Properties list, including them, and using the drop-down list. For example, if you want to use EAP with PEAP/MS-CHAPv2, set Termination to enabled, set the Termination EAP-Type to EAP PEAP, and set Termination Inner EAP-Type to EAP MS-CHAPv2. |

Advanced Properties for an Aruba Device (Authentication Profile)
|
7
|
In the Properties list, select AAA Profiles. (It is in the Profiles folder, below 802.1X Authentication Profile.) |
|
8
|
Enable the Include this property in the profile check box, type a name for the profile in the AAA Profiles text box, and click Add. |
|
9
|
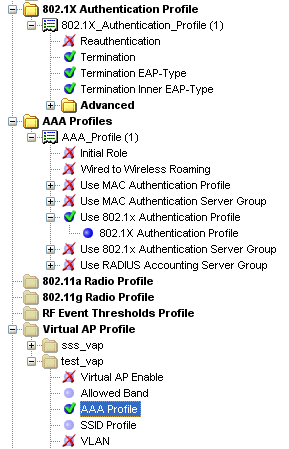
The new item appears in the Properties list. Select the Use 802.1x Authentication Profile option, include it, and select Yes from the drop-down list. |
|
10
|
Expand the Use 802.1x Authentication Profile option and select 802.1X Authentication Profile. From the drop-down list, select the profile you created in step 5. |
|
11
|
In the Properties list, expand the Virtual AP Profile option. |
|
12
|
Locate the Virtual AP that was created for the network profile and expand the folder. Select the AAA Profile option, include it, and select the name of the AAA Profile from the drop-down list. |

Advanced Properties for an Aruba Device (Virtual AP Profile)
|
13
|
Click OK to close the dialog box. |

© 2012 Wavelink Corporation. All Rights Reserved.
Open topic with navigation


