Configure and manage your wireless network on an enterprise-wide basis from the Avalanche Console. You can open the Avalanche Console from the Programs menu or from a shortcut.
To launch the Avalanche Console:
| 1 | From the Start menu, select Programs > Wavelink Avalanche MC > Avalanche MC Console. |
The Wavelink Avalanche Login dialog box appears.
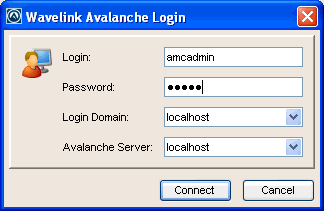
Wavelink Avalanche Login
| 2 | Enter your Login and Password. |
Avalanche is installed with a default user login of amcadmin and password of admin. Wavelink recommends you create a new password for this account once you log in. For information about changing passwords, see Managing User Accounts.
| 3 | From the Login Domain drop-down list, select or type the login domain if you have configured Avalanche to use LDAP or Active Directory. |
| 4 | From the Avalanche Server drop-down list, select or type the IP address or DNS name of the enterprise server. |
| 5 | Click Connect. |
The Avalanche Server Login dialog box appears. This dialog box indicates the progress of the Console as it attempts to contact the Enterprise Server.
If your Console can contact the Enterprise Server and your credentials are valid, the Avalanche Console appears.
If there are updates available, a dialog box will appear asking if you want to download automatically. You can download the updates or save the updates for the next time you launch the Console.
Note: To launch the Web Console after you have launched the Java Console, click View > Launch Web Console. For more information about the Web Console, click the Web Console Help button.
![]()
© 2012 Wavelink Corporation. All Rights Reserved.