Administrator accounts allow you to create new user accounts. When creating a new account, you assign a user name and password to the account allowing the user to log on to the Avalanche Console. You also assign permission levels to grant the user access to specific functionality.
When a user account is created, it must be assigned a “home.” The user (either Normal or Administrator) will only be allowed to access information for their home location and any associated sub-locations.
Note: A user who has read/write permissions for profiles can exclude an inherited profile for a location but will not be able to modify it.
You can configure the following options when creating a user account:
|
|
Select if the user is a Normal user or an Administrator. If the user is a Normal user, you will need to assign specific permissions. If the user is an Administrator, he will have access to the entire company. |
|
User Home |
The portion of your network that the user will be assigned to. The user will only be able to access profiles and information for his assigned location. |
|
Description |
A description of the user or group. |
|
Login |
The name the user will use to log in to the Avalanche Console. The login is case sensitive. The following special characters are not allowed: ~ ! ^ * ( ) + = | ? / < > , [ ] : ; { } \ " & space |
|
Password |
The password that will grant access to the Avalanche Console. Passwords are case sensitive. The password has a 32-character limit. |
|
Confirm Password |
You must confirm the password you assign to the user. |
|
First Name |
The first name of the user. |
|
Last Name |
The last name of the user. |
To create a new account:
| 1 | Click Tools > User Management. |
The User Management dialog box appears.
| 2 | Click Add. |
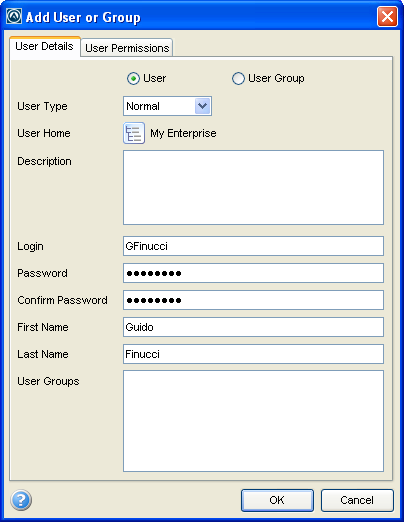
The Add User or Group dialog box appears.
Add User or Group dialog box
| 3 | Enter the information in the available text boxes. User Type, User Home, Login, Password, and Confirm Password are required fields. |
| 4 | To assign a user home, click the tree button and select the home location. |
| 5 | Assign permissions by clicking on the User Permissions tab now, or an Administrator can modify permissions later. |
Note: To add a user to an existing user group, edit the user group. You cannot change the user groups that a user belongs to from this dialog box.
| 6 | When you are finished, click OK. |
The new user is added to the list in the User Management dialog box.
The new account is available. However, if a new user is set as a Normal user, that user will not have access to any areas of the Console until permissions are assigned to that user. For more information, see Assigning User Permissions.
![]()
© 2012 Wavelink Corporation. All Rights Reserved.