On some mobile devices, you can calibrate the microphone to optimize the speech detection in your current environment. The microphone settings that you select will become the default values for future speech-to-text processing on the mobile device. It is recommended that you calibrate the microphone before initial use.
You can perform a quick calibration that automatically sets values according to your speaking voice and the background noise, or you can perform a full calibration, manually setting the values using slider bars. Before you begin calibration, ensure that your headset is connected and working properly.
When the speech-to-text engine hears input, it tries to match it to the expected phrases in the available grammar files. The degree to which the spoken phrase and an expected response match is called the confidence value. A higher confidence value indicates a better match. If the confidence value is too low, the input is rejected.
You do not have the option of a quick calibration unless Text-to-Speech is installed.
To perform a quick calibration:
1 From the Client Options menu, select Configure > Microphone.
2 The Options dialog box appears. Click Quick Calibration.
3 The Language dialog box appears. Select the language you want to use from the drop-down list and click OK.
The voice prompts will guide you through a prompt for speaking and a prompt for silence. During the speaking prompt, the top 10 energy levels are collected and the average used. The default test prompt is "Testing 1-2-3-4-5", as this longer prompt collects more energy levels for evaluation. When the calibration is complete, the new settings are applied and become the defaults for the device. For information on modifying the calibration prompts using the Grammar File Manager, see Modifying User Prompts.
To perform a full calibration:
1 From the Client Options menu, select Configure > Microphone.
2 The Test Settings dialog box appears. Click Full Calibration.
3 From the Language drop-down menu, select the language you will be using for speech-to-text conversion.
4 From the Grammar drop-down menu, select the grammar you will be using for speech-to-text conversion.
5 If you have a session currently connected, you can use the speech-to-text settings for that session instead of the default settings. Select the session from the Session drop-down menu.
6 Click Next.
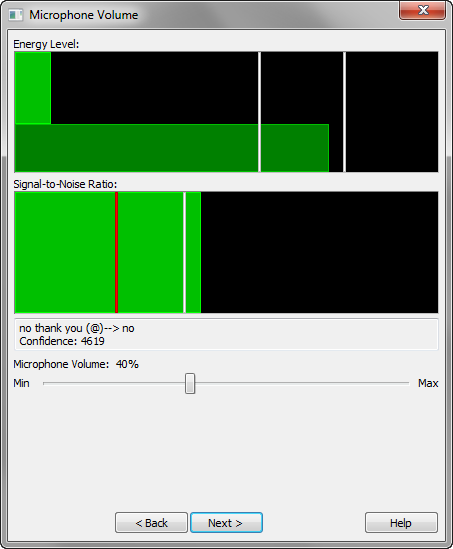
The Microphone Volume dialog box appears.
7 Use the Microphone Volume slider to adjust the Energy Level.
The Energy Level indicates how much the microphone input is currently changing. The top bright green bar is the current energy level, and it should fall between the two white bars when the user is speaking. The darker bar underneath is the maximum level reached within the past 5 seconds. The Signal-to-Noise Ratio bar shows the quality of the microphone and device audio processing. After you start talking, this bar should be to the right of the white line
When you speak one of the words or phrases included in the grammar selected in step 4, the phrase appears in the box underneath the Signal-to-Noise Ratio. This box also displays the confidence value.
8 Click Next.
The Other Settings dialog box appears. The Speech Detection State indicates whether the speech engine detects the user’s speech. When the user is not speaking, the state should be red. When the speech engine detects something that may be speech, the state turns yellow. When the speech engine is certain it is detecting speech, the state turns green.

Speech Detection State
9 Use the Absolute Threshold and Sensitivity sliders to adjust the speech detection settings.
The Absolute Threshold value indicates the minimum amount of sound required to indicate when speech begins. Adjust this value so that the user’s speech causes the state to turn yellow immediately, but any background noise causes the state to remain red.
The Sensitivity value determines when the speech engine begins detecting a user’s speech. A higher sensitivity value means the speech engine will react more easily; a lower value means the speech engine will pick up less background noise.
10 Click Next.
The Record/Playback dialog box appears. If you want to check the confidence values for a recording against a grammar file, you can use the options on this dialog box to record and play back microphone input as a .wav file. This option is helpful if you have words that the engine has a hard time recognizing. Record someone saying the words in a .wav file, and check the confidence levels using the playback. Modify the grammar files and then check back to see if your changes have increased recognition (higher confidence values).
11 Click Finish.
The microphone calibration wizard disappears and the new microphone settings are applied. These settings will be the defaults for the device.
Was this article useful?
The topic was:
Inaccurate
Incomplete
Not what I expected
Other
