This page refers to an older version of the product.View the current version of the online Help.
Servers
In this section:
Server Instances
The product Servers node displays the product Server Summary page, where you can see a list of all servers for the product. Click a server name to go to that server node in the tree structure and display the product Server Summary page.
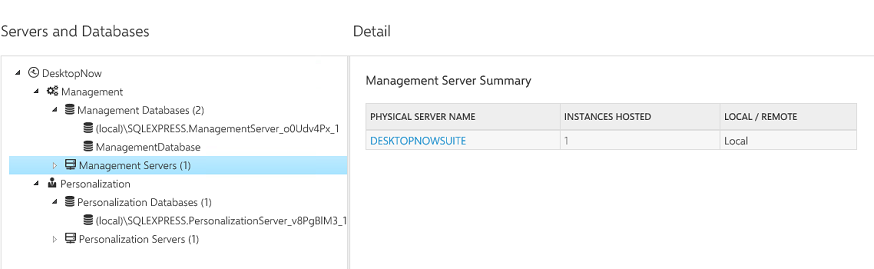
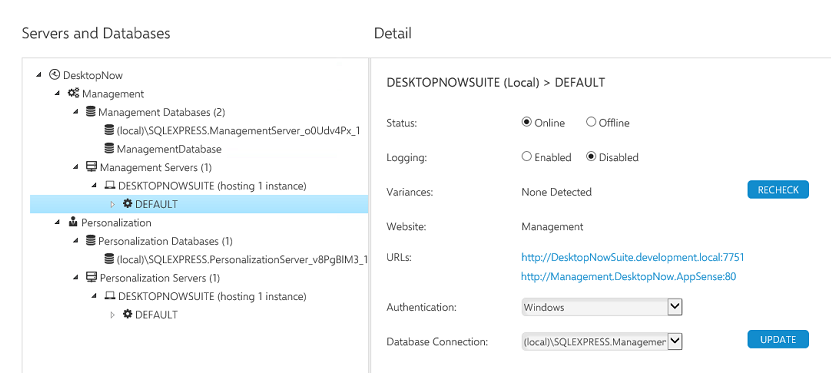
The Server node in the tree structure displays the Server Summary page in the work area where you can see a list of all instances for the selected server:
The status of each instance is listed together with whether logging is set and if there are any variances.
If there are no variances 'None Detected' displays. If there are variances the word 'Detected', displays in the Variances column. Click RECHECK to display the list of variances.
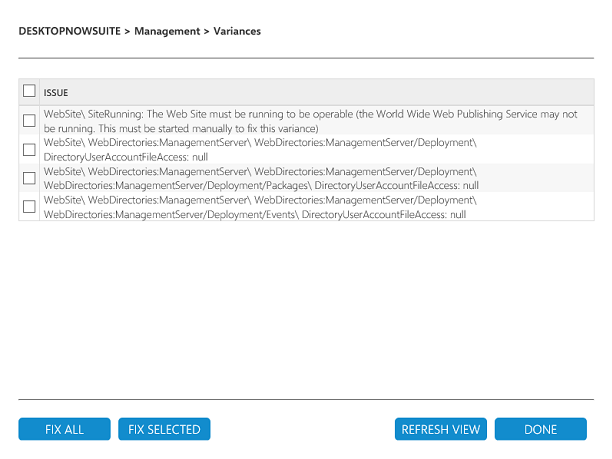
You can select to FIX ALL or FIX SELECTED variances. Click REFRESH VIEW to update the list and DONE when finished.
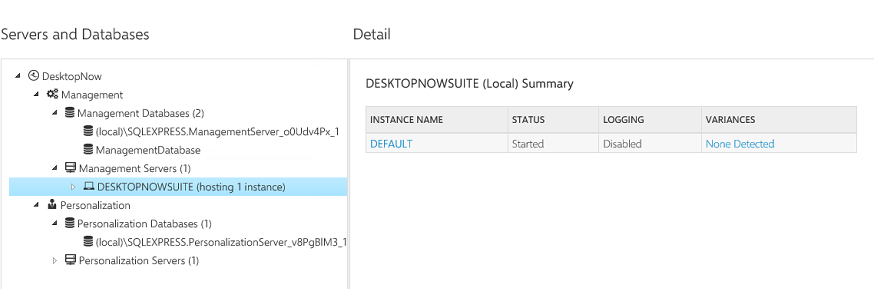
You can click any Instance name to display the instance configuration or Detail page. The appearance of the page depends on whether the instance has been configured:
- For instances that are not configured, the Detail page displays the options to configure a new instance.
- For instances that have been configured, the Detail page displays the configured settings and options such status, whether logging is enabled, and the option to recheck variances.
Configure a New Instance
-
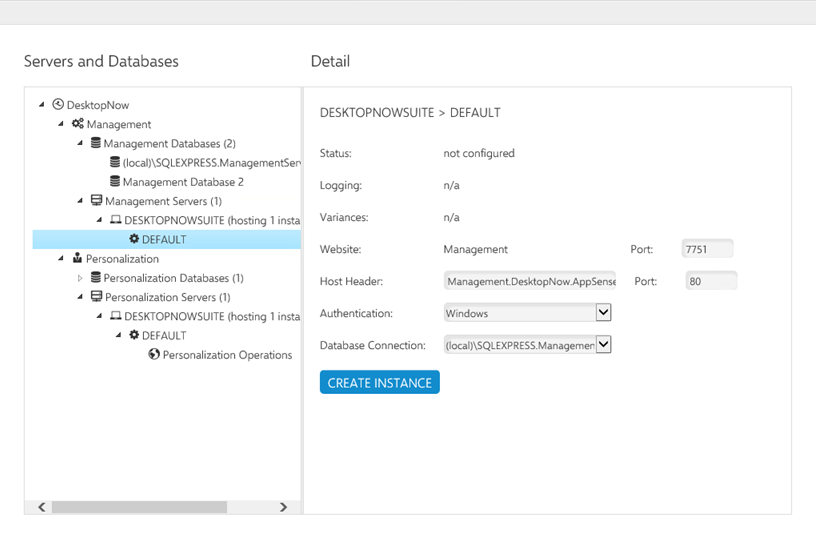
Click a server instance to display the Configure Instance page.
The Website name is either Management or Personalization.
-
You can edit the website Port number, the default port numbers are dependent on which installation method was selected in the User Workspace Manager Installer.
If you installed via Evaluation mode the default ports are:
- Management - 80
- Personalization - 80
- Configuration - 7750
If you installed via Advanced mode the default ports are:
- Management - 7751
- Personalization - 7771
- Configuration - 7750
-
Edit the Host Header and Port number or leave as the default.
The host header should contain your domain name only if you intend to add a CNAME record to DNS.
-
Select the Authentication type:
- Windows authentication - Deployment Agents must authenticate with the server using Windows Authentication. This increases the security of the server, ensuring that only computers in the domain can access the server.
- Anonymous authentication - Deployment Agents can access the server unchallenged.
- Select the Database Connection from the drop-down list. If the database does not exist, a CREATE NEW option displays. Click it to create a new database connection.
-
Click CREATE INSTANCE to start the configuration process.
Once the instance is configured, any red tiles relating to this instance are updated and the settings can be specified.
Specify Settings for an Instance
-
Click a configured server instance in the tree structure.
The Instance Settings page displays.
-
Set the instance Status.
The instance can be Online or Offline.
-
Set Logging to Enabled or Disabled.
Logging is disabled by default.
Management Server log files are written to %ProgramData%\AppSense\Management_[InstanceName]
If Logging is enabled you must restart the Management Server Services for the change to take effect.
Personalization Server log files are written to %ProgramData%\AppSense\PersonalizationServer\Personalization_[InstanceName]
-
Click RECHECK to run a variance check.
If the instance has variances that need fixing, the text ’Detected’ displays. Click Detected to display the variances.
- If there are no variances the text ’None Detected’ displays.
- Click the URL to go to the website.
-
Set the Authentication type:
- Windows authentication:Deployment Agents must authenticate with the server using Windows Authentication. This increases the security of the server, ensuring only computers in the domain can access the server.
- Anonymous authentication:Deployment Agents can access the server unchallenged.
- To set the Database Connection, select from the dropdown list.
- Click UPDATE to save any changes.