Environment Manager
This page refers to an older version of the product.
View the current version of the User Help.
File Type Association
The File Type Association (FTA) action sets default file extensions for selected applications. File associations created from this action overwrite default associations but users maintain the ability to override using the Open with... command or the Default Programs Control Panel settings. When an association is made, files use the icon associated with the executable when displayed in Windows.
In this section:
File Type Association (FTA) action
The Environment Manager 2020.3 release extends support for FTA to now include both Win32 apps and UWP (Universal Windows Platform) apps.
The File Type Association action dialog requires administrators to select the application type radio button and then select or specify the app required. The list of UWP apps available for selection is generated automatically by Environment Manager but can be manually edited if required.
- In the Policy Configuration navigation tree, select or create a node or condition on the Pre-Desktop, Session Unlock or Session Reconnect trigger.
- From the Actions ribbon, select File & Folder > File Type Associations.
-
In the Types field of the File Type Associations dialog, specify the file type(s) you want to associate.
•Enter the file extension required. To associate a number of extensions with one app, click Add and enter an additional value. Repeat this process until your list is complete.
•Click the ellipsis to open the Select a File Extension dialog and then select the file extension required (press Ctrl and click to make multiple selections). Click OK.
Use either method to add all the file types required for the association.
- Select the application type radio button required:
- Click OK
to save the action.
The action is created and is listed within the workspace.
•Win32
The field requires the path to the application you want to associate with the file type(s) specified.
In the Win32 field, click the ellipses and browse to the app required. Select the app, then click Open.
•UWP
In the UWP field, click the drop-down arrow and from the list select the application required.
See also UWP app list below
File type associations are created regardless of whether an application exists on endpoints.
See also Configuring Actions in the Action Management help.
- In the Policy Configuration navigation tree, select or create a node or condition on the Pre-Desktop, Session Unlock or Session Reconnect trigger.
- From the Actions ribbon, select File & Folder > File Type Associations.
-
In the Application path field, click the ellipses and browse to the app required. Select the app, then click Open. The field is populated with the path for the app selected.
- Click OK
to save the action.
The action is created and is listed within the workspace.
UWP app list
When associating file types with a UWP application, the user selects the app required from a list.
The list is generated the first time Environment Manager is run, and is based upon a scan of UWP apps available on the current machine combined with an applications list held in the console. On a server machine, for example, no UWP apps will be installed so the application list will be populated solely from the list held in the console.
To edit the list:
The list is saved as an xml file and can be edited to add or remove UWP apps if required.
The list is saved in the file C:\ProgramData\AppSense\Environment Manager\Console\AppNamesToAUMIds.xml.
Within the file, each UWP app is represented by a line entry.
Example:
<Entry AppName="Microsoft Store" AUMID="Microsoft.WindowsStore_8wekyb3d8bbwe!App" />
•AppName- the app display name
•AUMID - the Application User Model Identity
Note, this identifies a UWP application internally.
To obtain a list of AUMIDs on a particular machine you can use the following PowerShell commands:
$appxFamilies = Get-AppxPackage | foreach-object { $_.PackageFamilyName }
Get-StartApps | Where-Object {$appXFamilies.Contains(($_.AppId -split "!")[0]) } | Sort-Object -Property Name
To restore a modified list, simply delete the file and the console will regenerate it the next time it is run.
FTA Roaming
Environment Manager now includes an in-built Windows Settings Group (WSG) template to enable roaming of Windows 10 File Type Associations (FTAs). The template allows the user to select default programs for opening each file type, and for the selection to persist across sessions and devices. The template can be added to Personalization groups as required. See Windows settings groups (WSG).
The template is enabled for users of Environment Manager Policy and Personalization together (combined console).
For FTA roaming to work an action is required at computer startup to delete the Windows default associations xml file from the endpoint.
Enable FTA Roaming for Environment Manager Policy and Personalization
1.From the Policy Configuration navigation pane ensure your Personalization Servers list is maintained. See Personalization Servers in the Combined Console
2.In the User Personalization navigation pane click Connect.
Note that the personalization server must be added to your configuration before FTA roaming is deployed to endpoints.
3.In the User Personalization navigation tree select the personalization group required.
4.Select the Windows Personalization tab.
5.Click Add.
The available Windows Settings Groups are listed in the navigation tree.
6.Select the File Type Association template and click OK.
The template is added to your personalization group.
7. To view the details of the template click Personalization Settings > Windows Personalization > File Type Associations: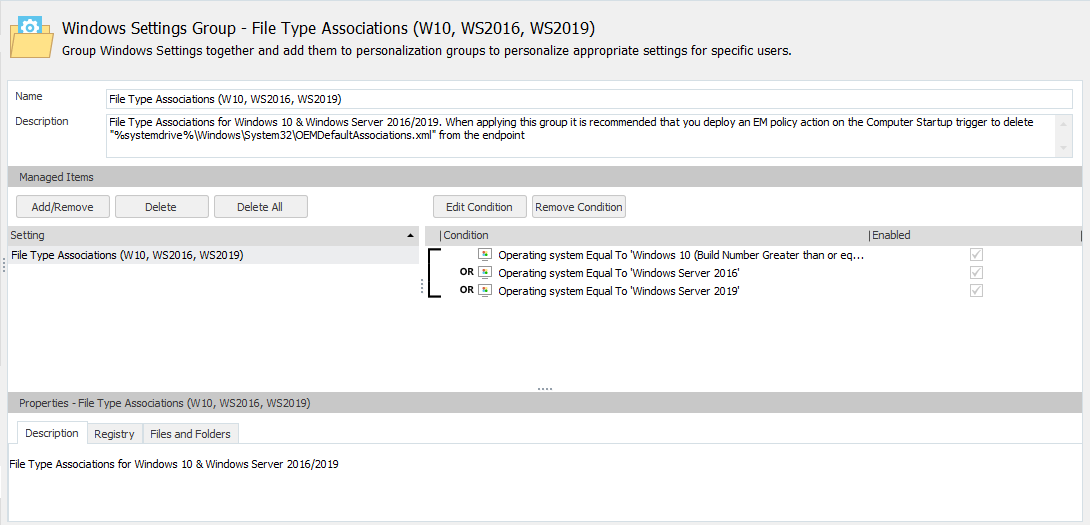
Note that in the Description field you are prompted to deploy a policy action to delete the following file from the endpoint: %systemdrive%\Windows\System32\OEMDefaultAssociations.xml.
8.Select and copy the file name from the Description field to your clipboard.
9.In the Policy Configuration navigation pane, create a new node or select an existing node in the Computer > Startup trigger.
10.In the Actions ribbon, select File & Folder > Delete File then paste the copied name file name from your clipboard.
11. Save your configuration.
The configuration can now be deployed to endpoints.