Environment Manager
This page refers to an older version of the product.
View the current version of the User Help.
Node Management
Nodes are used to help build up the structure of an Environment Manager configuration. They provide containers which house conditions and actions within triggers. By creating a hierarchy of nodes controlling the relationship between actions and the events which trigger those actions, a policy of computer usage is defined.
Nodes provide extra flow control to the configuration by forming the bridge between triggers and actions, allowing the dependency between trigger and action to be set.
In this section:
- Configuring Nodes
- Node Descriptions
- Node Scheduling
- Add a Node to a Configuration or Process Trigger
- Arrange Nodes
- Node Timeout
- Stop Sub Nodes on Fail
- Node Groups
- Clone
Configuring Nodes
Nodes are configured using the Nodes ribbon. The options are also available from the node shortcut menu and by using Keyboard Shortcuts.
Nodes can be added to any trigger or existing node in the Policy Configuration navigation tree. The Add Node option creates a new node as a child of the selected trigger or node in a configuration.
Select a node, condition or action, click Delete from the Edit tab, the shortcut menu or press the Delete key and confirm.
Select a node, condition or action, click Rename from the Edit tab, the shortcut menu or press the F2 key. Enter the new name and press Enter.
Disable/Enable
When a node is disabled, it remains present in the configuration but is not passed to the Environment Manager agent at run-time. This is useful when troubleshooting to help discover errors in a configuration.
To disable a node, condition or action, click Disable from the Edit tab, the shortcut menu or press Ctrl+T.
A banner displays at the top of the work area when a node is disabled. The node icon is faded and associated conditions and actions are displayed in gray, italic text.

To enable a node, condition or action, click Enable from the Edit tab, the shortcut menu or press Ctrl+T. A node can also be enabled by clicking the link in the yellow banner at the top of the work area.
When a node is disabled or enabled, any child nodes, actions and conditions, automatically match the state of the parent.
Individual actions and conditions can be enabled and disabled using the same ribbon button, shortcut menu option and keys.
Node Descriptions
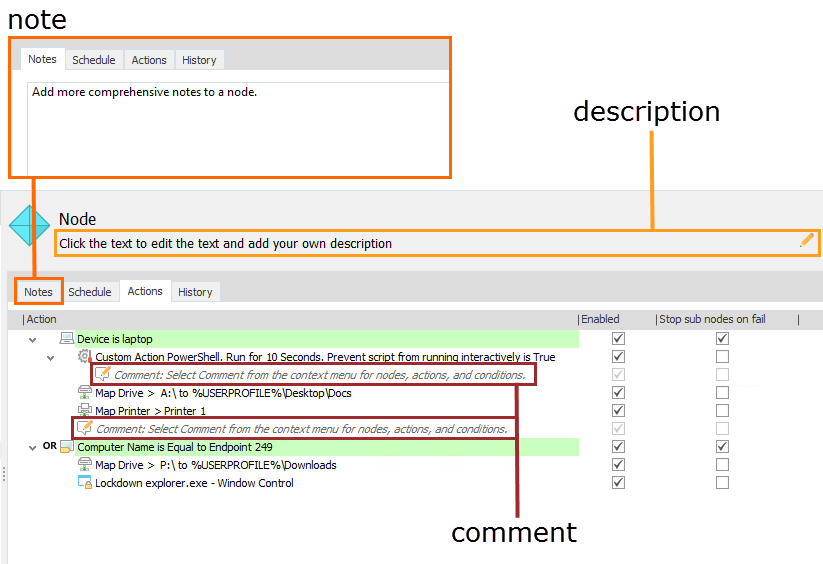
In large environments, where multiple administrators need to view and edit configurations, node descriptions provide a versatile method of adding free-text annotations. The feature is useful for documenting configuration changes and describing node behavior.
Video:Node Descriptions
There are three types of node descriptions:
- Descriptions - Click the text to add further information to a node, which can be viewed at a glance.
- Comments - Highlight a node, action or condition in the Action tab of a node and select Comment from the shortcut menu.
- Notes - Select the Node tab of a node to add more comprehensive text descriptions.
Node Scheduling
Schedule Environment Manager policy actions to occur at specified times and frequencies. This allows tasks to run without specific triggers being met and at regular intervals so policies can be reapplied. The actions in a scheduled node are added as a task in Windows Task Scheduler, run at a time and frequency specified in the node. Using node scheduling, tasks that are deployed with Group Policy Objects can be managed by Environment Manager.
Video:Node Scheduling
This feature can be used on the following triggers:
- Computer > Startup
- User Logon > Pre-Desktop
- User Logon > Desktop Created
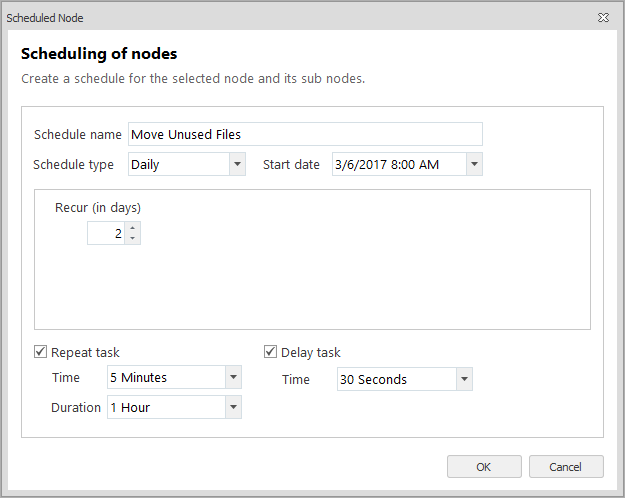
Select the Schedule tab in a node under a compatible trigger and select Create as a scheduled task to configure the schedule. To run the node's tasks when the trigger fires, select Execute the node and all sub nodes immediately - otherwise the tasks will run only when scheduled and not when the trigger is fired.
| Option | Description |
|---|---|
| Schedule name | The name that appears in the Windows Task Scheduler. Use a description of the node functionality to make it easy to identify tasks. |
| Schedule type |
The schedule type is used in conjunction with the schedule date to define when the task will occur. Select one of the following:
|
| Schedule date | Select the date and time from which the schedule will start. |
|
Recur |
Select the recurrence interval for daily and weekly schedules. |
| Repeat task | Select the interval between task repeats and for how long the task will repeat. The task will run on the start date and repeat at the set time interval for the specified duration. |
| Delay task | Select how long to delay the task from running after the task is triggered. The delay time will be a random time between the time the task is triggered and the specified delay time. For example, if the task is scheduled to run at 3.00 AM with a delay time of 10 minutes, the task will start between 3.00 and 3.10 AM. |
Windows Task Scheduler Default Values
Creating tasks in Windows Task Scheduler with Environment Manager is subject to the following registry keys that can limit the number of queued and concurrent tasks:
- TasksInMemoryQueue [Default = 75, Max = 1000]
- TasksPerLeastPrivEngine [Default = 50, Max = 1000]
For further information see Microsoft article 269472.
Add New Node to a Configuration or Process Trigger
- In the Policy Configuration navigation tree, select the trigger or node that you want to add a new node to.
- In the Nodes ribbon, select Node.
A new child node is added to the highlighted node or trigger.
- There are two process triggers within the Computer and User fixed nodes: Process Started and Process Stopped. Any nodes added to a process trigger must have a condition applied which specifies a process or application for conditions and actions within the node
- Select one of the process triggers, or a node within a process trigger.
- In the Nodes ribbon, select Node. The Computer Process Name dialog displays.
- Select a Condition to apply to the application or process; Equal, Not Equal, Query or Regular Expression.
- In the
Match field:
- Use the ellipsis to select the EXE file for the required application or process.
- Manually enter the file path or EXE name.
Enter a regular expression to match the required applications and processes.
For example:%PROGRAMFILES%\\Microsoft Office\\Office\d\d\\winword\.exe
The regular expression \d matches any single digit. Microsoft Office uses different default installation paths for each version - Office 2003 uses Office11 and Office 2013 uses Office15. Including Office\d\d in the file path ensures all versions of Word are found.
- Select whether you want to only target those processes that are the same case as the letters in the Match field.
- Select Match case to only search for processes with the same capitalization as the text in the Match field.
- If required, select the Match Parameters checkbox to enable further validation to be added to the match in the Parameters field.
- Click OK to create the node with the condition applied. Any actions attached to the node will only apply when triggered by the defined application or process.
Field Reference
| Option | Usage |
|---|---|
| Equal | Actions are applied for the application or process defined in the Match field. The Equal condition can also be used in conjunction with the Parameters field to apply further validation. |
| Not Equal | Actions are applied for all applications or processes other than that specified in the Match field. For example, enter excel.exe in the match field to apply the associated actions to all applications other than Microsoft Excel. |
| Query | Targets all processes and applications which match the criteria specified in the Match field. Wildcards can be used to target a range of applications and processes. |
| Regular Expression | Use regular expressions to specify processes and applications. |
| Parameters | Further validation can be added for Equal conditions by selecting the Match Parameters checkbox and adding extra definition in the Parameters field. For example, you might want to apply different conditions and actions for users who use Microsoft Access 2010 Retail and Runtime versions. To target the runtime version: Match field: C:\Program Files\Microsoft Office\Office14\msaccess.exeParameters field: /runtime Any actions applied to the process condition will only be applicable to the Runtime version of access. |
Example
You have a requirement to apply different conditions and actions for users who use Microsoft Access 2010 Retail and Runtime versions. To create a condition to target the Runtime version:
- Match: %PROGRAMFILES%\Microsoft Office\Office14\msaccess.exe
- Parameters: /runtime

Actions applied to the process condition will only be applicable to the Runtime version of access.
Arrange Nodes
The order in which the nodes are displayed in the Policy Configuration navigation tree determines the level of dependency. If all the nodes are at the same level in the hierarchy then their configured contents are executed in parallel. However, if the nodes are at different levels in the hierarchy, a dependency on the node above is created and actions are executed in sequence.

In the example above, Nodes 1, 3 and 7 will execute simultaneously. Node 2 and Nodes 4 and 5, will only execute once Nodes 1 and 3 respectively, are complete. Likewise, Node 6 will only execute once Node 5 is complete.
To arrange nodes, highlight and use one of the following methods:
- Press Ctrl and the appropriate arrow key.
- Drag and drop.
- Click the arrow buttons on the Nodes ribbon.
- Right-click to display the context menu and select Move Left, Move Right, Move Up, or Move Down.
- Click Cut, Copy and Paste from the Edit ribbon or use the corresponding shortcut menu options or keyboard shortcut.
Node Timeout
All nodes have a default timeout setting of 30 seconds. Child nodes will start automatically after the 30 second timeout, regardless of whether the actions within the parent node are complete or not. The default timeout can be amended by editing the appropriate key in the registry on an endpoint-to-endpoint basis. Alternatively, it can be amended for the whole configuration via the Advanced Settings.
The default timeout may be automatically overridden by any delay specified. This includes values from a delay action, or delay values specified within the action itself. It also includes timeout values on custom actions and conditions. The node timeout is modified when the total delay period for any action tree within the node exceeds the default node timeout period.
Note:
Creating a Delay action with a zero (0) second delay results in the node timeout to be set to indefinite. However, delayed actions (configured via the Action Management dialog) with a zero second delay (0) do not modify the node timeout value.
Any nodes which contain a Manage VHD action will automatically have a node timeout of indefinite. Any delays on these nodes run as intended but they do not modify the timeout period.
See also If conditions
Stop Sub Nodes on Fail
When applied, the Stop sub nodes on fail setting prevents any dependent sub nodes executing if a condition is not met or an action fails to run to completion. The setting can be applied to any action or condition and is enabled for new conditions by default.
To apply, select a node and set the Stop sub nodes on fail checkbox for each action and condition as required.

You can see the Stop if sub nodes on fail status of each node in the navigation tree:

Node Groups
The Node Group option creates a node to which multiple reusable nodes can be added that must run to a successful conclusion before any associated child nodes are run. Essentially, this means that child nodes can be dependent on multiple parent nodes. Without node groups the dependency can only be created between one parent and its child nodes.
Node group behavior is defined by the following rules:
- Only reusable nodes can be used within a node group but child nodes can be any appropriate to the trigger.
- Reusable nodes within a node group run in parallel.
- If any of the reusable nodes within the group fail, the child nodes will not run
The node group in the Computer > Startup trigger contains three reusable nodes; seen in the work area by selecting the node group. For the child node to run, all three of the reusable nodes must successfully complete.

Create all required Reusable Nodes prior to setting up a node group. Only nodes which exist in Library > Reusable Nodes can be added to the work area.
- In the Policy Configuration navigation tree, select a trigger, or node within a trigger, within which the node group is to be created.
- In the Node ribbon, select Node Group. A node is created in the Policy Configuration navigation tree.
- Highlight the new node and click in the console work area.
- On the Node tab, in the Add group, select Node Group Member and choose the required reusable nodes.
- Select a Reusable Node. The node is added to the node group node. Each added node can be Enabled or Disabled as required, using the corresponding checkbox in the work area.
- Repeat steps 4 and 5 to add further nodes.
- When all required reusable nodes have been added, create the dependent child nodes.
Clone
The Clone feature allows nodes, with or without their child nodes, to be copied, moved and used as reusable nodes.
Select the node you want to copy and on the Node ribbon, select Clone > Clone Node with Child Nodes.
The node, its child nodes and associated actions and conditions are copied to the same location as the original and renamed with a prefix of "Clone of".
Select the node you want to move and on the Node ribbon, select Clone > Move to reusable nodes.
The node, its child nodes and associated actions and conditions are move to reusable nodes
Select the node you want to move and on the Node ribbon, select Clone > Copy to reusable nodes.
The node and any associated actions and conditions are copied to reusable nodes and renamed with a prefix of "Clone of". Child nodes are not copied.
Select the node you want to move and on the Node ribbon, select Clone > Copy to reusable nodes.
The node, its child nodes and associated actions and conditions are copied to the same location as the original and renamed with a prefix of "Clone of".
Select the condition you want to move and on the Node ribbon, select Clone > Copy to reusable conditions.
The condition is copied to reusable conditions and renamed 'Reusable Condition'.
Stop sub nodes on fail is not supported for reusable conditions. If Stop Sub Nodes on Fail is enabled on the condition being copied, it will be removed in the Reusable Conditions node.