File Director
This page refers to an older version of the product.View the current version of the online Help.
Clustering
File Director supports clustered infrastructures and failover processing and is fully scalable to meet the varying demands of organizations.
If an appliance is taken offline, the File Director service is maintained by having users log on in the background to an alternate appliance in the cluster, according to the current network load balancing method. Although users are momentarily disconnected, they are automatically returned to the service without losing their session state. Any transactions that have not been committed to the database are rolled back.
When setting up the load balancer, ensure that session persistence is setup for the File Director cluster. It is recommended that the cookie insert method is used.
In this section:
- Set up the Initial Cluster Node
- Configure Additional Cluster Nodes
- Manage a Cluster in the Admin Console
- Apply a Patch to a Cluster
Set up the Initial Cluster Node
Prerequisites
Before configuring clustering:
- Ensure all appliances that will be in your cluster are of the same version.
- Create a new blank database in the default SQL instance (SQL Server 2008, 2008R2, 2012, 2014 and 2016 are supported).
- Create a new SQL account.
It is recommended that the SQL Service account has DBO privileges.
Note that only local SQL accounts are supported, domain-based accounts are not supported. - Configure the switching environment to allow Broadcast traffic.
- Ensure all cluster nodes that are to share common settings are available on the same network to allow low frequency broadcast discovery between the cluster peers.
- Take a backup of the current appliance configuration.
Enable Clustering on the First File Director Appliance
- Boot up the appliance for the first cluster node.
- Press F2 and logon.
- Select Cluster Configuration and press Enter.
- Enter a cluster name.
- Enter a port number. The default port is 49152 but you can use any port from 49152 to 65535.
-
Press F10 to save the cluster configuration.
Disable Clustering
To disable clustering, follow the process above and at step 4 leave the cluster name field blank.
Configure an External Microsoft SQL Database
- Log on to the Admin Console for the first cluster node.
- Select Cluster > Database.
-
Select Microsoft SQL Server.

- Complete the following
fields to configure your database:
- Database Host: DNS name or IP Address of the SQL server
- Database Port: 1433
- Database User: SQL account created during initial SQL setup.
- Database Password: Password set for the SQL account created during initial SQL setup.
- Database Name: Name of the blank database created during initial SQL setup
- Click Save to configure the database. A message confirms the setup has been successful.
- Restore the backup of the appliance configuration you took prior to configuring clustering.
-
Select Home > Status to ensure that appliance is fully set up.

Configure the Appliance on the Initial Cluster Node
The following appliance settings from the initial cluster node are shared between appliances in the cluster:
- DNS server settings
- Certificate settings
- Database configuration settings
- NTP server settings
- Web client enabled state
- DSCP setting
- Toggle Web Client setting
- HTTP Access setting
- Syslog settings
- Kerberos settings
- License details
It is recommend that once you have enabled clustering and set up the database on the first node, you configure the appliance settings or restore a backup with the required settings configured. When further nodes are added to the cluster, the appliance settings are automatically applied.
Application settings, such as Map Points, are not automatically moved to the SQL server when database settings are updated. A backup of the required settings must be restored to seed these settings in the database when switching from a configured local setup to a clustered one.
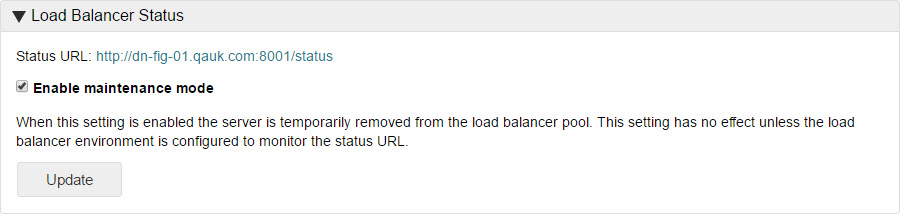
Check the Load Balancer Status
- Select Configuration > Advanced.
-
Locate the Load Balancer Status section.
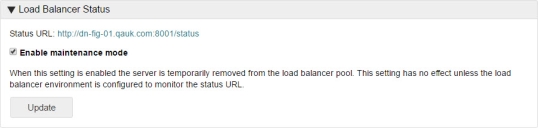
- Click the Status URL
link to check the health status of a server in a load balanced environment.
A status page is displayed showing one of the following:
- Success - The server is functioning correctly within the load balancer pool.
- Failure - The server is either offline or is not functioning correctly within the load balancer pool.
Configure Additional Cluster Nodes
Once you have successfully configured the initial cluster node, configure all the nodes you want to be part of the cluster.
- Boot up the appliance for the node you are adding to the cluster.
- Log in to the Admin Console for that node and Upload a License File.
- On the appliance text console, press F2 and logon.
- Select Cluster Configuration and press Enter.
- Enter the name of the cluster. This must be the name you entered when setting up the initial cluster node.
- If you are not using the standard port number (49152), enter the port number you are using for your cluster.
- Press F10 to save the cluster configuration.
-
If you have already performed configuration via other nodes of the cluster, the settings are automatically updated to any new nodes in the cluster and thereafter should automatically remain synchronized through updates when any setting changes.
To confirm clustering is operating correctly, logon to the web admin for the node and make a simple change, such as changing the DNS settings. When you log into another node in the cluster, the same change should be apparent.
- Repeat this process for every new node that you add to the cluster.
Manage a Cluster in the Admin Console
If clustering is enabled on the appliance, you can check the status of the nodes in your cluster, apply a patch to your cluster, update, and shutdown nodes.
Patch Server
By nominating one of the nodes in a cluster as the Patch Server, you can apply patches to all nodes in the cluster. Any active node in a cluster can be used as the patch server.
To make a node the patch server, log into the web admin console for a node that is not currently the patch server, select Cluster > Status and click Promote to Patch Server. The current node is now identified as the patch server.

Status

The status shows the name of the cluster, the File Director server version, and which node in the cluster is currently the patch server.
If a patch server has not been set, these details are not displayed.
Cluster Status
The state of each node in the cluster is denoted by the icon displayed in the Cluster Status column.
| Icon | Meaning |
|---|---|

|
Active The node is online and using the correct File Director server version, determined for the cluster by the version applied to the patch server. |

|
Warning
This can signify one of the following states:
A patch server has not been set. Set one of the nodes as the patch server.
|

|
Inactive The node is offline. |
Host
Displays the name of each node in the cluster, identifies which node is the patch server, and which node you are currently accessing through the web admin console. Click on a name to see details of the current component versions of that node and its patching history. The name of the current node and the patch server are annotated appropriately.
IP Address
The IP address of each node in the cluster.
Action
In the web admin console for any node in the cluster, use the buttons in the Actions column to reboot or shutdown any other node in the cluster. If a node is inactive, it can be removed from the list using the corresponding button. If a removed node restarts, it will automatically re-display in the list.
Update

The Update screen displays cluster name, File Director Server Version and which node is the current patch server. All patches that have previously been uploaded are listed in the Updates area.
Apply a Patch to a Cluster
This process explains how to apply a patch to all nodes in a cluster. To apply a patch when clustering has not been enabled, see Apply a File Director Patch.
Before applying any update to File Director you are advised to take a backup or snapshot of your virtual machine(s), your database, and the appliance configuration. See Backup and Restore
We recommend appliances are forced offline via the maintenance
mode flag (or manually via the load balancer) and bought back online following
the patching process. This is stop any traffic from the load balancer.
You can apply a patch to a cluster using any nodes as long as one of the nodes in the cluster is the patch server. To make the current node the patch server, select Cluster > Status and click Promote to Patch Server.
Log in to the web admin console on any node in the cluster.
- Select Cluster > Update.
- In the Status section, details of the current patch version are displayed.
- Click Choose File and navigate to a File Director patch file.
-
Click Upload.
The patch is displayed in the Updates section of the screen along with all patches that have been previously uploaded.
Select a patch and click Delete to remove it from the list and from the patch server.
- Select the row in the
table of the required patch and click Deploy
Update.
To see the components and release notes for a patch, click the patch name.
Note: 2018.3 Patch
Periodically, large patches are issued containing multiple component updates and upgrades to the OS. The 2018.3 patch is an example. Before installing the 2018.3 patch be aware it will require a system reboot several times during the update process. In addition, it is essential you perform recommended backups, as in some circumstances you will need to re-import the appliance snapshot after the update process has completed. For further information on installing the 2018.3 patch, see https://community.ivanti.com/docs/DOC-70692
Applying Updates - Additional Information
- Updates are applied in parallel to all components across the cluster that are not the same version as the patch.
- Nodes may require a reboot following an update - follow the instructions displayed.
- Nodes that are offline are not updated and display with a warning icon in the Status screen. Reapply the patch when the node is online to update its components. This does not affect any nodes that have already been updated.
- The progress of the update is displayed and you are informed when the update is complete.
- Depending upon the File Director version you are upgrading from, you may be required to restore your appliance configuration from the pre-upgrade backup. See Backup and Restore.
- Disable maintenance mode on each appliance and test client connections to File Director.
Maintenance Mode
Maintenance mode status is recommended for appliances before starting the patching process as a database schema upgrade may be required. This is performed by the first node to be upgraded. From this point on, all older nodes are blocked from communicating with the database, which causes their health monitors to fail and be marked as offline by the load balancer. Client device session tokens (logon states) are held in appliance memory. When the cluster is patched, these are lost, which means that the clients need to reauthenticate on their next connection with the appliance (generally within 30 seconds unless notification checks are disabled). Because all this traffic will be directed at the first single updated appliance that shows as online to the load balancer, the resultant traffic could saturate this appliance and result in an unbalanced configuration.
Related topics...
Copyright © 2019, Ivanti. All rights reserved.