Windows Client Policy Tool - Sync Rules
In this section:
Synchronization rules can be applied on your Windows client. The rules enable precise control over the files that are included or excluded from synchronization and are a powerful tool for system and infrastructure administrators.
The Sync Rules page allows you to create bespoke rules by selecting options from a simple interface. The tool generates the correct syntax for your rule and outputs this in the format required by the Windows client. It enables you to create accurate rules without a detailed technical knowledge of the language they are written in.
Synchronization rules are output as expressions using Boolean logic, and are written a custom language recognized by the client. They can be created to exclude files with certain attributes from being uploaded to the server (exclusions) or to prevent certain files from being downloaded from the server to the client on automatic map points (electives). Refer the Exclusions, Electives and Overrides help topic for further information and a range of examples.
Expression builder model
The expression builder prompts the user to construct each rule as a statement, selecting options from a list of possible alternatives:
Prevent <this action> when files meet <Any/All> of the following criteria <criterion specified>.
Examples:
•Prevent File synchronization (uploads) when files meet Any of the following criteria <criterion specified>.
The example above prevents files from being uploaded if they match any of the criteria specified - effectively this excludes the files specified from synchronization.
•Prevent Automatic downloads when files meet Any of the following criteria <criterion specified>.
This example prevents automatic download of files whose attributes match the expression.
Note that depending upon how File Director has been configured for map points, files residing on the server are automatically downloaded to the client. Creating a rule for the Prevent Automatic downloads action allows you to specify files to exclude from this download.
Sync Rules page
The Sync Rules page comprises 2 panels:
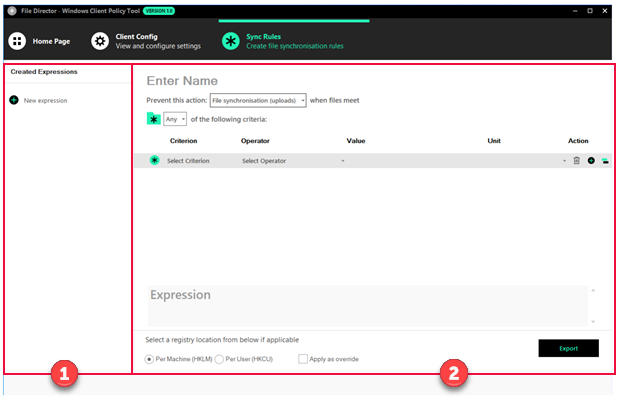
1.Created Expressions
Lists expressions created by the administrator.
At first use, this panel will be empty.
2.Expression builder tool
The tool presents drop-down controls enabling you to construct bespoke and correctly formatted expressions by selecting from the drop-down options listed.
Create an expression
Complete the following steps to build an expression:
1.Click the Enter Name field and type a descriptive name for your expression.
The expression name is added to the Created Expression panel on the left.
2.Click the arrow icon in the first drop-down list and select the value required.

The selection made here will determine whether the expression will prevent upload or automatic downloads.
The options are framed to describe the resulting outcome of the rule.
•File synchronization (uploads) is used to exclude files from synchronization.
•Automatic downloads is used to prevent files from automatically downloading.
3.In the second drop-down list, select the operator required.
Where your rule specifies a number of criteria for matching file types, this operator determines whether All or Any of those criteria must apply.
4.To specify the criteria your rule will use, select the required values from beneath the headings displayed.
Each completed row represents a node within the rule and a rule may comprise multiple nodes.
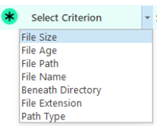
•Click the arrow icon next to Select Criterion. From the drop-down list select the criterion required .
•Click the arrow icon next to Operator. The drop-down list includes only operators valid for the selected criterion. Select the operator required.
•Click Enter Value and enter the value required for the criterion. Typically this will be a numeric value to determine a file size, age or quantity, or a text string to determine a file path, name or regular expression .
•Click the arrow icon next to Unit. The drop-down list includes units valid for the selected criterion. Select the unit required.
Note that for certain criteria a unit value is not applicable, for example where the where the Beneath or File Extension criteria are selected.
The expression text is generated for your rule dynamically, and is displayed in the central panel.
Action icons enable you to do the following:
 Delete node
Deletes the current rule, removes any data contained in the rule and updates the expression text accordingly.
 Add node
Adds a rule node to the dialog, allowing you to specify further criteria by which your files will be identified. See Rule example.
 Nest node
Allows you to add a group of nested nodes to your rule. This enables you to build nested expressions and so create very specific and powerful rules. See Nested nodes.
Rule example
The example following illustrates a rule to exclude files from upload if they are above a certain size (12 GB) or if they are beyond a certain age (5 days):
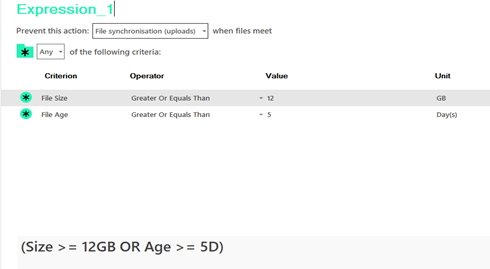
Note that the Any Operator is selected. It determines that any of the criterion must be met for the rule to apply. However, in terms of Boolean logic, this expression requires an OR statement; and this is reflected in the expression text generated (displayed within the panel).
Nested nodes
The expression builder provides the ability to create expressions within an expression. This process is called nesting and enables great flexibility. For example, it allows you to specify further selection rules and achieve more granular control over your file synchronization. See also Nested example below.
Create a nested expression
Nested nodes are created in the same way as simple expressions - see Create an expression above. The key difference being that the Operator selected within a group node will apply to each nested (or child) node(s) you define.
1.Having created a sync rule comprising one or more complete nodes, click the nested node action button () to insert a new group node to the expression builder.
A group node is indicated with a green folder icon ( ).
).
2.Complete the node as required. Note that the Operator selected will apply to the nested node(s) of your rule.
Nested example
The example following illustrates a rule to prevent files being uploaded where the file is above a certain size (2 GB), or age (5 months), or where the files age is less than 5 months old, but where the file extension is ISO.
To accomplish this expression, a nested (group) node is created:
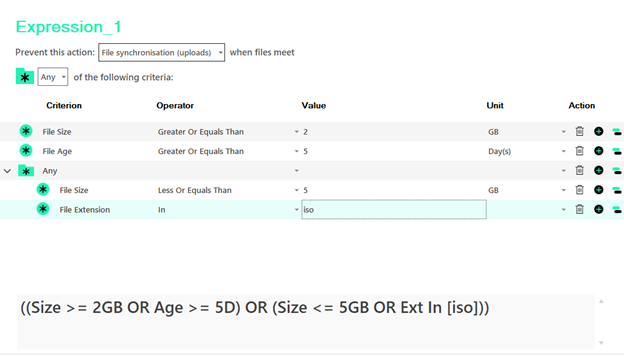
Note the Any Operator is used for both the simple and the nested nodes within this rule.
Edit or delete an expression
Modifications made using the Windows Client policy Tool are non-persistent, so any edits or deletion of your modifications must take place within the current session and prior to exporting your files.
Edit an expression
1.From the Created Expressions panel, select the expression required.
The defined rules are displayed in the expression builder and are editable.
2.Any changes made are saved automatically.
Delete an expression
1.Click the delete icon () displayed to the right of the expression entry.
2.When prompted, confirm you wish to proceed.
This action deletes the expression.
Export
The Windows Client Policy Tool allows you to export all modifications from either the Client Config or the Sync Rules page. The export action will apply to both sets of modifications simultaneously.
1.Click the Export button from either page.
This action identifies the changes you have made.
2.In the dialog displayed, select the required folder location for the export output, then press OK.
Up to four separate registry files are generated and these are output within a single folder. The resulting folder can be deployed to the endpoints required and file synchronization changes monitored accordingly.