Tour the Cherwell Outlook Add-In
The Cherwell Outlook Add-In interacts with Business Object Records directly from Microsoft Outlook. What each User sees in the Add-In is controlled by Outlook Integration Configurations (defined in CSM Administrator), as well as by the options defined in the Cherwell Outlook Add-In setup.
In the Inbox (or other monitored folder), expand or close the Add-In by
clicking the
 or
or
 buttons. If the Add-In cannot automatically find one
specific record to link to, it lists the most recent Business Object Records
(potential link items) for Users to select from and
manually
link e-mails to. If an e-mail is linked (either automatically or
manually) to a specific Business Object Record, the Add-In lists only the
associated record.
buttons. If the Add-In cannot automatically find one
specific record to link to, it lists the most recent Business Object Records
(potential link items) for Users to select from and
manually
link e-mails to. If an e-mail is linked (either automatically or
manually) to a specific Business Object Record, the Add-In lists only the
associated record.
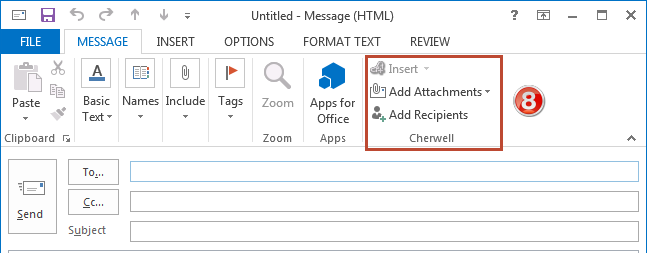
When sending (replying to, forwarding, or sending new) e-mails from Outlook, the Add-In provides a Cherwell Group in the Outlook ribbon with options for inserting links to Business Objects, inserting Attachments, and choosing additional recipients.
The Cherwell Outlook Add-In has several pieces of functionality:
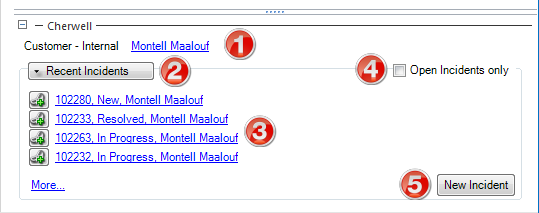
- View or change Customer: Click the Customer's name to open a context
menu to select from the following options:
Note: The Customer that appears here is based on the Customer Identification settings configured for the Outlook Integration Configuration being used. If a Customer cannot be found, the Customer shows as Unknown. The Customer Object (example: Customer - Internal) precedes the Customer's name.
- Quick View: Opens the Customer Record in a second window to take a quick look at the details.
- Go to Record: Navigates to the
Customer Record in
CSM.
Note: Users might have to log in to CSM before opening the Customer Record in CSM.
- Choose from Cherwell: Opens the CSM Contact Manager to select a different Customer to associate with the e-mail.
- Choose from Current Recipients: Opens another context menu with a list of the names in the To line of the e-mail. Select one of the names to associate the e-mail with that person.
- Remove Customer Association: Unlinks
the e-mail from the Customer (changes the Customer to Unknown).
Note: If any of the options that change or remove the Customer association are selected, the Business Object Records listed in the Cherwell Outlook Add-In change to show the most recent records associated with the newly selected Customer.
- Select Type of Business Object: Click the Business Object drop-down
to select the
types of Business Object Records to list.
Note: If only one type of Business Object is defined in the Outlook Integration Configuration (Objects page), only that Business Object appears in the drop-down (example: Incident).
- View or Link a Business Object Record: Click a
Business Object Record from the list of
most recent records (potential link items) to view or open the record, or to
link the record to the current e-mail.
Note: The list of recent Business Object Records (potential link items) is based on the Business Object settings for the Outlook Integration Configuration being used. It only appears if the Add-In cannot automatically find one specific record to link an e-mail to. Click More to expand the list of linkable Business Object Records.
- View Open Business Objects only: Select this check box to filter the list of potential link items to only show records that have not been closed
- Create a New <Business Object (example: Incident)>: Click this
button to create a new Business Object Record from the current e-mail.
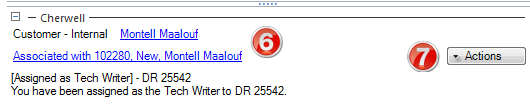
- View Associated Business Object Record (if an e-mail has been automatically or manually linked to a specific record): Click the associated Business Object Record to open a context menu to view the record, open the record, or unlink the record.
- Select Actions: Click the Actions drop-down to select the
One-Step that executes against the associated
Business Object Record.
Note: The One-Step Actions that appear in the drop-down menu are based on the available Actions configured for the Outlook Integration Configuration being used.
- Select Add-In options for outgoing e-mails:
- Insert [Business Object Record (example:
Incident 101323)]: Inserts a link to open a linked Business Object Record
in the
CSM Desktop Client, Portal, or Browser Client.
Note: This option is only available when sending an e-mail that is linked to a specific Business Object Record.
- Add Attachments: Inserts Attachments from the Business Object Record or Attachment Manager into the e-mail. Select Attachments in the drop-down.
- Add Recipients: Opens the
CSM Address Book to select recipients to add to the To, Cc, or Bcc
lines.
- Insert [Business Object Record (example:
Incident 101323)]: Inserts a link to open a linked Business Object Record
in the
CSM Desktop Client, Portal, or Browser Client.