Create a Filter Widget
Use the Filter Widget Properties window (accessed from within the Widget Manager) to create a Filter Widget.
To create a Date Filter Widget:
- Create a Widget.
- In the Type drop-down list, select Filter.
- Select the Business Object whose data you want to filter (example: Incident). Only one type of Business Object can be selected. The drop-down list displays only Major Business Objects. To display all Business Objects, select the Show All check box.
- Define a Date Filter:
- Select the Filter by Date radio button.
- Ranges: Select this button to open the Multiple Date Ranges window, and then select one or more date ranges (example: Any time, Today, Within last 1 week, etc.) to display in the drop-down list. If you select multiple data ranges, select a default range (example: Any time) to display in the filter when the Widget first appears.
- Filter Field: Select the date/time Field whose value limits the Widget (example: Created Date Time would limit records to created Any Time, created Today, created within the last 1 week, etc.; Modified Date Time would limit records to modified Any Time, modified Today, modified within the last 1 week).
- Hide Date Filters For Other Widgets On Dashboard: Select this check box to hide any other date-filtered Widgets on the Dashboard so that this Filter Widget controls the date range.
- If Widget Has a Date/time Filter, Use Its Field (even If Different Business Object Type): Select this check box to allow a Widget with its own Date/Time filter to use its defined filtering field instead of the Dashboard filtering field (example: Dashboard filter uses Created Date Time but individual Widget uses Modified Date Time).
- Select Save.
To create a Lookup Table Filter Widget:
- Create a Widget
- In the Type drop-down list, select Filter.
- Select the Business Object whose data you want to filter (example: Incident). Only one type of Business Object can be selected. The drop-down list displays only Major Business Objects. To display all Business Objects, select the Show All check box.
- Define the lookup values to
display in the filter (example: Filter Incidents by status):
- Select the Filter by Lookup Table radio button.
- Define the following:
- Filter Field: Select the Field in the Business Object from which to retrieve values (example: Status).
- Lookup
and Field:
Select the Lookup table and Field that supply all the possible values (example: For Incident, it might be the Status field in the Incident Status Lookup table, with Status values like New, In Progress, Assigned, etc.).
- Order by:
Select the Field to use to order the values, as well as an ascending (example: 0-10, A-Z) or descending (10-0, Z-A) order. Rarely will the alphabetical order match the order in which the values should appear in your item, unless you prefix the values with numbers or letters (example: For status, you would likely want lifecycle order, not alphabetical order); therefore, it is common to define a field that contains a sequence number purely for controlling the order (example: Status Order).
- Select Save.
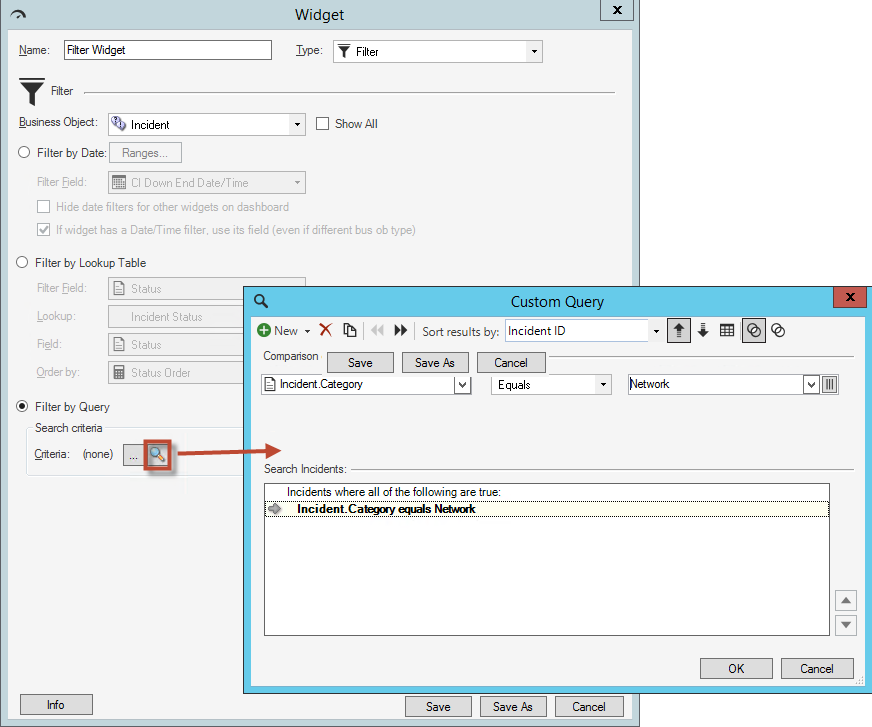
To create a Query Filter Widget:
- Create a Widget
- In the Type drop-down list, select Filter.
- Select the Business Object whose data you want to filter (example: Incident). Only one type of Business Object can be selected. The drop-down displays only Major Business Objects. To display all Business Objects, select the Show All check box.
- Define a Query Filter
(example: Show Incidents owned by me):
- Select the Filter by Query radio button.
- Define the Query using
one of the following options:
- Select the ellipses
button
 to open the Search Manager, and then select an
existing
Saved Search
or
create a Saved Search. Saved Searches can be used over and over in
numerous places.
to open the Search Manager, and then select an
existing
Saved Search
or
create a Saved Search. Saved Searches can be used over and over in
numerous places.
- Select
Custom Query
 to open the
Custom Query
Builder, and then create a custom Search Query to use only for this
scenario.
to open the
Custom Query
Builder, and then create a custom Search Query to use only for this
scenario.
- Select the ellipses
button
-
Select Save.
Tip: A Query filter uses a button to toggle the filter on/off on a Dashboard. Use the
Dashboard
Editor to
define
how the button looks and behaves on the Dashboard (example: Text,
colors, visibility, etc.).
on a Dashboard. Use the
Dashboard
Editor to
define
how the button looks and behaves on the Dashboard (example: Text,
colors, visibility, etc.).