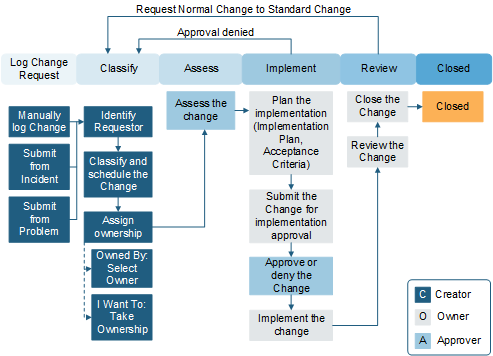
Normal Change Requests require approval.
Normal Changes have six stages: Classify, Assessment,
Authorization, Implementation, Review, and Closed.
To create a Normal Change Request:
- Create a Change Request and select
Normal from the
Change Type drop-down list.
- All fields in the
Classification section are required fields.
- Under
Status, select the
Next: Risk Analysis link.
- Select the
Risk Assessment link to fill out the Risk
Assessment survey (required).
You cannot edit a Risk Assessment after you submit it.
- Under
Status, select the
Next: Planning link.
A prompt appears notifying you that a Peer Review work item
has been created and needs to be assigned. Select
Close to close the window.
- Select the
Tasks tab to complete the Peer Review.
- During the Planning stage, complete the implementation plan,
provide evidence of testing, add tasks if necessary, and prepare the Change
Request for approval. Under the
Risk and Planning section, all fields are
required before you can submit for approval.
- Create any Tasks necessary for the Change Request.
- Under
Status, select the
Next: Approval link to submit the Change
Request for authorization.
CSM
calculates lead times and an approval deadline. If the proposed start date does
not meet the lead time requirement, you will have to either reschedule the
change or submit it as an exception.
If the CAB approves the Change Request, the status moves to
Scheduled. If it is denied, the status moves to Rejected.
Note: After submitting for approval, all fields in the
Classification and
Risk and Planning sections are disabled
and read-only, with the exception of the Assigned Team/Assigned To and Proposed
Start and End Dates. After approval, the Proposed Start and End Dates are
disabled and read-only.
- When you are ready to begin implementation tasks, select the
Next: Begin Work link (under
Status).
The Stage moves to In Progress. You can also place the
Change Request on hold by selecting the
On Hold link under
Actions.
- Under the
Validation and Review section, all fields are
required. Complete all tasks.
All fields in this section must be filled out before you can
move a Change Request to Closed status. The exception is if the Close Code is
Cancelled,
Declined by CAB, or
Withdrawn.
- After the Change is deployed, select the
Select Next: Validate Change link (under
Status).
- All implementation tasks must be closed before advancing to the
next status.
- Under
Status, select the
Next: CMDB Update link.
After the Change Owner updates the CMDB, select the
CMDB Update Complete check box.
- Under
Status, select the
Next: Mark as Complete link.
The status changes to Closed.