Create a Change Request
Normal Changes and Emergency Changes require steps to create a plan and gain approval from a Change Advisory Board (CAB). Standard Changes consist of pre-approved procedures and Tasks.
Normal, Emergency, and Standard Change Requests each have slightly different forms, but share many fields. This topic provides an overview of the Change Request Form. Refer to Create a Standard Change Request, Create a Normal Change Request, and Create an Emergency Change Request for details on the workflow for each Change Type.
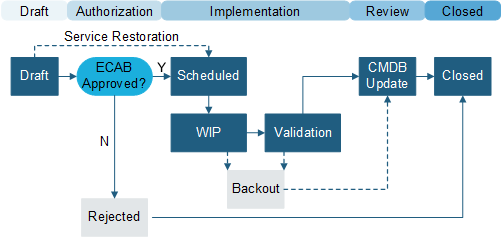
The diagrams below show high-level workflows for each Change Type.
High-Level Standard Change Workflow
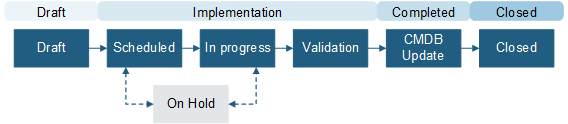
High-Level Normal Change Workflow

High-Level Emergency Change Workflow
Create and Classify the Change
On the CSM toolbar, select .
A new Change record is created with a unique Change ID.
| Field | Description |
|---|---|
| Requester | In the Requester Field, specify the name of
the person who initiated the Change, and then press
Enter or
Tab to search for the Customer Record.
If an exact match is found, the Requested By Fields in the Default Form are auto-populated with the customer’s name and email. If multiple matches are found, the Contact Manager opens so you can select the appropriate customer. To browse customers, select the Related Item Picker. |
| Title | Specify a title for the Change. |
| Description | Specify a description of the Change. |
| Change Type | Select Normal, Standard, or Emergency. The fields that are show on the rest of the form depend on this selection. |
| Change Model | Select the Related Item Picker to choose a Change Model (required for Standard Changes, optional for Normal and Emergency Changes). The Change Model will pre-populate several fields, depending upon how the Change Model was set up. |
| Emergency Subtype | Select a subtype (Service Restoration or Outage Avoidance) from the drop-down list (Emergency Change only). |
| Primary Configuration Item | Select the Related Item Picker to launch the CMDB window, and then select a CI. This shows CIs for any customer or for a selected customer. |
| Assigned Team | Specify the Team Owner of the Change. |
| Reason | Use the drop-down list to select a reason for the Change. |
| Change Already Implemented? | Indicates whether the Emergency Change has already been implemented (Emergency Change - Service Restoration only). |
| Assigned To | Specify the member of the Team who will be
the User Owner of the change.
The Creator can take ownership of the Change by selecting Assign to Me in the Actions list. |
| Proposed Start Date | Select the Calendar Date Selector to select a start date for the Change (Standard and Normal Change only). |
| Proposed End Date | Select the
Calendar Date Selector to select an end
date for the Change (Standard and Normal Change only).
Note: If a Stop icon appears next to the Proposed Start
and/or Proposed End Date, you are outside of the maintenance window, and you
must select an acceptable date. Hover over the icon for a detailed error
message.
|
| Impact | Select the scope of the Change from the drop-down list. |
| Urgency | Select the service level from the drop-down list. |
| Priority | The Impact and Urgency scores are used to calculate the Priority. |
| Service Affected | Select the Related Item Picker to select the affected Service. |
| View Change Calendar | Select the View Change Calendar link to open the Change Calendar. |
| View Collision Detection | Select the View Collision Detection link to open a Configuration Map of the Primary CI. |
| Review Date | Select the Calendar Date Selector to select a review date the Change (Normal Change only). |
Risk and Planning
The procedures in this section are for Normal Changes and Emergency Changes but do not apply to Standard Changes. These types of Changes require approval from a Change Advisory Board (CAB).
| Field | Description |
|---|---|
| Implementation Plan | Specify the process required to implement the Change. |
| Justification | Enter a justification for the Change Request. |
| Acceptance Criteria | Specify the functionality and quality requirements. |
| Validation Plan | Provide a validation plan (Normal Change only). |
| Back Out Plan | Specify a plan to back the Change out if implementation fails. |
| Outage Required | Select this check box if the CI will experience an outage while the Change is implemented (Normal Change only). |
| Impact Assessment | Provide an impact assessment. |
| Outage Start Date | Select the Calendar Date Selector to select a start date for the outage (Normal Change only). |
| Outage End Date | Select the
Calendar Date Selector to select a start
date for the outage (Normal Change only).
Note: If a Stop icon appears next to the Outage Start and/or
Outage End Date, you are outside of the maintenance window, and you must select
an acceptable date. Hover over the icon for a detailed error message.
|
| Complete Risk Assessment | In the Actions list, select this link to open the Risk Assessment questionnaire. |
Validation and Review
Emergency Changes are time sensitive and do not require all of the review procedures listed in this section. Steps that are used only for Normal Changes are marked (Normal Change only).
- Owner assesses the Change:
Field Description Impact Assessment Specify the impact assessment (consequences of the Change). Back Out Plan Specify a back out plan or attach information that details what actions to perform if the Change implementation does not work. - A peer review task must be assigned and completed.
- (Normal Change only) Owner submits the Change for
authorization:
- Under Status, select the Next: Submit for Approval link.
- If a peer review task is incomplete, the Change cannot be submitted for approval.
- (Normal Change only) Approver approves the Change:
- In the Approval grid, double-click an Approval Record.
The Approval form opens. The Approver Name and Details fields are auto-populated per the defined Approval process rules.
- (Optional) Provide comments.
- Select
Approve.
The Approval Status icons indicate the number of pending Approvals and their status (Pending, Approved, Denied, or Abstained).
The Change status changes to Pre-Implement and the Change enters the Implement phase.
- In the Approval grid, double-click an Approval Record.
- (Normal Change only) If the Change is approved, it moves to
the Scheduled status.
- Under Status, select the Next: Scheduled link.
- When you are ready to implement the Change, select the Next: Begin Work link.
- After deployment of the Change, the owner completes the
Validation and Review section.
Field Description Actual Start Date Select the Calendar Date Selector to select the date that the Change actually started. When a Change Request moves to the In Progress status, this field is auto-populated with the current date/time. Actual End Date Select the Calendar Date Selector to select the date that the Change actually ended. Note: If a Stop icon appears next to the Actual Start and/or Actual End Date, you are outside of the maintenance window, and you must select an acceptable date. Hover over the icon for a detailed error message.Close Code Select a close code from the drop-down list. Close Notes Specify additional information related to implementation of the Change. PIR Select the Post Implementation Review status. CMDB Update Complete Select this check box when the CMDB update is finished. Email Change Review Select this link to email the user assigned to this Change.