Add a List Box Control to a Form
Use the Form Editor (accessed from within a Blueprint in CSM Administrator) to add a List Box control to a form.
Good to Know:
- A List Box control is highly configurable. You can add or many to a form, then define the associated field, how to order the values in the list, and whether or not to use images and colors next to each value to help identify them. You can also define how the list box looks and behaves on the form (example: Text, tooltip, size, color, border style, image, alignment, anchoring, layering, visibility, enabling/disabling, and tab order).
- See Form Editor Behaviors for tips on working with controls and the Form Editor.
To add a List Box control to a form:
- Open a form in the Form Editor.
- Drag-and-drop the List Box control from the Standard Controls tree onto the form.
- Define what will be listed in the
List Box control:
- Right-click the
List Box control, and then select
Control Properties.
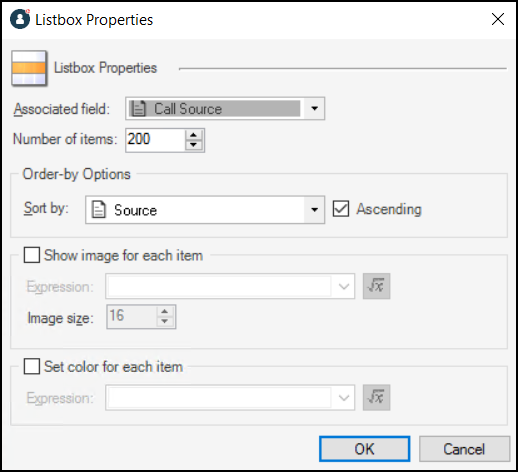
- Define List Box properties:
- Associated field:
Select the field whose values to display in the List Box control.
- Sort by:
Select the field to use to order the values, as well as an ascending or descending order. Rarely will the alphabetical order match the order in which the values should appear in your item, unless you prefix the values with numbers or letters (example: For status, you would likely want lifecycle order, not alphabetical order); therefore, it is common to define a field that contains a sequence number purely for controlling the order (example: Status Order).
- (Optional)
Show image for each item:
Select this check box to display an image next to each item, and then define an expression to determine which image to display and when to display it.
- (Optional)
Set color for each item:
Select this check box to display an image next to each item, and then define an expression to determine which color to display and when to display it.
- Right-click the
List Box control, and then select
Control Properties.
- Define how the form control looks and behaves on the form (example: Size, alignment, etc.).
- Publish the Blueprint to commit the changes, or save the Blueprint to continue making other changes.