Create a Filter Widget
Use the Filter Widget Properties window (accessed from within the Widget Manager) to create a Filter Widget.
To create a Date Filter Widget:
- Create a Widget.
- In the Type drop-down list, select Filter.
- Select the Business Object whose data you want to filter (example: Incident). Only one type of Business Object can be selected. The drop-down list displays only Major Business Objects. To display all Business Objects, select the Show All check box.
- Define a Date Filter:
- Select the Filter by Date radio button.
- Ranges: Select this button to open the Multiple Date Ranges window, and then select one or more date ranges (example: Any time, Today, Within last 1 week, etc.) to display in the drop-down list. If you select multiple data ranges, select a default range (example: Any time) to display in the filter when the Widget first appears.
- Filter Field: Select the date/time Field whose value limits the Widget (example: Created Date Time would limit records to created Any Time, created Today, created within the last 1 week, etc.; Modified Date Time would limit records to modified Any Time, modified Today, modified within the last 1 week).
- Hide Date Filters For Other Widgets On Dashboard: Select this check box to hide any other date-filtered Widgets on the Dashboard so that this Filter Widget controls the date range.
- If Widget Has a Date/time Filter, Use Its Field (even If Different Business Object Type): Select this check box to allow a Widget with its own Date/Time filter to use its defined filtering field instead of the Dashboard filtering field (example: Dashboard filter uses Created Date Time but individual Widget uses Modified Date Time).
- Select Save.
To create a Lookup Table Filter Widget:
- Create a Widget
- In the Type drop-down list, select Filter.
- Select the Business Object whose data you want to filter (example: Incident). Only one type of Business Object can be selected. The drop-down list displays only Major Business Objects. To display all Business Objects, select the Show All check box.
- Define the lookup values to
display in the filter (example: Filter Incidents by status):
- Select the Filter by Lookup Table radio button.
- Define the following:
- Filter Field: Select the Field in the Business Object from which to retrieve values (example: Status).
- Lookup
and Field:
Select the Lookup table and field that supply all the possible values (example: For Incident, it might be the Status field in the Incident Status Lookup table, with Status values like New, In Progress, Assigned, etc.).
- Order by:
Select the field to use to order the values, as well as an ascending or descending order. Rarely will the alphabetical order match the order in which the values should appear in your item, unless you prefix the values with numbers or letters (example: For status, you would likely want lifecycle order, not alphabetical order); therefore, it is common to define a field that contains a sequence number purely for controlling the order (example: Status Order).
- Select Save.
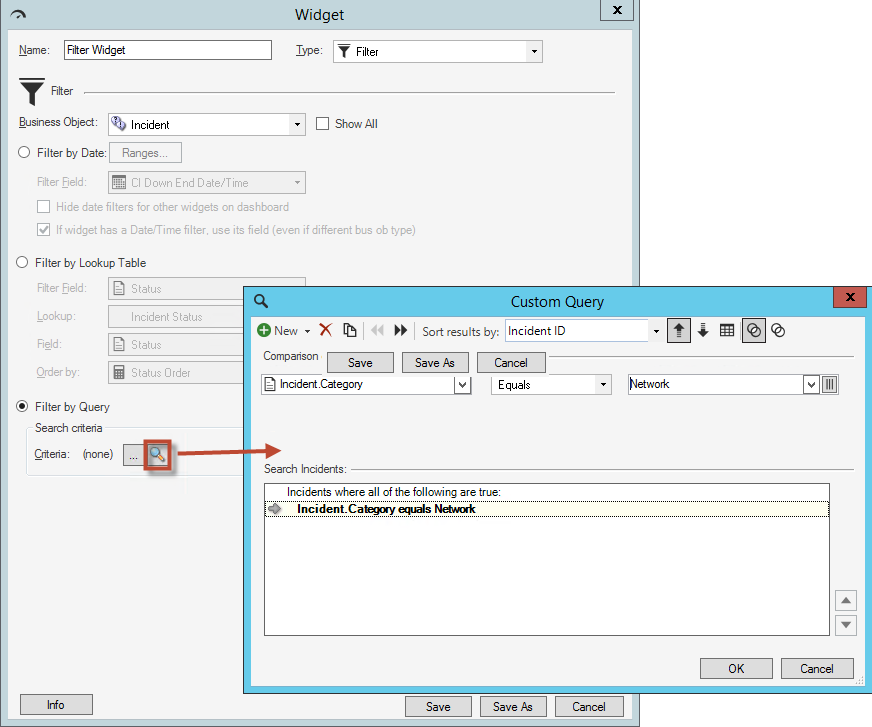
To create a Query Filter Widget:
- Create a Widget
- In the Type drop-down list, select Filter.
- Select the Business Object whose data you want to filter (example: Incident). Only one type of Business Object can be selected. The drop-down displays only Major Business Objects. To display all Business Objects, select the Show All check box.
- Define a Query Filter
(example: Show Incidents owned by me):
- Select the Filter by Query radio button.
- Define the Query using
one of the following options:
- Select the ellipses
button
 to open the Search Manager, and then select an
existing
Saved Search
or
create a Saved Search. Saved Searches can be used over and over in
numerous places.
to open the Search Manager, and then select an
existing
Saved Search
or
create a Saved Search. Saved Searches can be used over and over in
numerous places.
- Select
Custom Query
 to open the
Custom Query
Builder, and then create a custom Search Query to use only for this
scenario.
to open the
Custom Query
Builder, and then create a custom Search Query to use only for this
scenario.
- Select the ellipses
button
-
Select Save.
Tip: A Query filter uses a button to toggle the filter on/off on a Dashboard. Use the
Dashboard
Editor to
define
how the button looks and behaves on the Dashboard (example: Text,
colors, visibility, etc.).
on a Dashboard. Use the
Dashboard
Editor to
define
how the button looks and behaves on the Dashboard (example: Text,
colors, visibility, etc.).