Define Actions for an Action Catalog Widget
Use the Actions page (accessed from within the Action Catalog Widget Properties window) to define Actions and sort order for an Action Catalog widget.
- Action: Which Actions are listed in an Action Catalog widget. Actions come from Action fields. An Action field is configured to hold Actions (example: "Action Command" or "Action Name" hold properties are set on the field). Each Action value can execute the same default Action (example: "Create Incident and set prioritization") or each value can have its own unique Action. See Action Catalog Widgets.
- Sort Order: The order in which Actions
are listed in an Action Catalog widget. Actions are sorted by the values in a
selected field (example: Subcategory), either ascending (1-10, A-Z) or
descending (10-1, Z-A).
Access the Action Catalog Properties window from within the Widget Manager when you create or edit an Action Catalog widget.
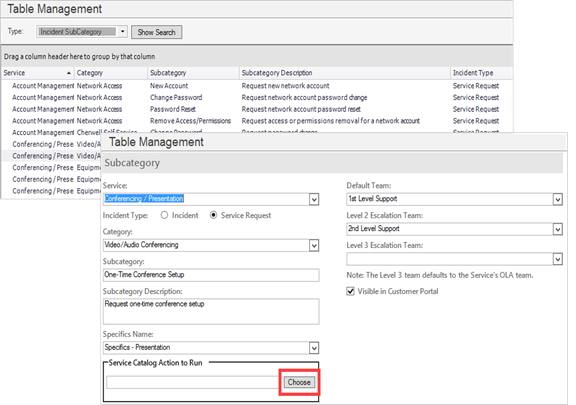
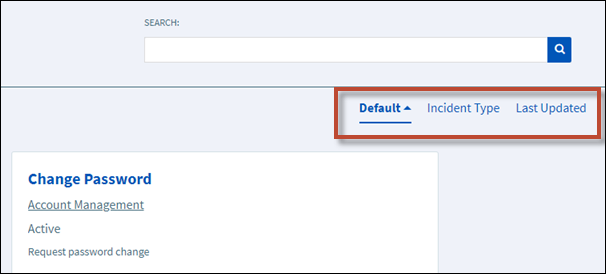
For example, the Service Catalog lists Actions from the Incident Subcategory Business Object. The Subcategory Business Object's Action Command field is configured to hold the Service Actions (One-Time Conference Setup and Request Account). All values execute the same default Action (Create Incident and set categorization) but you could define a unique Action in Table Management. Actions are sorted alphabetically from A-Z by Subcategory (Action) name.
To define Actions for an Action Catalog widget:
- Create a widget.
- In the Type drop-down list, select Action Catalog.
- Select the
Actions page, and then select the Business
Object that contains the Actions to execute from the widget (example: Incident
Subcategory contains all the Service Actions).
Only Business Objects that contain Action fields and are appropriate for an Action Catalog are listed. See Create Action Fields.
- (Optional) To limit the Business Object Actions by some criteria
(example: IncidentSubCategory.Service equals Printing to show only Printing
Actions), select the
Limit action records using query check box.
Select the
Custom Query button
 to open the Custom Query Builder, and then create a
custom search query to use only for this scenario. See
Custom Query
Builder.
to open the Custom Query Builder, and then create a
custom search query to use only for this scenario. See
Custom Query
Builder.
- Select the Actions to execute from the Action Catalog:
Note:CSM automatically selects the first Action field it finds in the selected Business Object. If you manually select a non-Action field, you must configure the field to be an Action field by adding the Action Command or Action Command Name Hold property.
- Action field: Select the Action field that contains the Actions
to execute (example: Action Command field). Each field value appears as a
hyperlink that executes a defined Action, either a default Action (set below)
or a unique Action (set in table management). See
About
Table Management.
To define a unique Action, locate the value in table management (), and then select an Action to execute.
- Default action: Select the
ellipsis button
 to open the
One-Step™
Action
Manager, and then select a default
One-Step Action to execute for all hyperlinks or if there is no Action in the Action
field (example: "Create Incident and set categorization"). You can also create
a new
One-Step Action. See
Create/Edit a
One-Step Action.
to open the
One-Step™
Action
Manager, and then select a default
One-Step Action to execute for all hyperlinks or if there is no Action in the Action
field (example: "Create Incident and set categorization"). You can also create
a new
One-Step Action. See
Create/Edit a
One-Step Action.
- Action field: Select the Action field that contains the Actions
to execute (example: Action Command field). Each field value appears as a
hyperlink that executes a defined Action, either a default Action (set below)
or a unique Action (set in table management). See
About
Table Management.
- To add a sort order for the Actions:
Sorts, as described here, can only be added when the Style on the Widget Display page is set to Cards with Search or Cards with Search v2.
- Sorts: Select the
Add Sort button
 to add a new sort for an Action.
- Sort order Field: Select the field to use to sort the Actions (example: Sort Actions alphabetically from A-Z by Subcategory).
- Select the
Sort in Descending Order button
 to toggle the sort order between ascending (1-10,
A-Z) and descending (10-1, Z-A). A non-active icon
indicates ascending order; an active icon
to toggle the sort order between ascending (1-10,
A-Z) and descending (10-1, Z-A). A non-active icon
indicates ascending order; an active icon
 indicates descending order.
- Select the
Edit button
 to change the sort name, sort field or to toggle
the sort order.
to change the sort name, sort field or to toggle
the sort order.
- Select the Delete button to delete a sort.
- Select the
Up or
Down buttons to change the order in which
the sorts are listed in the Portal.
The top sort option in the list in the dialog is the default sort. The sort direction is shown by an arrow in the Portal next to each sort.
The Up and Down buttons have nothing to do with the precedence of one sort over another as only one sort can be used at a time.
Sorts are only shown in the Portal if there are more than one.
- Sorts: Select the
Add Sort button
- To add one or more filters for the Actions:
Filters, as described here, can only be added when the Style on the Widget Display page is set to Cards with Search or Cards with Search v2.
- Filters: Select the
Add Filter button
to add a new filter for an Action, and then give
the new filter a name.
- To create a filter with a saved search, select the
Custom Query button
to open the
Custom Query Builder.
The stored query search button
is disabled when
Show in Search Manager is disabled for the
current Business Object.
- Select the
Edit button
to change the filter name, or edit your custom
query for your saved search.
- Select the Delete button to delete a filter.
- Select the Up or Down buttons to change the order in which the filters are listed in the Portal.
You can create a maximum of 10 filters.
- Filters: Select the
Add Filter button
-
Select OK.
- Publish the Blueprint to see your changes reflected in the Portal site. See Publish a Blueprint.