Form Editor Behaviors
The Form Editor has built-in behaviors and functions that are useful when creating or editing a form.
Search for Fields
- Field Search control
 : Use to search for a field by name or description (example: "Incident" or "Status"). You can search using a specific word or phrase (example: OwnedBy).
 - Show in folders button
 : Use to hide/display all folders in the Fields tree. Hiding folders displays all fields directly under the root node, regardless of how they are stored in the tree.
The Search Control and Show in folders button are displayed on both the Blueprint Editor and each tab in the Form Editor.
Select a Control
- Select a control or click-and-drag (rubber-band) over the control. This deselects all other controls.
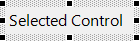
- A selected control is identified by black handles (boxes) around the bounding box. The bounding box represents the control's vertical and horizontal dimensions.
Select Multiple Controls
- To select multiple controls:
- Hold down the Ctrl or Shift keys while you select each control in turn.
- Click-and-drag (rubber-band) over the controls you want to select. Any control that is included (even partially) in the rubber-band box is selected.
- Press Ctrl+A to select all controls.
- When multiple controls are selected:
- The controlling control is the last selected control, and the control against which all other selected controls are sized and aligned.
- The controlling control is identified by black handles. All other selected controls are identified by white handles.

- To change the controlling control, hold down the Ctrl or Shift keys and select a different selected control. The control is removed from the selection. Repeat the action to re-add the control as the controlling control.
Edit Controls
- To delete a control, select it, and then press the Delete key.
- To edit the detailed properties of a selected control, right-click>Control Properties.
- To edit the field properties of a selected field form control, right-click > Field Properties.
- To duplicate a control, press Ctrl+Drag.
- To move a control, drag the control.
- To maintain aspect ratio when resizing, hold down Shift while sizing.
- To move/nudge a selected control:
- One (1) pixel, press an Arrow key.
- Ten (10) pixels, hold down Shift and press an Arrow key.
Container Controls
- Group Box, Tabbed Group Box, and Rectangle controls serve as containers for other controls, including other container controls.
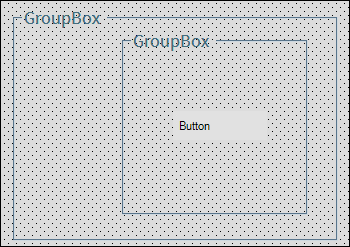
- When a container control is completely nested inside another container control (example: A Group Box is placed inside another Group Box), a parent-child relationship is formed between the two controls. When this relationship exists, the parent control carries the child control along with it when it is dragged across the Form Editor.
- To break the parent-child relationship between nested controls, either drag the child control so that it partially overlaps the parent control or move it completely outside of the boundaries of the parent control.
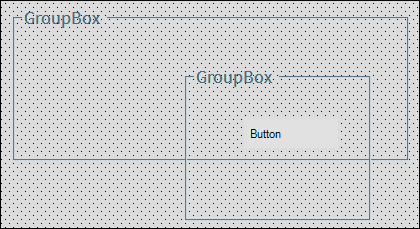
- If a third control is placed inside two nested container controls or within an area of overlap between two container controls, the third control is a child of both container controls and can be can be repositioned with either control independently.
For example, in the following image, a Button has been placed inside two nested Group Box controls. When you drag each Group Box on the Form Editor, the Button will move independently with the Group Box that is currently in focus.

When you move one of the nested Group Box controls so that it only partially overlaps with the other Group Box, as shown in the following example, the Button is a child of both Group Box controls and can be repositioned with either control independently, even though the two Group Box controls do not share a parent-child relationship.

Reposition and Resize Controls
To reposition and resize the selected control(s), right-click and choose Position and Size (or press Ctrl+Shift+P). The window opens. For example:

- In the Position field group, enter the left and top pixel location.
- In the Size field group, enter the width and height in pixels.
The position of the selected control (or, if multiple controls are selected, the entire group's position) is displayed by default. Size information is only displayed if a single control is selected, or if multiple selected controls share the same width and/or height.
When resizing multiple controls, if:
- All selected controls support the Auto-size property (for more information, see Size a Control), an Auto-Size Dynamically check box is displayed. The check box is selected if all selected controls have Auto-size enabled. For example:

If you don't want to use auto-sizing, you can clear the check box and set a width and height for all selected controls.
- Some (not all) selected controls have Auto-size enabled, the check box is displayed in a mixed-state
 . You can select or clear the check box to enable or disable Auto-size for all selected controls.
 - All selected controls are Tabbed Group Boxes, a Tab Width field group is displayed. You can clear the check box and specify a new width for the Tabbed Group Boxes.
