Simultaneous Form Editing
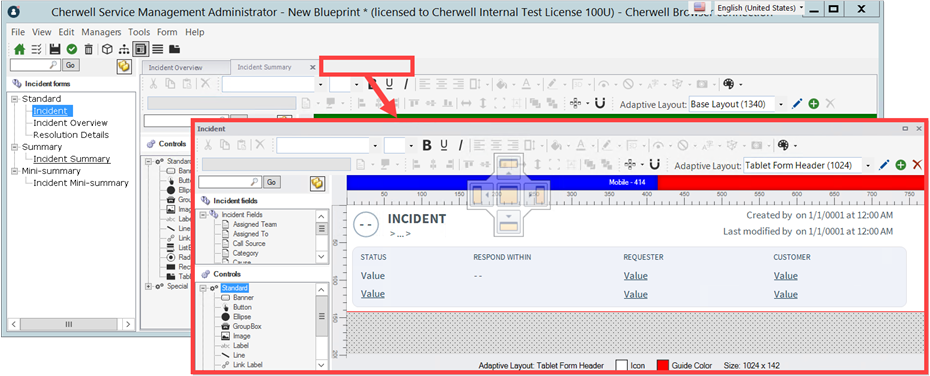
Using the Form Editor, you can edit multiple forms simultaneously. This lets you copy and paste controls between forms, for example. Forms are displayed on tabs. You can float/dock tabs to view forms side by side or in separate windows.
Simultaneous form editing is useful for working with multiple forms, cloning existing forms and making different versions of an existing form. You can copy and paste single or multiple controls between forms, maintaining all control properties (color, font, tooltip, etc.).
- You can open up to nine forms simultaneously.
- Simultaneous form editing is available for all form types.
- Form Editor preferences (example: Show Rulers, snapping settings) are consistent across all tabs.
Simultaneous form editing works best with standard desktop scaling.
Open Multiple Forms in Tabs
If no forms are currently open, you can select the link in the empty form preview to create a new form. When you create the new form, it is opened in a tab.
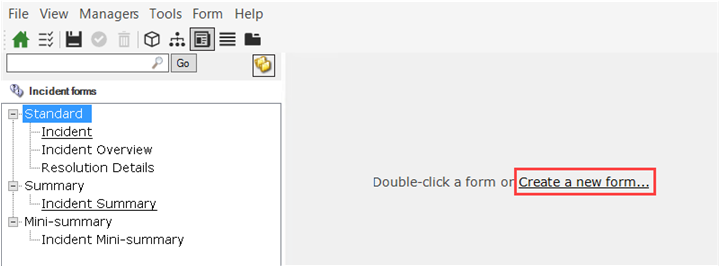
To create a new form, you can also select Form > New Form.
To open an existing form in another tab, double-click a form in the forms list. When displaying multiple tabs, the Form Editor Toolbar is displayed on the active tab and the corresponding form is selected in the Forms list.
If multiple tab groups are displayed, when you open an existing form, it is added to the same tab group as the active tab. For more information on docking tabs in multiple tab groups, see Dock Tabs.
If you open an existing form when the active tab is in a floated window, the new tab is added to the tab group of the previously active tab in the main window. For more information on floating tabs to separate windows, see Float Tabs.
When you edit a form, an * (asterisk) is displayed on the form's tab and in the Forms list. This means the form has changes not yet applied to the Blueprint. You can update the Blueprint or abandon the changes using the options on the Form Menu Bar Item.
When you edit a form and close its tab without updating the Blueprint, you are prompted to apply the form's changes to the Blueprint. You can optionally abandon the changes (close the form without saving).
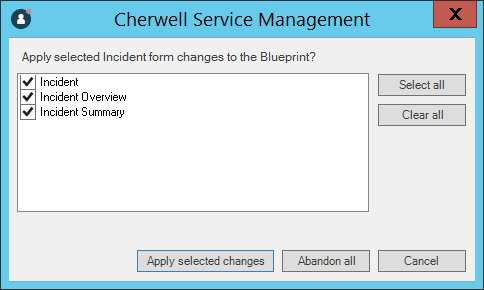
When you edit several forms in multiple tabs and close the Blueprint without updating, you are prompted to select the forms whose changes should be applied to the Blueprint. Select or clear the check boxes for each form. For example:
| Option | Description |
|---|---|
| Select all |
Select all form check boxes. All check boxes are selected by default. |
| Clear all | Clear all form check boxes. |
| Apply selected changes |
Apply changes for the selected forms to the Blueprint. If you clear a check box, changes for that form are abandoned and are not applied to the Blueprint. |
| Abandon all | Close the Blueprint without applying changes for any forms. Changes to the forms are not saved. |
| Cancel | Close the prompt and return to the Form Editor. The Blueprint and form tabs remain open and unsaved. |
The multiple form prompt is also displayed when you close a floated window, regardless of how many forms are displayed. For more information, see Float Tabs.
Float Tabs
You can drag and reorder the displayed tabs. You can also drag and float a tab to display that form in a separate window.
To return the tab, drag the window back to the tab list.
- You can drag multiple tabs to the same floated window. In this situation, docking options are available for the floated window. For more information, see Dock Tabs.
- You can also float and dock tabs using the appropriate tab menu option. For more information, see Use the Tab Menu.
Dock Tabs
You can drag and dock a tab. The docking widget is displayed when you drag a tab and point to any area in which it can be docked (including floated windows).
To use the docking widget, drag a tab to a docking widget option.

| 1 | Dock to the area's tab group. |
| 2 |
Dock in a new tab group at the top of the area. The area is split horizontally. Any existing tabs are moved below the docked tab. |
| 3 |
Dock in a new tag group at the right of the area. The area is split vertically. Any existing tabs are moved to the left of the docked tab. |
| 4 |
Dock in a new tab group at the bottom of the area. The area is split horizontally. Any existing tabs are moved above the docked tab. |
| 5 |
Dock in a new tab group at the left of the area. The area is split vertically. Any existing tabs are moved to the right of the docked tab. |
You can also dock tabs using the appropriate tab menu option. For more information, see Use the Tab Menu.
You can only split an area horizontally or vertically. Consequently, after docking a tab to the:
- Top or bottom, you can only dock subsequent tabs to the top or bottom of that area.
- Left or right, you can only dock subsequent tabs to the left or right of that area.
For example, after docking two tabs to the top of an area, when you dock another tab to that area:

To re-enable all docking widget options for an area, you must re-dock all forms as tabs in that area by:
- Using the docking widget tab option
 .
. - Dragging the docked tab back to a tab group.
- Using the appropriate tab menu option. For more information, see Use the Tab Menu.
For vertical tab groups, if there is not enough space to display all tabs in the tab group, arrows are displayed. Click an arrow to scroll left or right in the tab group. For example:

If you reach the end of a tab group and can no longer scroll left or right, the relevant arrow is disabled.
Use the Tab Menu
You can right-click a tab to perform the following actions.
- The tab menu is dynamic. Some options are displayed or hidden under certain circumstances.
- Many options let you float or dock tabs. For more information, see Float Tabs or Dock Tabs.
| Option | Description |
|---|---|
| Close |
Close the tab. If the form is floated to a separate window and is the only tab displayed, the floated window is also closed. |
| Close All But This |
Close all tabs except the right-clicked tab. Selecting this option in a floated window displaying multiple tabs closes all tabs (except the right-clicked tab) in the floated window. Tabs open in the main window are unaffected. |
| Float | Float the tab to a separate window. |
| Float All |
Float all tabs in the tab group to a separate window. Other tab groups in the main window are unaffected. Hidden for tabs in floated windows. |
| New Horizontal Tab Group |
Dock the tab in a new tab group beneath the current tab group. Hidden if vertical tab groups exist for the area. |
| New Vertical Tab Group |
Dock the tab in a new tab group to the right of the current tab group. Hidden if horizontal tab groups exist for the area. |
| Move to Main Window |
Dock the tab to the tab group of the previously active tab in the main window. Displayed only for tabs in floated windows. |
| Move to Next Tab Group |
Dock the tab to the tab group beneath or to the right of the current tab group, depending on whether horizontal or vertical tab groups exist, respectively. Displayed only if tab groups exist beneath or to the right of the current tab group, as applicable. |
| Move to Previous Tab Group |
Dock the tab to the tab group above or to the left of the current tab group, depending on whether horizontal or vertical tab groups exist, respectively. Displayed only if tab groups exist above or to the left of the current tab group, as applicable. |