Flyout Widget Properties
The Flyout Widget Properties window allows you to define the display (HTML page or website) and specific properties of a collapsible Flyout Widget. When collapsed, it appears as a tab on the Dashboard.
| Properties | Description |
|---|---|
| Tab Text | Type the text that will display on the collapsed tab. |
| Tab Size | Type the size of the collapsed tab in pixels. |
| Tab Color | Select the color of the tab. |
| Drop Shadow on Tab | Select this option if you want to display a drop shadow on the tab. |
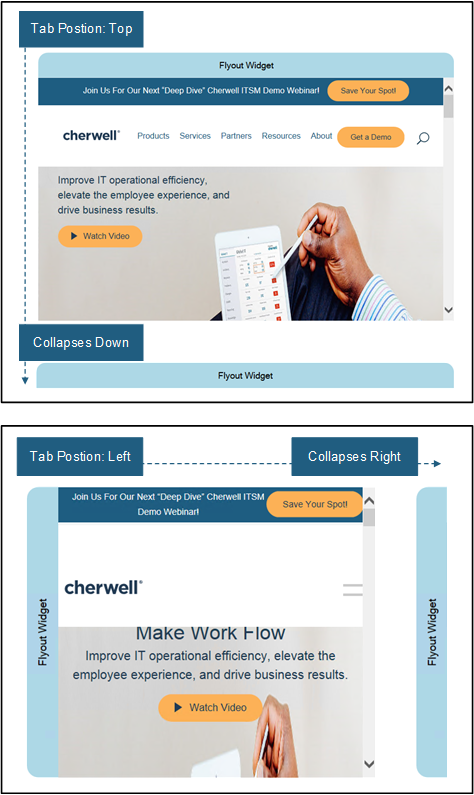
| Tab Position | Select the side of the widget on which the
tab will appear. The widget expands in the direction of the tab and collapses
away from the tab.
|
| HTML page | Select this option to display a specific HTML
page. Browse to select an existing HTML page or create a new HTML page. See
HTML Page Editor.
2-tier connection: When using a 2-tier connection, a CSM login window opens. Type your User name and Password to open the HTML Page Editor. |
| Web Site |
Select this option to display a website, utilize tokens, and/or send a POST request to a URL. You can store and use data from a POST response. To do this, the User's Security Group must have permissions to Edit Stored Values. |
|
Type the URL of the website. Tokens: The URL can include data tokens that allow the server to deliver more sophisticated and customized information. Right-click the field or select the drop-down arrow next to the field to specify a token on the URL. The token can reference Stored Values, System Functions, and Custom Expressions. When using the CTRL + Click keyboard shortcut on the URL, it follows the link, but any associated tokens will be dropped. |
|
This check box must be selected to send a pre-load POST to a website. When selected the pre-load POST is configured to execute, the POST URL field is enabled and required, and POST Body field is enabled but not required. When disabled, the POST URL and POST Body fields are disabled and the pre-load POST does not execute. |
|
Type a POST URL that can execute a POST request upon loading or refreshing. This field is enabled and required when the Execute POST before widget load check box is selected. Tokens: The Post URL can include data tokens that allow the server to deliver more sophisticated and customized information. Right-click the field or select the drop-down arrow next to the field to specify a token on the URL. The token can reference Stored Values, System Functions, and Custom Expressions. If the POST fails, it will fail silently and an error will be logged. |
|
Type a POST Body that will send to the POST URL upon loading or refreshing. This field is enabled when the Execute POST before widget load check box is selected. Tokens: The Post Body can include data tokens that allow the server to deliver more sophisticated and customized information. Right-click the field or select the drop-down arrow next to the field to specify a token on the URL. The token can reference Stored Values, System Functions, and Custom Expressions. If the POST fails, it will fail silently and an error will be logged. |
|
Select this option to store and use the data from a POST response in a Stored Value. Browse to select an existing Stored Value or create a new Stored Value. Incoming data must be valid JSON or XML. See Managing Stored Values. |
| Refresh |
Select this check box to refresh the content according to a defined time period, and then provide the refresh timeframe (every x hours or minutes). Use refresh on Widgets where the data is likely to change. Refresh executes only when a Widget is active and being displayed. If you leave a dashboard and come back to it, the data will be automatically refreshed and the refresh timer will start over. |
See Flyout Widgets and Create a Flyout Widget for additional information.
