The Ivanti AntiVirus Workflow
Learn the sequence of specific tasks you need to perform to create your first AntiVirus policy.
Install Module Server Component
Install the AntiVirus module server component. This component is installed after the initial Ivanti Endpoint Security installation.
If you purchased an AntiVirus license during your initial Ivanti Endpoint Security purchase, AntiVirus is installed during the initial Ivanti Endpoint Security installation by default.
For more information, see Step 1: Install the AntiVirus Module Server Component.
Add the Module Endpoint Component to Agents
Add the AntiVirus module endpoint component to agents you want to support AntiVirus functions. Each agent you add the endpoint component to consumes an AntiVirus license. For more information, see Step 2: Add the AntiVirus Module to Endpoints.
Verify Endpoint Component Installation Status
Use the endpoint or group management pages to ensure all the endpoints you specified have installed the AntiVirus module. For more information, see Step 3: Verify AntiVirus Endpoint Component Installation Status.
Create Groups
Create a new group (or multiple groups) to enable the collectively manage endpoints using the AntiVirus module For more information, see Step 4: Create an AntiVirus Group.
Run an Initial Virus and Malware Scan
Perform a thorough or full system scan to ensure your environment is free of active threats. For more information, see Step 5: Run an Initial Virus and Malware Scan.
Review and Remediate Initial Scan Event Alerts
Upon completion of the initial scan, details about malware detected are displayed on the Virus and Malware Events Alerts page for review and remediation purposes. For more information, see Step 6: Review and Remediate Initial Scan Event Alerts.
Create AntiVirus Policies to Monitor Your Environment
Use the scheduled (periodic) and/or real-time (continuous) scan capabilities to provide on-going, in-depth protection against malware. For more information, see Step 7: Create AntiVirus Policies to Monitor Your Environment.
Step 1: Install the AntiVirus Module Server Component
After logging in to Ivanti Endpoint Security, the first step in implementing AntiVirus features and functions is to install the server module
Install the server module using Installation Manager.
- Select Tools > Launch Installation Manager.
Installation Manager opens to the New/Update Components tab. - Select the Ivanti AntiVirus check box for your version number of Ivanti Endpoint Security.
- Click Install.
The Install/Update Components dialog opens. - Click Next to dismiss the Database backup recommended notification. Ivanti recommends backing up your database before installing a module.
- Click Install.
A dialog opens, notifying you that installing the module may cause users currently logged in to lose their work. - Click OK.
The installation begins. - Click Finish.
Select the Launch Ivanti Endpoint Security check box to relaunch Ivanti Endpoint Security after clicking Finish.
The AntiVirus server module is installed.
After Completing This Task:
Continue to Step 2: Add the AntiVirus Module to Endpoints.
Step 2: Add the AntiVirus Module to Endpoints
After installing the AntiVirus server module, you must add the AntiVirus module to your managed network endpoints.
Prerequisites:
- Complete Step 1: Install the AntiVirus Module Server Component.
- Ivanti Endpoint Security Agent must be installed on target endpoints.
- Antivirus software from any other vendors should be uninstalled from target endpoints.
- Target endpoints must have a minimum of 2 GB of free disk space for the creation of temporary files during AntiVirus engine and definitions file updates.
The endpoint component is added from the Endpoints page.
- Select Manage > Endpoints.
The Endpoints page opens to the All tab. - From the list, select the endpoints that you want to install the AntiVirus module endpoint component on.
- Click Manage Modules.
The Add/Remove Modules dialog opens. - Select the AntiVirus check box for all endpoints you want to install the component on.
- Click OK.
The AntiVirus module is added to the selected endpoints and Windows Security Center recognizes Ivanti AntiVirus as the antivirus program on each.
After Completing This Task:
Continue to Step 3: Verify AntiVirus Endpoint Component Installation Status.
Step 3: Verify AntiVirus Endpoint Component Installation Status
Use the endpoint or group management pages to ensure all the endpoints you specified have installed the AntiVirus module.
Server Prerequisites:
Complete Step 2: Add the AntiVirus Module to Endpoints.
- Access the agents from the group or endpoint level:
- From the navigation menu, select Manage > Groups.
- From the Browser tree, select the group that contains endpoints with the AntiVirus module installed.
- On the All tab, ensure the value for an endpoint's AV Installed column is Yes.
|
Option |
Description |
|---|---|
|
Groups view |
|
|
Endpoints view |
From the navigation menu, select Manage > Endpoints. |
After Completing This Task:
Add the AntiVirus module to endpoints you require.
Endpoint
- Right-click on the Agent Control Panel icon in the Windows system tray and select Agent Control Panel.
The Agent Control Panel displays. - Ensure AntiVirus appears among the menu options on the left menu bar.
After Completing This Task:
Continue to Step 4: Create an AntiVirus Group.
Step 4: Create an AntiVirus Group
After installing the server and endpoint components, create a new group for your endpoints. By placing your AntiVirus endpoints in a group (or multiple groups), you can manage them collectively. For example, you deploy content to all AntiVirus endpoints with one deployment by using groups.
Prerequisites:
Complete Step 3: Verify AntiVirus Endpoint Component Installation Status.
If groups already exist and suit your AntiVirus purposes, group creation is not necessary. You can use those groups instead. However, AntiVirus adds new group settings. If you use preexisting groups for AntiVirus, edit the group settings to leverage new features.
- From the navigation menu, select Manage > Groups.
- From the Browser tree, select Custom Groups.
Groups are arranged within a directory tree structure. You can place your new group anywhere within the custom group hierarchy. - Create a group.
- From the View list, select Group Membership.
- Click Create.
- In the Name field that displays, type a group name.
- In the Description field that displays, type a description.
- Click the Save icon.
- Add endpoints to the group.
- From the View list, select Endpoint Membership.
- Click Manage.
- Assign endpoints to the group.
- Click OK.
- Define the group's settings.
Group settings contain additional group controls.- From the View list, select Settings.
- Define the settings.
- Click Save.
The group is created.
The group you create is added as a child group to the group selected within the directory tree.
After Completing This Task:
Continue to Step 5: Run an Initial Virus and Malware Scan.
Step 5: Run an Initial Virus and Malware Scan
Use the Scan Now - Virus and Malware Scan Wizard to perform a thorough or full system scan to ensure your environment is free of active threats.
Prerequisites:
Complete Step 4: Create an AntiVirus Group.
The first virus and malware scan you run should utilize all the of the protection mechanisms provided by the AntiVirus module. By default, the Scan Now - Virus and Malware Scan Wizard is configured to perform the most thorough scan possible:
- Attempts to clean then quarantine then delete any viruses it detects.
- Scans boot sectors and automatically repairs them.
- Scans archive files such as .zip, .cab, and .rar.
- Scans memory.
- Detailed logging level (includes results summary, name, time, and status for each scanned file)
Be prepared for the scan to last a considerable duration.
- Select Discover > Scan Now – Virus and Malware Scan. If you are on the Virus and Malware Event Alerts page, click Scan Now.
The Virus and Malware Scan Wizard opens to the Scan Name and Scheduling page. - [Optional] Type a new name in the Scan Name field.
- Schedule the scan using one of the following methods:
- Select the Run scan at option.
- Type the start date in the Start date field. You can also select the start date by clicking the Calendar icon.
- Type the start time in the Start time field using a hh:mm format followed by AM or PM. This field supports both 12- and 24-hour time. Alternatively, you can select the start time by clicking the Clock icon.
- Click Next.
The Targets page opens. - Build a list of targets (endpoints) for the virus scan, using either or both of the following methods:
- From the Target type list, select Endpoints.
- In the search field, type an endpoint name in one of the following formats: endpointname or domain\endpointname. Alternatively, you can type an IP address.
- Click the Search icon. One or more endpoints are displayed in the area under the search field.
- Select the check box for the endpoint you want to scan.
- Click Add to Target List.
- From the Target type list, select Endpoint Groups.
- In the tree control, select one or more endpoint groups.
- Click Add to Target List.
- Click Finish.
The Virus and Malware Scan Wizard closes. The scan begins, either immediately or at the scheduled time. After the scan completes, the Virus and Malware Scan Results page displays details of any malware that has been detected.
By default, new virus scans are named New Virus and Malware Scan, followed by the server's date and time, which is formatted according to your browser's locale setting.
|
Method |
Steps |
|---|---|
|
To schedule an immediate scan: |
Select the Run scan immediately option. |
|
To schedule a later scan: |
The purpose of the deferred scan feature is to enable you to schedule the scan at a time that will not adversely affect network or endpoint performance. |
|
Method |
Steps |
|---|---|
|
To define targets using individual endpoints: |
You can type a partial name or IP address to search for a range of endpoints. |
|
To define targets using endpoint groups: |
You can exclude an endpoint or subgroup from a group that is to be scanned. Select the endpoint/subgroup in the tree control and click Exclude from Target List. |
You must add at least one endpoint or group for Next to become available. If you change your mind about anything you have added to the target list, you can remove it from the list by selecting its check box and clicking Remove.
One or more endpoints are assigned to the scan.
The scan begins, either immediately or at the scheduled time. After the scan completes, Review > Virus and Malware Event Alerts lists the malware that has been detected. Any files with known threats will be cleaned, deleted, or quarantined.
After Completing This Task:
Continue to Step 6: Review and Remediate Initial Scan Event Alerts.
Step 6: Review and Remediate Initial Scan Event Alerts
Details about malware detected during the initial scan are displayed on the Virus and Malware Events Alerts page.
Prerequisites:
Complete Step 5: Run an Initial Virus and Malware Scan.
The page provides a centralized view of all the Event Alerts generated during the scan, each of which include the name of the malware detected and the endpoints affected. You can then (if necessary) take further action to remove any remaining malware threat to the network.
- Select Review > Virus and Malware Event Alerts.
The Virus and Malware Event Alerts page opens. - Review the results.
You can use the Group By row, available above the list, to sort list items into groups based on column headers. This feature (along with the filters above the toolbar) is useful when you need to examine a large number of event alerts.
After Completing This Task:
You can use Scan Now to launch the Virus and Malware Scan Wizard, configuring it to perform specific actions that will reduce the threat to the network. See Using the Virus and Malware Scan Wizard for more information.
Complete Step 5: Run an Initial Virus and Malware Scan.
Step 7: Create AntiVirus Policies to Monitor Your Environment
Use the scheduled (periodic) and/or real-time (continuous) scan capabilities to provide on-going, in- depth protection against malware.
Prerequisites:
Step 6: Review and Remediate Initial Scan Event Alerts
The Ivanti Endpoint Security agents that detect and remediate malware threats on endpoints need to be assigned a properly configured antivirus policy. Policies define such features as when the endpoints will be scanned for threats, where on endpoints to search for threats, and the actions to be taken when threats are discovered.
The AntiVirus module enables you to create two types of antivirus policies: Recurring Virus and Malware Scan and Real-time Monitoring Policy.
Recurring Virus and Malware Scan
Runs a scan on a regular, scheduled basis. It typically analyzes all the files on an endpoint (except those specifically excluded from the scan). It can take an appreciable amount of time to run if there are a large number of files to be scanned.
- Select Manage > Antivirus Policies.
The Antivirus Policies page opens. - From the Manage > AntiVirus Policies toolbar, select Create > Recurring Virus and Malware Scan.
The Recurring Virus and Malware Scan Policy Wizard opens at the Name and Schedule Policy page.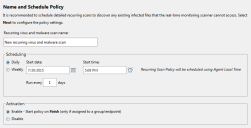
- Type a new name in the Recurring virus and malware scan name field. Make the name descriptive, conveying the role of this recurring policy.
- Select and configure a Scheduling option:
- Select the Daily option.
- Type the start date in the Start date field. You can also select the start date by clicking the Calender icon.
- Type the start time in the Start time field using a hh:mm format followed by AM or PM. This field supports both 12- and 24-hour time. Alternatively, you can select the start time by clicking the Clock icon.
- Type a value in the Run every x days field.
- Select the Weekly option.
- Type the start date in the Start date field. You can also select the start date by clicking the Calender icon.
- Type the start time in the Start time field using a hh:mm format followed by AM or PM. This field supports both 12- and 24-hour time. Alternatively, you can select the start time by clicking the Clock icon.
- Type a value in the Run every x weeks on: field.
- Select one or more of the daily check boxes to run the scan on those days.
- Select an Activation option.
- Click Next to set the scanning options.
The Scan Options page opens.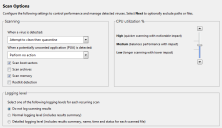
- From the drop-down list, select the action that occurs when a virus is detected.
- To clean an infected file means to completely remove the malicious code so that the file is safe to use. It is not always possible to remove the malicious code, however. When this happens, you can either delete the file or quarantine it. To quarantine means to move it to a safe place on the endpoint where it can be kept for further examination.
In certain cases (such as when the malware is a Trojan) the entire file is malicious. Such a file cannot be cleaned, so the only options are to quarantine or delete it. - Virus detection actions are not used for memory scans.
- From the drop-down list, select the action to be taken when a potentially unwanted application (PUA) is detected:
- Set the Scanning options:
- Perform no action - the boot sector is left as it is and an alert is sent to the Virus and Malware Event Alerts page.
- Clean/Delete/Quarantine - the boot sector is automatically repaired.
- Scanning archives will result in longer scan durations.
- Infected .rar files can be quarantined and deleted, but can't be cleaned.
- Set the CPU utilization % threshold to control the level of impact the scan is to have on endpoint performance:
- Set the logging options:
- Click Next.
- You have some applications whose manufacturers recommend be excluded from virus scans.
- You have folders containing large amounts of data that you consider relatively safe, such as graphics files. Excluding them from the scan saves time.
- You have files that cause known "false positives" during a scan.
- Exclude files and folders, using one of the following methods:
- Click Add. A blank entry is added to the exclusions list.
- Select an exclusion type from the Type field. The types are File and Folder.
- Enter the path to the item you want to exclude in the Path field.
- Click
 to add the exclusion to the list.
Repeat this procedure for all files and folders you want to exclude from the scan. - Configure the Optional drives settings:
- Click Next.
- Build a list of targets (endpoints), using either or both of the following methods:
- If the Groups section is not open, click its up arrow to open it.
- Select one or more endpoint groups by selecting their check boxes.
- Click Add. This adds the group(s) to the Assigned list.
- If the Endpoints section is not open, click its up arrow to open it.
- In the search field, do one of the following:
- Type an endpoint name (to search for a specific endpoint)
- Type part of an endpoint name (to search for similarly named endpoints)
- Leave it blank (to search for all available endpoints)
- Click the Search icon. Depending on what you typed, one or more endpoints will appear in the Name column, with their respective IP addresses.
- Select the check box for each endpoint you want to assign.
- Click Add. This adds the endpoint(s) to the Assigned list.
- Click Finish.
The Virus and Malware Scan Policy Wizard closes. The newly created policy is displayed in the Antivirus Policies page.
The name must be unique, otherwise a warning will be displayed.
Important: If an endpoint's internal clock changes (for example, due to Daylight Savings Time or time-zone differences while traveling) a recurring scan scheduled to take place during the time skipped will not occur.
Ensure you or the endpoint user run a Scan Now immediately after a time change to maintain continuous protection.
|
Method |
Steps |
|---|---|
|
Daily |
|
|
Weekly |
Leave the value at 1 if you want the scan to run at least once a week. |
|
Setting |
Result |
|---|---|
|
Enable - Start policy on Finish (only if assigned to a group/endpoint) |
The policy is created and activated when you click Finish and the wizard closes. The policy must be assigned to at least one endpoint or group. |
|
Disable |
The policy is created but not activated when you click Finish and the wizard closes. You may activate it at a later time. |
If you click Finish at this point, a basic policy is created, but is not assigned to any endpoints. You can configure the policy further and assign it to endpoints later.
|
Setting |
Result |
|---|---|
|
Perform no action |
Does nothing with the infected file, but sends an alert to the server. |
|
Attempt to clean then quarantine
|
Attempts to clean the infected file. If this is not possible, the file is quarantined. An alert is sent to the server. |
|
Attempt to clean then delete |
Attempts to clean the infected file. If this is not possible, the file is deleted. An alert is sent to the server. |
|
Attempt to clean then quarantine then delete |
Attempts to clean the infected file. If this is not possible, the file is quarantined. If it is not possible to quarantine it, it is deleted. An alert is sent to the server. |
Note:
|
Setting |
Result |
|---|---|
|
Perform no action
|
The system ignores the potentially unwanted application. |
|
Send alert only |
An alert is sent to the server only. |
|
Alert and action (treat as malware) |
An alert is sent to the server and the file is cleaned, quarantined, or deleted, according to the action you selected in the When a virus is detected drop down. |
|
Setting |
Result |
|---|---|
|
Scan boot sectors |
The virus scan will be more thorough if you scan boot sectors in addition to program and data files. Note: If malware is detected in a boot sector, the action taken depends on the virus detection option selected: |
|
Scan archives |
The virus scan will be more thorough if you scan archive files such as .zip and .cab files. Note: |
|
Scan memory |
Viruses and other malware can reside in memory as well as on the disk(s). The virus scan will be more thorough if you scan memory for such viruses and malware. Virus detection actions and exclusions are not applied to memory scans. |
|
Rootkit detection |
A rootkit, similar to a hack tool, enables attackers to gain administrator access to a system. They hide the attacker's presence and give them full control of a server or client endpoint without being noticed. |
|
Setting |
Result |
|---|---|
|
High |
Quicker scanning but may noticeably impact endpoint performance. |
|
Medium |
Balances scan speed with endpoint performance impact (default option). |
|
Low |
Slower scanning but has the lowest impact on endpoint performance. |
As logging information is kept on the endpoint, the option you choose will not affect the loggings sent to the server.
|
Setting |
Result |
|---|---|
|
Do not log scanning results |
No scan log is generated. |
|
Normal logging level (includes results summary) |
A standard scan log is generated. |
|
Detailed logging level (includes results summary, name, time and status for each scanned file) |
A detailed scan log is generated. Caution: Logging detailed virus scan results typically generates large amounts of data, especially when recurring scans run frequently. |
If you click Finish at this point, the policy will be created, but not assigned to any endpoints. You can assign it to endpoints at a later time.
The Exclude Files and Folders page opens.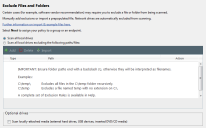
This page enables you to exclude specified files and paths from the scan. You may want to do this because:
Caution: Excluding files or paths from the scan always involves some degree of risk.
Masks and system variables can be used in exclusions. See Exclusion Rules.
More information on excluding files and folders from Ivanti AntiVirus malware scans, including recommended exclusions, can be found in the Ivanti Community Article Excluding files, folders and processes from scans.
|
Method |
Steps |
|---|---|
|
Manually exclude specific files and folders from the scan. |
Click Remove ( |
|
Import an XML file containing a formatted list of file and folder exclusions. |
|
Setting |
Result |
|---|---|
|
Scan locally-attached media |
All storage media (including external hard drives, USB devices, and DVD/CD media) are included in the scan. |
If you click Finish at this point, the policy will be created, but not assigned to any endpoints. You can assign it to endpoints at a later time.
The Assign virus and malware scan policy to groups and/or endpoints page opens.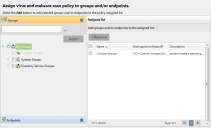
Important: Recurring scans will not run on an endpoint that is shutdown or hibernating at the scheduled scan time.
|
Method |
Steps |
|---|---|
|
To define targets using groups: |
|
|
To define targets using endpoints: |
|
You can remove targets from the Assigned list by selecting the applicable check boxes and clicking Remove.
Real-Time Monitoring Policy
Runs a scan when an endpoint accesses a file to carry out an action such as a read or a write. It continuously checks files in the background for malware before it gets a chance to cause damage.
- Select Manage > Antivirus Policies.
The Antivirus Policies page opens. - Click Create > Real-time Monitoring Policy.
The Real-time Monitoring Policy Wizard opens.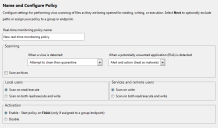
- Type a new name in the Real-time monitoring policy name field. Make the name descriptive, conveying the role of this real-time monitoring policy.
- From the drop-down list, select the action that occurs when a virus is detected.
- To clean an infected file means to completely remove the malicious code so that the file is safe to use. It is not always possible to remove the malicious code, however. When this happens, you can either delete the file or quarantine it. To quarantine means to move it to a safe place on the endpoint where it can be kept for further examination.
In certain cases (such as when the malware is a Trojan) the entire file is malicious. Such a file cannot be cleaned, so the only options are to quarantine or delete it. - Virus detection actions are not used for memory scans.
- From the drop-down list, select the action to be taken when a potentially unwanted application (PUA) is detected:
-
[Optional] Select the Scan archives check box to scan compressed files like: .zip, .rar, and .cab
- Scanning the contents of archive files will impact endpoint performance.
- Infected .rar files can be quarantined or deleted, but can't be cleaned.
- Configure the Local users setting. This applies when the endpoint is being used as a workstation, with a logged-on user.
- Configure the Services and remote users setting. This applies when the endpoint is being used as a server. If someone physically logs on to the server, the Local users setting applies.
- Select an Activation option.
- Click Next.
- You have some applications whose manufacturers recommend be excluded from virus scans.
- You have folders containing large amounts of data that you consider relatively safe, such as graphics files. Excluding them from the scan saves time.
- You have files that cause known "false positives" during a scan.
- Exclude files, folders or processes, using one of the following methods:
- Click Add. A blank entry is added to the exclusions list.
- Select an exclusion type from the Type field. File, Folder, or Process.
- Enter the path to the item you want to exclude in the Path field.
- Click
 to add the exclusion to the list.
Repeat this procedure for all files, folders and processes you want to exclude from the scan. - Configure the Optional drives settings:
- Click Next.
- Build a list of targets (endpoints), using either or both of the following methods:
- If the Groups section is not open, click its up arrow to open it.
- Select one or more endpoint groups by selecting their check boxes.
- Click Add. This adds the group(s) to the Assigned list.
- If the Endpoints section is not open, click its up arrow to open it.
- In the search field, do one of the following:
- Type an endpoint name (to search for a specific endpoint)
- Type part of an endpoint name (to search for similarly named endpoints)
- Leave it blank (to search for all available endpoints)
- Click the Search icon. Depending on what you typed, one or more endpoints will appear in the Name column, with their respective IP addresses.
- Select the check box for each endpoint you want to assign.
- Click Add. This adds the endpoint(s) to the Assigned list.
- Click Finish.
The Real-time Monitoring Policy Wizard closes. The newly created policy is displayed in the Antivirus Policies page.
The name must be unique. If it is not, a warning will be displayed.
|
Setting |
Result |
|---|---|
|
Perform no action |
Does nothing with the infected file, but sends an alert to the server. |
|
Attempt to clean then quarantine
|
Attempts to clean the infected file. If this is not possible, the file is quarantined. An alert is sent to the server. |
|
Attempt to clean then delete |
Attempts to clean the infected file. If this is not possible, the file is deleted. An alert is sent to the server. |
|
Attempt to clean then quarantine then delete |
Attempts to clean the infected file. If this is not possible, the file is quarantined. If it is not possible to quarantine it, it is deleted. An alert is sent to the server. |
Note:
|
Setting |
Result |
|---|---|
|
Perform no action
|
The system ignores the potentially unwanted application. |
|
Send alert only |
An alert is sent to the server only. |
|
Alert and action (treat as malware) |
An alert is sent to the server and the file is cleaned, quarantined, or deleted, according to the action you selected in the When a virus is detected drop down. |
Note:
See Archive Types Supported for Scanning
|
Setting |
Result |
|---|---|
|
Scan on read/execute |
Scans files before they are used. |
|
Scan on both read/execute and write |
Scans files that are opened for write. New or changed files are scanned on close. |
With Scan on read/execute selected, it is possible that an infected file can be downloaded from the Internet and saved to disk. With Scan on both read/execute and write selected, the scanner will detect and (if possible) remove the malware before writing the file to disk.
|
Setting |
Result |
|---|---|
|
Scan on write |
Scans files that are saved to disk. |
|
Scan on both read/execute and write |
Scans files that are being read or executed, as well as those being saved to disk. This is not the default option, as it increases scanning time. But if the server becomes infected, this is the option to select. |
|
Setting |
Result |
|---|---|
|
Enable - Start policy on Finish (only if assigned to a group/endpoint) |
The policy is created and activated when you click Finish and the wizard closes. The policy must be assigned to at least one endpoint or group. |
|
Disable |
The policy is created but not activated when you click Finish and the wizard closes. You may activate it at a later time. |
If you click Finish at this point, a basic policy is created, but is not assigned to any endpoints. You can configure the policy further and assign it to endpoints later.
The Exclude Files, Folders and Processes page opens.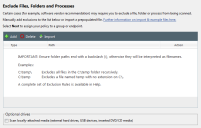
This page enables you to exclude specified files and paths from the scan. You may want to do this because:
Caution: Excluding files or paths from the scan always involves some degree of risk.
Masks and system variables can be used in exclusions. See Exclusion Rules.
More information on excluding files and folders from Ivanti AntiVirus malware scans, including recommended exclusions, can be found in the Ivanti Community Article Excluding files, folders and processes from scans.
|
Method |
Steps |
|---|---|
|
Manually exclude specific files, folders and processes. |
Click Remove ( |
|
Import an XML file containing a formatted list of file, folder and process exclusions. |
|
Setting |
Result |
|---|---|
|
Scan locally-attached media |
All storage media (including external hard drives, USB devices, and DVD/CD media) are included in the scan. |
If you click Finish at this point, the policy will be created, but not assigned to any endpoints. You can assign it to endpoints at a later time.
The Assign real-time monitoring policy to groups and/or endpoints page opens.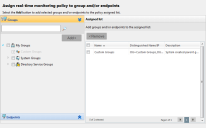
Important: Recurring scans will not run on an endpoint that is shutdown or hibernating at the scheduled scan time.
|
Method |
Steps |
|---|---|
|
To define targets using groups: |
|
|
To define targets using endpoints: |
|
You can remove targets from the Assigned list by selecting the applicable check boxes and clicking Remove.