Working with Agent Policy Sets
There are many tasks that you can perform from the Agent Policy Sets page related to agent policy sets. Some tasks are performed by clicking toolbar buttons, while others are performed by interacting with list items.
- Creating an Agent Policy Set
- Editing an Agent Policy Set
- Deleting an Agent Policy Set
- Changing the Global Uninstall Password
- Defining Agent Policy Logging Levels
- Defining Inventory Collection Options
- Defining Agent Hours of Operation
- The Edit FastPath Servers Dialog
- Exporting Data for Agent Policy Sets
Creating an Agent Policy Set
You can create an unlimited number of Agent Policy Sets to define how endpoints behave. Following creation, associate an Agent Policy Set with a group or endpoint to apply policy settings. After installing new modules, additional options are available when creating an Agent Policy Set.
Create an Agent Policy Sets from the Create Agent Policy Set dialog.
- Select Manage > Agent Policy Sets.
- Click Create.
The Create Agent Policy Set dialog opens. - Type the applicable information in the Policy Set Details fields.
- Define the Agent Hardening option.
These options define the steps required to delete an agent. For additional information, refer to About Agent Hardening. - Define the Agent Logging options.
The following table describes each option. - Define the Ivanti Endpoint Security Agent Communication options. The following table describes each option.
- Define the Ivanti Endpoint Security Agent Notification Defaults options. The following table describes each option.
- This policy will not take effect until the agent is restarted.
- This policy can hide only the Ivanti Endpoint Security Agent for Windows. Agents installed on Linux, Unix, or Mac endpoints cannot be hidden.
- When set to True, endpoint users can still open the Agent Control Panel using Windows Control Panel.
- This policy cannot hide the Patch Agent or the Agent.
- Define the Reboot Behavior Defaults option.
An endpoint module installation or feature may require an endpoint to restart (such as the Device Control module). This option defines how the reboot is performed.- From the Reboot behavior list, select a behavior.
Notify user, user response required before reboot: All logged-on endpoint users must agree unanimously to a restart. After the final user agrees to the reboot it will start immediately.
Notify user, automatically reboot within 5 minute timer: All users logged on to the endpoint are notified by a dialog that a restart will take place in five minutes.
Don't notify user, wait for next user-initiated reboot: No dialog notifies users that a reboot is required, and the policy does not take effect until the next time the endpoint is rebooted.
- From the Reboot behavior list, select a behavior.
- Define the Patch Agent Communication options. The following table describes each option.
- [Optional] Define the Configuration Policies option according to context.
- Define the Ivanti Patch and Remediation Deployment Notification Defaults options.
- Define the Ivanti Patch and Remediation Reboot Notification Defaults.
- Define the Discover Applicable Updates (DAU) option.
- Define the FastPath Servers options.
For additional information, refer to About FastPath. - Define the Bandwidth Throttling options.
- Define the Power Management options (Ivanti Power Management only).
For additional information, refer to Power Management Policies. - Define the Device Control options.
- Define the AntiVirus option:
- Click Save.
Your Agent Policy Set is saved. You can now assign the Agent Policy Set to endpoint groups or edit the set.
|
Field Name |
Type |
|---|---|
|
Policy Set Name |
The name of the Agent Policy Set. |
|
Policy Set Description |
A description of the Agent Policy Set (optional). |
|
Option |
Description |
|---|---|
|
Agent uninstall protection (list) |
Select from the list to define whether the agent requires a password to be uninstalled. The default value is On. |
|
Option |
Step |
|---|---|
|
Logging level (button) |
Click to open the Logging Level dialog. Use this dialog to select the agent logging level. For additional information, refer to Defining Agent Policy Logging Levels. |
|
Maximum log file size (field) |
Type the amount of disk space that triggers the agent to delete its log (1-500 MB). A value of 10 is the default setting. |
|
Options |
Step |
|---|---|
|
Use HTTP for file download (list) |
Select whether packages are downloaded using HTTP, regardless of whether HTTPS is used for communication between the agent and Ivanti Endpoint Security (True or False). The default value is True. |
|
Send interval (list) |
Select the amount of time that the agent should wait before sending an event to the Ivanti Endpoint Security server (0-5 seconds). A value of 2 seconds is the default setting. |
|
Receive interval (field and list) |
Type and select the amount of time that the agent should delay before reattaching events from the Ivanti Endpoint Security Server. This value cannot exceed seven days. A value of 0 seconds is the default setting. |
|
Timeout interval (field and list) |
Type and select the amount of time the agent should stay attached to the Ivanti Endpoint Security server before disconnecting (1 minute-7 days). A value of 12 hours is the default setting. |
|
Heartbeat interval (field and list) |
Type and select the amount of time between agent check-ins with the Ivanti Endpoint Security server (1 minute-1 day). A value of 15 minutes is the default setting. |
|
Option |
Description |
|---|---|
|
Hide Agent Control Panel |
This option controls whether the Agent Control Panel (and all associated dialogs and notifications) are hidden or accessible to an endpoint user after logging on (True or False). Note: |
|
Show Alerts on Endpoint |
This option control whether the associated dialogs and notifications for the Agent Control Panel are hidden or accessible to an endpoint user after logging on (True or False). |
|
Option |
Step |
|---|---|
|
Use SSL for agent to server communication (list) |
Select whether the Patch Agent uses HTTPS when communicating with the Ivanti Endpoint Security server. |
|
Use HTTP for package download (list) |
Select whether files are downloaded using HTTP, regardless of whether HTTPS is used for communication between the agent and Ivanti Endpoint Security (True or False). The default value is False. |
|
Agent Listener Port (field) |
Select the agent listener port number. When the agent is contacted using this port, it responds with the agent version number and initiates communication with Ivanti Endpoint Security. The default value of 0 disables the agent listener. |
|
Agent Scan Mode (list) |
Select the mode that the Discover Applicable Updates (DAU) task runs in. These modes include: Normal: Performs the DAU task normally, which uses the least amount of resources. Initial Only: Performs the first DAU task in fast mode, but subsequent DAU tasks in normal mode. Fast Scan: Performs the DAU task faster, but uses more resources. The default value is Normal. |
|
Communication Interval (field and list) |
Type and select the interval (in minutes, hours, or days) between agent and Ivanti Endpoint Security communication (1 minute-1 day). The default value is 15 minutes. |
|
Inventory Collection Options (button) |
Click to open the Select Inventory Collection dialog. Use this dialog to select the inventory values for recording during agent scanning. For additional information, refer to Defining Inventory Collection Options. |
|
Resume Interrupted Downloads (list) |
Select whether the agent resumes interrupted downloads at the point of interruption (True or False). The default value is True. |
|
Hours of Operation (button) |
Click to open the Edit Agent Hours of Operation dialog. Hours of operation are based on agent local time, allowing for further definition of the agent start and end times. For additional information, refer to Defining Agent Hours of Operation. |
|
Context |
Step |
|---|---|
|
If defining this option for the first time: |
Click the Define button adjacent to Security Configuration management. |
|
If editing this option after it has been defined: |
Click the Modify button adjacent to Security Configuration management. |
The Configuration Policy Management dialog opens. For more information regarding defining configuration policies, see Uploading and Applying a Benchmark to a New Agent Policy Set.
|
Option |
Step |
|---|---|
|
User May Cancel (list) |
Select whether the deployment recipient can cancel the deployment (True or False). The default value is False. |
|
User May Snooze (list) |
Select whether the deployment recipient can snooze the deployment (True or False). The default value is True. |
|
Deploy Within (field) |
Select the default time (in minutes) between the creation of the deployment and the deployment deadline (1-1440). The default value is 5 minutes. |
|
Always On Top (list) |
Select whether deployment notifications display as the topmost window (True or False). The default value is True. For additional information about the Always on Top policy, refer to About the Show on Top Option. |
|
Option |
Step |
|---|---|
|
User May Cancel (list) |
Select whether the deployment recipient can cancel the reboot (True or False). The default value is True. |
|
User May Snooze (list) |
Select whether the deployment recipient can snooze the reboot (True or False). The default value is True. |
|
Reboot Within (field) |
Type the default time (in minutes) between the creation of the deployment and the reboot deadline (1-1440). The default value is 5 minutes. |
|
Always on Top (list) |
Select whether reboot notifications display as the topmost window (True or False). The default value is True. For additional information about the Always on Top policy, refer to About the Show on Top Option. |
|
Option |
Step |
|---|---|
|
Scheduling Frequency (field) |
Type the frequency (in hours) of the DAU task (1-8760). The default value is 26 hours. |
|
Option |
Step |
|---|---|
|
Interval (field and list) |
Type the time interval (in minutes, hours, or days) between FastPath server validations (0 minutes-7 days). The default value of 0 disables the option. |
|
Servers (button) |
Click Define to open the Edit FastPath Servers dialog. Use this dialog to add FastPath servers. For additional information, refer to Adding/Editing FastPath Servers. |
|
Option |
Step |
|---|---|
|
Maximum Transfer Rate (field) |
Type the maximum amount of network bandwidth (in kilobytes per second), per endpoint that can be used by the agent for content download (0-1024). The default value of 0 disables bandwidth throttling. |
|
Minimum File Size (field) |
Type the threshold (in KB) at which a file will be managed by bandwidth throttling (0-1024). Files smaller than the defined value will not be managed by bandwidth throttling. The default value is 100. |
|
Option |
Description |
|---|---|
|
DC install SK-NDIS driver (list) |
Indicates whether Ivanti Endpoint Security installs a SK-NDIS on endpoints assigned the policy (Do not install or Install Enabled). |
|
DC detection interval (field) |
Indicates the detection interval (in minutes) that determines how often the endpoint verifies installation. |
|
DC device event upload interval (field) |
Indicates the reporting interval (in minutes) that determines how other the endpoint reports device events back to the server. |
|
DC agent reboot behavior (Read-only text) |
Indicates how reboots are performed following installation of the Device Control endpoint module. This behavior is defined using the Reboot behavior option. For additional information, refer to Creating an Agent Policy Set. |
|
Option |
Description |
|---|---|
|
Delay AV definition distribution by (field) |
Type the time interval (in hours, up to 23 hours) that the Ivanti Endpoint Security Agent is to delay requesting a new AntiVirus definitions file from the Application Server. The default value of 0 hours disables the option. Use this option to make time to test a new definitions file in a test environment before distributing it to agents (for example, to check for false positives that can negatively affect system functionality). Important: Delaying the download of important updates can make your environment vulnerable to new viruses or malware. |
After Completing This Task:
To assign an Agent Policy Set to a group, complete Assigning an Agent Policy Set to a Group.
Editing an Agent Policy Set
Following the creation of an Agent Policy Set, you can modify it to accommodate network environment changes.
The Edit A Policy Set dialog allows you to modify an agent policy set.
- From the Navigation Menu, select Manage > Agent Policy Sets.
- Click the Edit icon associated with the policy set you want to edit.
The Edit a Policy Set dialog opens. - [Optional] Edit the Policy Set Details fields.
- [Optional] Edit the Agent Hardening options.
These options define the steps required to delete an agent. For additional information, refer to About Agent Hardening. - [Optional] Edit the Agent Logging options.
- [Optional] Edit the Ivanti Endpoint Security Agent Communication options.
- [Optional] Define the Ivanti Endpoint Security Agent Notification Defaults options. The following table describes each option.
- This policy will not take effect until the agent is restarted.
- This policy can hide only the Ivanti Endpoint Security Agent for Windows. Agents installed on Linux, Unix, or Mac endpoints cannot be hidden.
- When set to True, endpoint users can still open the Agent Control Panel using Windows Control Panel .
- This policy cannot hide the Patch Agent or the Agent.
- [Optional] Edit the Reboot Behavior Defaults.
An endpoint module installation or feature may require an endpoint to restart (such as the Device Control module). This option defines how the reboot is performed.- From the Reboot behavior list, select a behavior:
Notify user, user response required before reboot: All logged-on endpoint users must agree unanimously to a restart. After the final user agrees to the reboot it will start immediately.
Notify user, automatically reboot within 5 minute timer: All users logged on to the endpoint are notified by a dialog that a restart will take place in five minutes.
Don't notify user, wait for next user-initiated reboot: No dialog notifies users that a reboot is required, and the policy does not take effect until the next time the endpoint is rebooted.
- From the Reboot behavior list, select a behavior:
- [Optional] Edit the Patch Agent Communication options.
- [Optional] Edit the Configuration Policies option.
- [Optional] Edit the Ivanti Patch and Remediation Deployment Notification Defaults options.
- [Optional] Edit the Ivanti Patch and Remediation Reboot Notification Defaults.
- [Optional] Edit the Discover Applicable Updates (DAU) option.
- [Optional] Edit the FastPath Servers options.
- [Optional] Edit the Bandwidth Throttling options.
- [Optional] Edit the Power Management options (Ivanti Power Management only).
For additional information, refer to Power Management Policies. - Edit the Device Control options (Device Control only).
- Define the AntiVirus option:
- Click Save.
Your edits are saved. The new policy values take effect the next time the applicable agents communicate with the Ivanti Endpoint Security server.
|
Field Name |
Type |
|---|---|
|
Policy Set Name |
The name of the Agent Policy Set. |
|
Policy Set Description |
A description of the Agent Policy Set (optional). |
|
Option |
Step |
|---|---|
|
Agent uninstall protection (list) |
Select from the list to define whether the agent requires a password to be uninstalled. The default value is On. |
|
Global Uninstall Password (button) |
Click Modify to open the Global Uninstall Password dialog. Use this dialog to define a password for manually uninstalling the agent. For additional information, refer to Changing the Global Uninstall Password. This option only available when editing the Global System Policy agent policy set. Only users assigned to the built- in Administrator role may view or modify the global uninstall password. |
|
Option |
Step |
|---|---|
|
Logging level (button) |
Click to open the Logging Level dialog. Use this dialog to select the agent logging level. For additional information, refer to Defining Agent Policy Logging Levels. |
|
Maximum log file size (field) |
Type the amount of disk space that triggers the agent to delete its log (1-500 MB). A value of 10 is the default setting. |
|
Options |
Step |
|---|---|
|
Use HTTP for file download (list) |
Select whether packages are downloaded using HTTP, regardless of whether HTTPS is used for communication between the agent and Ivanti Endpoint Security (True or False). The default value is True. |
|
Send interval (list) |
Select the amount of time that the agent should wait before sending an event to the Ivanti Endpoint Security server (0-5 seconds). A value of 2 seconds is the default setting. |
|
Receive interval (field and list) |
Type and select the amount of time that the agent should delay before reattaching events from the Ivanti Endpoint Security Server. This value cannot exceed seven days. A value of 0 seconds is the default setting. |
|
Timeout interval (field and list) |
Type and select the amount of time the agent should stay attached to the Ivanti Endpoint Security server before disconnecting (1 minute-7 days). A value of 12 hours is the default setting. |
|
Heartbeat interval (field and list) |
Type and select the amount of time between agent check-ins with the Ivanti Endpoint Security server (1 minute-1 day). A value of 15 minutes is the default setting. |
|
Option |
Description |
|---|---|
|
Hide Agent Control Panel |
This option controls whether the Agent Control Panel (and all associated dialogs and notifications) are hidden or accessible to an endpoint user after logging on (True or False). Note: |
|
Show Alerts on Endpoint |
This option control whether the associated dialogs and notifications for the Agent Control Panel are hidden or accessible to an endpoint user after logging on (True or False). |
|
Option |
Step |
|---|---|
|
Use SSL for agent to server communication (list) |
Select whether the Patch Agent uses HTTPS when communicating with the Ivanti Endpoint Security server. |
|
Use HTTP for package download (list) |
Select whether files are downloaded using HTTP, regardless of whether HTTPS is used for communication between the agent and Ivanti Endpoint Security (True or False). The default value is False. |
|
Agent Listener Port (field) |
Select the agent listener port number. When the agent is contacted using this port, it responds with the agent version number and initiates communication with Ivanti Endpoint Security. The default value of 0 disables the agent listener. |
|
Agent Scan Mode (list) |
Select the mode that the Discover Applicable Updates (DAU) task runs in. These modes include: Normal: Performs the DAU task normally, which uses the least amount of resources. Initial Only: Performs the first DAU task in fast mode, but subsequent DAU tasks in normal mode. Fast Scan: Performs the DAU task faster, but uses more resources. The default value is Normal. |
|
Communication Interval (field and list) |
Type and select the interval (in minutes, hours, or days) between agent and Ivanti Endpoint Security communication (1 minute-1 day). The default value is 15 minutes. |
|
Inventory Collection Options (button) |
Click to open the Select Inventory Collection dialog. Use this dialog to select the inventory values for recording during agent scanning. For additional information, refer to Defining Inventory Collection Options. |
|
Resume Interrupted Downloads (list) |
Select whether the agent resumes interrupted downloads at the point of interruption (True or False). The default value is True. |
|
Hours of Operation (button) |
Click to open the Edit Agent Hours of Operation dialog. Hours of operation are based on agent local time, allowing for further definition of the agent start and end times. For additional information, refer to Defining Agent Hours of Operation. |
|
Context |
Step |
|---|---|
|
If defining this option for the first time: |
Click the Define button adjacent to Security Configuration management. |
|
If editing this option after it has been defined: |
Click the Modify button adjacent to Security Configuration management. |
The Configuration Policy Management dialog opens. For more information regarding defining configuration policies, see Uploading and Applying a Benchmark to a New Agent Policy Set.
|
Option |
Step |
|---|---|
|
User May Cancel (list) |
Select whether the deployment recipient can cancel the deployment (True or False). The default value is False. |
|
User May Snooze (list) |
Select whether the deployment recipient can snooze the deployment (True or False). The default value is True. |
|
Deploy Within (field) |
Select the default time (in minutes) between the creation of the deployment and the deployment deadline (1-1440). The default value is 5 minutes. |
|
Always On Top (list) |
Select whether deployment notifications display as the topmost window (True or False). The default value is True. For additional information about the Always on Top policy, refer to About the Show on Top Option. |
|
Option |
Step |
|---|---|
|
User May Cancel (list) |
Select whether the deployment recipient can cancel the reboot (True or False). The default value is True. |
|
User May Snooze (list) |
Select whether the deployment recipient can snooze the reboot (True or False). The default value is True. |
|
Reboot Within (field) |
Type the default time (in minutes) between the creation of the deployment and the reboot deadline (1-1440). The default value is 5 minutes. |
|
Always on Top (list) |
Select whether reboot notifications display as the topmost window (True or False). The default value is True. For additional information about the Always on Top policy, refer to About the Show on Top Option. |
|
Option |
Step |
|---|---|
|
Scheduling Frequency (field) |
Type the frequency (in hours) of the DAU task (1-8760). The default value is 26 hours. |
|
Option |
Step |
|---|---|
|
Interval (field and list) |
Type the time interval (in minutes, hours, or days) between FastPath server validations (0 minutes-7 days). The default value of 0 disables the option. |
|
Servers (button) |
Click Define to open the Edit FastPath Servers dialog. Use this dialog to add FastPath servers. For additional information, refer to Adding/Editing FastPath Servers. |
|
Option |
Step |
|---|---|
|
Maximum Transfer Rate (field) |
Type the maximum amount of network bandwidth (in kilobytes per second), per endpoint that can be used by the agent for content download (0-1024). The default value of 0 disables bandwidth throttling. |
|
Minimum File Size (field) |
Type the threshold (in KB) at which a file will be managed by bandwidth throttling (0-1024). Files smaller than the defined value will not be managed by bandwidth throttling. The default value is 100. |
|
Option |
Step |
|---|---|
|
DC install SK-NDIS driver (list) |
Indicates whether Ivanti Endpoint Security installs a SK-NDIS on endpoints assigned the policy (Do not install or Install Enabled). |
|
DC detection interval (field) |
Indicates the detection interval (in minutes) that determines how often the endpoint verifies installation. |
|
DC device event upload interval (field) |
Indicates the reporting interval (in minutes) that determines how other the endpoint reports device events back to the server. |
|
DC agent reboot behavior (Read-only text) |
Indicates how reboots are performed following installation of the Device Control endpoint module. This behavior is defined using the Reboot behavior option. For additional information, refer to step 8. |
|
Option |
Description |
|---|---|
|
Delay AV definition distribution by (field) |
Type the time interval (in hours, up to 23 hours) that the Ivanti Endpoint Security Agent is to delay requesting a new AntiVirus definitions file from the Application Server. The default value of 0 hours disables the option. Use this option to make time to test a new definitions file in a test environment before distributing it to agents (for example, to check for false positives that can negatively affect system functionality). Important: Delaying the download of important updates can make your environment vulnerable to new viruses or malware. |
Deleting an Agent Policy Set
As your network environment changes, Agent Policy Sets may no longer be applicable. When this event occurs, you may delete the unnecessary Agent Policy Set.
You can delete Agent Policy Sets at any time from the Agent Policy Sets page.
- From the Navigation Menu, select Manage > Agent Policy Sets.
- Delete one or more Agent Policy Sets. Use one of the following methods.
- Select the check boxes associated with the Agent Policy Sets you want to delete.
- From the toolbar, click the Delete button.
- Acknowledge the deletion by clicking OK.
The Agent Policy Set(s) is deleted.
|
Method |
Steps |
|---|---|
|
To delete one Agent Policy Set: |
Click the Delete icon associated with an Agent Policy Set. |
|
To delete multiple Agent Policy Sets: |
|
Assigned agent policy sets and the Global System Policy cannot be deleted.
A dialog displays, asking you to acknowledge the deletion.
Changing the Global Uninstall Password
Change the Global Uninstall Password associated with the Global System Policy set. to uninstall any agent in your network.
To uninstall an agent from its host endpoint, you must enter one of two passwords: Endpoint Uninstall Password or the Global Uninstall Password. The Global Uninstall Password feature ensures that endpoint users cannot uninstall the agent without the knowledge and permission of the administrator.
Define the Global Uninstall Password when editing the Global System Policy.
- From the Navigation Menu, select Manage > Agent Policy Sets.
- Click the edit icon (
 ) for the Global System Policy set.
The Edit a Policy Set dialog opens. - Under the Agent Hardening section, click the Modify button adjacent to the Global uninstall password field.
The Global Uninstall Password dialog opens.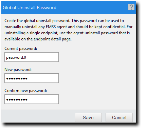
- Type the desired password in the New password field.
The password must be at least 8 characters in length.
- Retype the password in the Confirm new password field.
- Click Save.
Password edits are not saved until the agent policy set itself is saved.
- Finish any desired edits to the Global System Policy set and click Save.
Password edits are not saved until the Global System Policy set is saved.
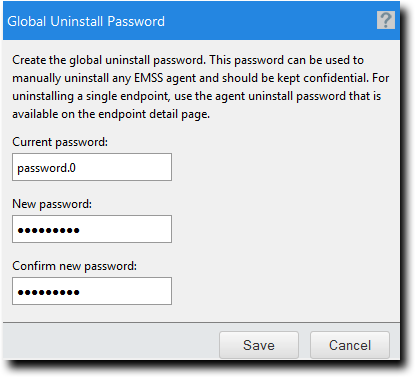
The Global Uninstall Password dialog closes. Your edits take effect the next time Ivanti Endpoint Security and the applicable agents communicate.
The password required to uninstall the agent from the endpoint locally can be found. Refer to Viewing the Agent Uninstall Password for additional information.
Defining Agent Policy Logging Levels
All Ivanti Endpoint Security Agents record a log of events that transpire on the endpoint. An Agent Policy Set logging level setting controls how much memory an agent's host endpoint allocates for event logs.
A defined logging level can help troubleshoot agent policy behavior. Define logging levels carefully: a low logging level may not record enough information to be useful; however, a high logging level may record verbose information at the cost of higher disk space.
Define logging levels when creating or editing an Agent Policy Set.
- From the Navigation Menu, select Manage > Agent Policy Sets.
- Perform one of the following procedures based on your context.
-
Under the Agent Logging section perform one of the following procedures based on your context.
- Move the slider to the desired logging level.
The following table describes each logging level. - Click Save.
- Finish any additional edits to the Agent Policy Set and click Save.
Logging level edits are not saved until the Agent Policy Set is saved.
|
Context |
Procedure |
|---|---|
|
If you are creating an agent policy set: |
Click Create. |
|
If you are editing an agent policy set: |
Click the edit icon associated with the policy set containing the logging level setting you want to edit. |
Either the Create an Agent Policy Set or the Edit a Policy Set dialog opens.
|
Context |
Procedure |
|---|---|
|
If you are defining the logging level for the first time: |
Click the Define button adjacent to the Logging level field. |
|
If you are modifying the logging level: |
Click the Modify button adjacent to the Logging level field. |
The Logging Level dialog opens.
|
Logging Level |
Description |
|---|---|
|
Trace |
Logs all errors and system actions. This highest level logging level should be used only when necessary, as it will consume a large amount of resources on the endpoint. |
|
Diagnostic |
Logs all errors and major system actions. |
|
Normal |
Logs all errors and basic system action and usage information. |
|
Error |
Logs only errors. |
|
Critical |
Logs only critical events. |
The Logging Level dialog closes. Your edits take effect the next time the Ivanti Endpoint Security server and the applicable agents communicate.
Defining Inventory Collection Options
Each Ivanti Endpoint Security agent compiles a list of hardware and software present on its host endpoint. However, you can control how detailed this inventory is; you can configure what hardware and software items the agent should scan for. Selecting fewer items from the list requires fewer system resources, but the resulting inventory is not as robust.
Perform this task from Select Inventory Collection dialog when editing or creating an agent policy set.
- From the Navigation Menu, select Manage > Agent Policy Sets.
- Perform one of the following procedures based on your context.
- Under the Patch Agent Communication section perform one of the following procedure based on your context.
- Select or clear the check boxes associated with the desired inventory collection options. The following table describes each option.
Selecting an option with child options automatically selects the child options as well.
- Click OK.
- Finish any desired edits in the agent policy set dialog and click Save.
Edits to the Inventory Collection Options are not saved until you click Save in the agent policy set dialog.
|
Context |
Procedure |
|---|---|
|
If you are creating an agent policy set: |
Click Create. |
|
If you are editing an agent policy set: |
Click the edit icon associated with the policy set containing the logging level setting you want to edit. |
Either the Create Agent Policy Set or the Edit a Policy Set dialog opens.
|
Context |
Procedure |
|---|---|
|
If you defining inventory collection options for the first time: |
Click the Define button adjacent to the Inventory Collection Options field. |
|
If you modifying inventory collection options: |
Click the Modify button adjacent to the Inventory Collection Options field. |
The Select Inventory Collection dialog opens.
|
Option |
Description |
|---|---|
|
Allow use of WMI during inventory collection |
Required if Windows Management Instrument (WMI) data will be gathered. |
|
Hardware |
Selects or clears all options grouped under Hardware. |
|
USB controllers |
Scans for data regarding USB device inventory (from HKEY_LOCAL_MACHINE\Enum\USB). |
|
IDE ATA/ATAPI controllers |
Scans for data regarding IDE ATA/ATAPI controllers. |
|
Other hardware devices |
Scans for system device data. |
|
Processors |
Scans for processor data. |
|
USB Storage Devices |
Scans for data regarding USB device inventory (from HKEY_LOCAL_MACHINE\Enum\USBSTOR). |
|
Network adapters and MAC address (may use WMI) |
Scans for data regarding network adapters. |
|
Physical RAM - amount |
Scans for the endpoint’s total physical RAM. |
|
System devices |
Scans the Windows registry for additional hardware information. |
|
Non-Plug and Play drivers |
Scans for data regarding non plug-and-play drivers. |
|
Locally attached drives, total, and free space |
Scans for data regarding the disk drives. |
|
USB devices |
Scans for data regarding USB controllers. |
|
BIOS information |
Scans for BIOS data. |
|
Sound, video, and game controllers |
Scans for data regarding sound, video, and game controllers. |
|
Services |
Scans for a listing of Windows services (not applicable for Windows 9x or ME). |
|
Software |
Scans for a listing of installed software. |
|
Other |
Selects or clears all child options grouped under Other. |
|
OS serial number (requires WMI) |
Scans for the OS serial number (requires WMI). |
|
Virtual Machines |
Scans to determine if the endpoint is a virtual machine. |
|
Endpoint serial number (requires WMI) |
Scans for the endpoint’s serial number (requires WMI). |
|
Endpoint manufacturer and model (may use WMI) |
Scans for the computer manufacturer and model. |
|
Endpoint asset tag (requires WMI) |
Scans for the endpoint’s asset tag (requires WMI). |
|
User - last logged on |
Scans for last logged in user and time. |
|
System uptime (may use WMI) |
Scans for and returns the time since last reboot (system uptime). |
|
Custom import from file (may use WMI) |
Scans for files containing custom inventory data. |
Your edits are saved. These edits take effect the next time Ivanti Endpoint Security and the applicable agents communicate.
Defining Agent Hours of Operation
Agent hours of operations determine when a patch agent is active on its host endpoint. In other words, this setting restricts agent operations to a specific time range. By applying a specific hours of operation setting, you can configure the agents to operate at optimal hours. For example, setting your agents to only work during the weekend will ensure bandwidth remains open during operation hours, helping to maintain worker efficiency. Optimal agent hours of operation vary by network.
Edit agent hours of operation when creating or editing an agent policy set.
- From the Navigation Menu, select Manage > Agent Policy Sets.
- Perform one of the following procedures based on your context.
- Under Patch Agent Communication perform one of the following procedure based on your context.
- Click time units to define agent hours of operation.
Green units indicate days and times of enablement, while red units indicate days and times of disablement.- Click All to toggle all Time units on or off.
- Click Day to toggle time units for a day on or off.
- Click Time units to toggle individual units on or off.
- Click OK.
- Finish any desired edits in the dialog and click Save.
Changes made to the Hours of Operation schedule will not be saved until you have clicked Save in the agent policy set dialog.
|
Context |
Procedure |
|---|---|
|
If you are creating an agent policy set: |
Click Create. |
|
If you are editing an agent policy set: |
Click the edit icon associated with the policy set containing the logging level setting you want to edit. |
Either the Create Agent Policy Set or the Edit a Policy Set dialog opens.
|
Context |
Procedure |
|---|---|
|
If you are creating an agent policy set: |
Click the Define button adjacent to the Hours of Operation field. |
|
If you are editing an agent policy set: |
Click the Modify button adjacent to the Hours of Operation field. |
The Edit Agent Hours of Operation dialog opens.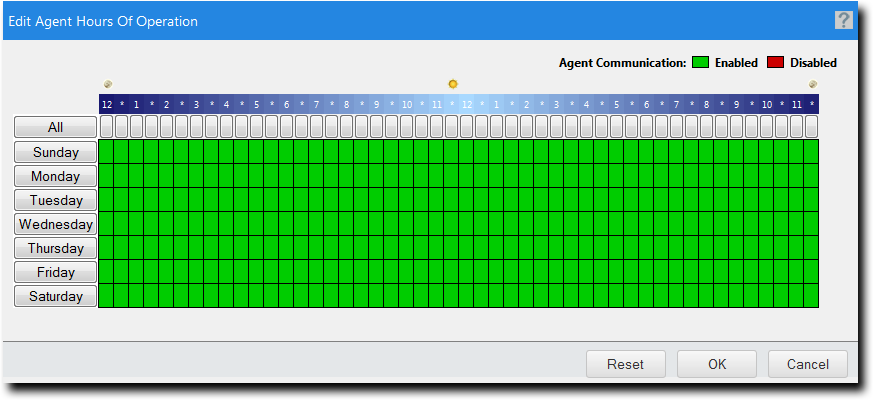
Your edits are saved. These edits take effect the next time Ivanti Endpoint Security and the applicable agents communicate.
The Edit FastPath Servers Dialog
Use this dialog to leverage caching proxies in your network, also known as FastPath Servers, to store content and reroute your server and agent communications.
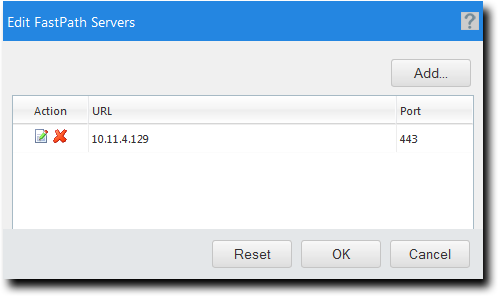
To access this dialog, click the Define/Modify next to Servers field within the Create/Edit A Policy Set dialog.
|
Column |
Description |
|---|---|
|
Action |
Contains action icons ( |
|
URL |
The URL of the FastPath server. |
|
Port |
The port number the FastPath server uses to route communication between the server and agents. |
The following table describes the buttons specific to the Create/Edit FastPath Servers dialog.
|
Button |
Description |
|---|---|
|
Add |
Opens the Add/Modify FastPath Server dialog. For additional information, refer to Adding/Editing FastPath Servers. |
About FastPath
In large networks, you can configuring caching proxies, or FastPath servers, to increase deployment speed and reroute server and agent communications.
This practice provides several benefits:
- Endpoints download deployment content from FastPath servers instead of your Ivanti Endpoint Security server. This action reduces bandwidth consumed during large deployments.
- You can assign FastPath servers to endpoints by applying policies to groups, rather than assigning them directly to the endpoint.
- You can assign fallback FastPath servers, in case the primary FastPath server fails.
Periodically, agents validate the FastPath servers you have assigned to a group. During this process, agents determine the FastPath server used by contacting each one. The FastPath server with the shortest path to the agent is used for deployments and communications.
Add FastPath servers and a FastPath communication interval to a policy by defining the FastPath Server policies.
Adding/Editing FastPath Servers
Use of FastPath servers, or caching proxies, optimizes communication routes between your server and agents.
You can add or edit FastPath servers from the Add/Modify FastPath Server dialog when creating or editing agent policy sets.
- From the Navigation Menu, select Manage > Agent Policy Sets.
- Perform one of the following procedures based on your context.
- Under FastPath Servers perform one of the following procedures based on context.
- Click Add.
If you want to edit existing FastPath server settings, click
for the server. - Define the FastPath server information.
Type the FastPath server information in the following fields. - If using a FastPath server that requires authentication, select the Authenticated check box and type the applicable information in the following fields.
Ivanti Endpoint Security validates the credentials that you enter. - Click OK.
The Add/Modify Fastpath Server dialog closes. - [Optional] Repeat the previous step to add another FastPath server.
Tip:
Ivanti recommends the following practices when assigning FastPath servers:
- Add the Ivanti Endpoint Security server itself as a FastPath server. This practice ensures that if all other FastPath servers cannot be validated, the agent can still communicate with the server.
- Because FastPath servers do not share cache directories with each other, do not add more than three servers per policy. Adding more servers negates bandwidth conservation.
- Assign FastPath servers to groups based on geographical location.
- Click OK to close the Edit FastPath Servers dialog.
- Finish any desired edits in the agent policy set dialog and click Save.
Added FastPath servers are not saved until its parent agent policy set is saved.
|
Context |
Procedure |
|---|---|
|
To create an agent policy set: |
Click Create. |
|
To edit an agent policy set: |
Click |
A dialog for creating or editing an agent policy set opens.
|
Context |
Procedure |
|---|---|
|
If adding FastPath servers for the first time: |
Click Define next to the Servers field. |
|
If modifying FastPath servers that have already been defined: |
Click Modify next to the Servers field. |
The Edit FastPath Servers dialog opens.
The Add/Modify Server dialog opens.
|
Field |
Description |
|---|---|
|
URL |
The FastPath server URL in the following format: http://<FastPathURL>. |
|
Port |
The FastPath server port number used to route server and agent communication. |
|
Field |
Description |
|---|---|
|
User Name |
A local or domain user account that authenticates with the FastPath server. |
|
Password |
The password for the user name. |
|
Confirm Password |
The password retyped. |
Your edits are saved. Your FastPath servers are validated immediately.
Deleting FastPath Servers
When you no longer want to use a FastPath server, delete its entry from the Edit FastPath Servers dialog.
Delete FastPath Servers from the Edit FastPath Servers dialog. You can delete FastPath servers when creating or editing an agent policy set.
- From the Navigation Menu, select Manage > Agent Policy Sets.
- Click the Edit icon associated with the agent policy set that contains the FastPath server you want to delete.
The Edit a Policy Set dialog opens. - Under FastPath Servers click the Modify button adjacent to the Servers field.
The Edit FastPath Servers dialog opens. - Click the Delete icon associated with the FastPath server you want to delete.
A dialog opens asking you to acknowledge the deletion. - Acknowledge the deletion by clicking OK.
The FastPath server is deleted.
Exporting Data for Agent Policy Sets
Click the toolbar Export button to export the list of Agent Policy Sets listed on the Agent Policy Sets page to a comma-separated value (.csv) file. Exporting data lets you work with data in other programs for reporting and analytical purposes.
Data for policy values are also exported. For additional information, refer to Exporting Data.
Assigning an Agent Policy Set to a Group
Assigning an Agent Policy Set to a group defines functional rules for the group.
Prerequisites:
Create an Agent Policy Set. Refer to Creating an Agent Policy Set (Groups Page) for details.
Assign Agent Policy Sets to groups from the Agent Policy Sets view.
Groups that do not have an associated Agent Policy Set assigned, use the Global System Policy. Refer to About Agent Policies and Agent Policy Sets for additional information.
- From the Navigation Menu, select Manage > Groups.
- From the View list, select Agent Policy Sets.
- Select a group from the directory tree.
You may select a group that is either in the Custom Groups or Systems Groups hierarchy.
- Click Assign.
The Select a Policy Set list becomes active. - Select an agent policy set from the Select a Policy Set list.
- Click the Save icon (
 ) to save your changes.
The Select a Policy Set list closes and your policy is assigned.The Cancel icon (
 ) cancels your changes and any edits are not saved.
The policy set is saved and associated with the group.
Unassigning an Agent Policy Set from a Group
When desired, you can unassign an Agent Policy Set from a group.
Prerequisites:
An Agent Policy Set is assigned. Refer to Assigning an Agent Policy Set to a Group for details.
Unassign the Agent Policy Sets to groups from the Agent Policy Sets view.
Groups that do not have an associated Agent Policy Set assigned, use the Global System Policy. Refer to About Agent Policies and Agent Policy Sets for additional information.
- From the Navigation Menu, select Manage > Groups.
- From the View list, select Agent Policy Sets.
- Select a group from the directory tree.
You may select a group that is either in the Custom Groups or Systems Groups hierarchy.
- Remove the desired policy sets. Use one of the following methods.
- Select the check boxes associated with the Agent Policy Sets you want to remove.
- From the toolbar, click the Unassign button.
- Click OK.
The selected policy set(s) are removed and the dialog closes.
|
Method |
Steps |
|---|---|
|
To remove one Agent Policy Set: |
Click the Unassign icon ( |
|
To remove multiple Agent Policy Sets: |
|
An Unassign Disabled icon indicates you cannot remove an inherited Agent Policy Set. Instead, you must change the group policy inheritance setting or remove the inherited policy set from the parent group. Refer to Policy Inheritance in Editing Group Settings for additional information.
A dialog appears, prompting you to acknowledge the removal.
The Agent Policy Set(s) are no longer associated with the group.