Installing Agents by Agent Management Job
You may install agents on network endpoints remotely using an Agent Management Job.
Prerequisites:
- Ivanti Endpoint Security is installed and initial replication has been completed. For details regarding installing Ivanti Endpoint Security, refer to the Ivanti Endpoint Security: Server Installation Guide.
- Ensure that your endpoint meets the minimum requirements for agent installation. For additional information, refer to Agent Requirements.
You cannot complete an Agent Management Job on Linux, UNIX, or Mac endpoints.
- You have gathered and confirmed the information and tasks in the Agent Management Job checklist. Refer to Agent Management Job Checklist for a description.
Configuration using an Agent Management Job is similar to configuration using the Discovery Scan Job. Configuration occurs using the Install Agents Wizard.
- Log in to Ivanti Endpoint Security.
For additional information, refer to Logging in in the Endpoint Security Help. - Begin configuration of the Install Agent Wizard.
Complete one of the following steps to begin configuration.Context
Steps
To open the Wizard without targets predefined:
Select Discover > Assets and Install Agents.
To open the Wizard with target predefined:
Select Manage > Endpoints.
Select the endpoints you want to install the agent on.
From the toolbar, select Manage Agents > Install Agents.

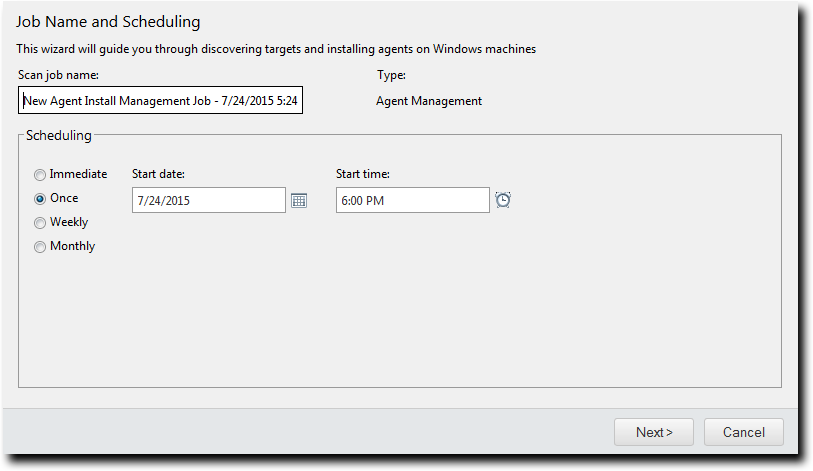
The wizard opens to the Job Name and Scheduling page. - [Optional] Type a new name in the Scan job name field.
By default, a new Agent Management Job for installation is named New Agent Install Management Job, followed by the server's date and time.
- Schedule the job, using one of the following methods.
- Click the Calender icon to select a Start date. Selecting a date automatically fills the Start date field.
- Click the Clock icon to select a Start time. Selecting a time automatically fills the Start time field.
Tip: During job scheduling, you can use the following shortcuts:
- Ensure the Once option is selected.
- Define a start date by typing a date in the Start date field.
- Define a start time by typing a time in the Start time field.
- Select the Weekly option.
- Define a start date by typing a date in the Start date field.
- Define a start time by typing a time in the Start time field.
- Define the day of the week the job runs by selecting a day from the Run every week on the following day list.
- Select the Monthly option.
- Define a start date by typing a date in the Start date field.
- Define a start time by typing a time in the Start time field.
- Define the day of the month the job runs by selecting a day from the Run every month on the following day list.
- Click Next.
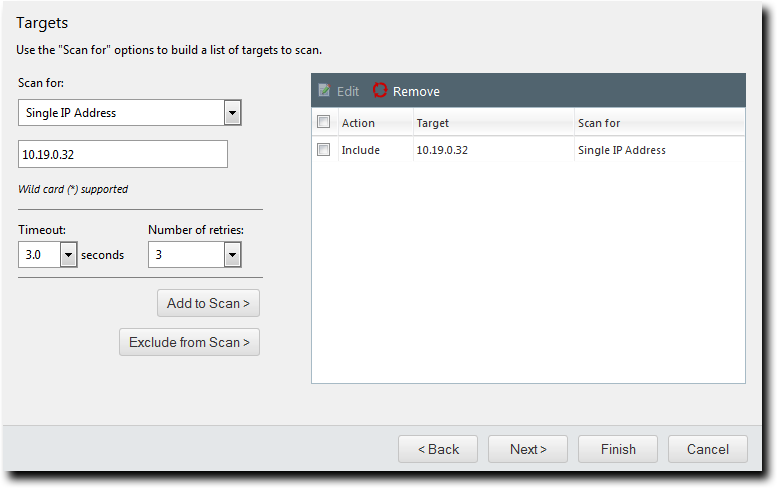
The Targets page opens.
- Define targets (endpoints) for the job to locate.
Select one or more of the following discovery methods to build a list of targets to scan. - From the Scan for list, select Single IP Address.
- Type an IP address in the empty field. Wildcards are supported.
For additional information refer to Defining Targets Using Wildcards.
- Select an item in the Timeout list.
The Timeout list item defines the number of seconds per attempt before a scan fails due to inactivity for a particular target. Under most network conditions, the Timeout list item does not require editing.
- Edit the Number of retries list.
The Number of retries list defines the number of times a scan retries on that target if the scan times out.
- From the Scan for list, select IP Range.
- In the first empty field, type the beginning of IP range.
Wildcards are supported. For additional information refer to Defining Targets Using Wildcards.
- In the second empty field, type the ending of the IP range.
-
Select an item in the Timeout list.
The Timeout list item defines the number of seconds per attempt before a scan fails due to inactivity for a particular target. Under most network conditions, the Timeout list item does not require editing.
- Edit the Number of retries list.
The Number of retries list defines the number of times a scan retries on that target if the scan times out.
- From the Scan for list, select Computer name.
- In the empty field, type an endpoint name in one of the following formats: computername or domain\computername.
- From the Scan for list, select Network Neighborhood.
- From the second list, select the desired network neighborhood.
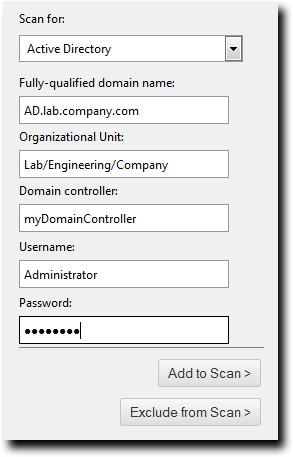
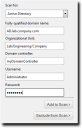
- From the Scan for list, select Active Directory.
- In the Fully-qualified domain name field, type the DNS domain name of the domain controller you want to scan.
For example, if your domain controller DNS name is box.domain.company.local, you would type domain.company.local in this field
- Optionally, in the Organizational Unit field, type the active directory organizational unit string from specific to broad, separating each string with front slashes (such as Techpubs/ Engineering/Corporate).
The omission of this field returns job results containing the full contents of all the active directory organizational units. View the following figure for an example of how to enter data using Active Directory.
-
In the Domain controller field, type the domain controller IP address.
- In the Username field, type a user name that authenticates with the domain controller.
Type the user name in one of the following format: domainname\username or username.
- In the Password field, type the password associated with the user name
- From the Scan for list, select Import file.
- Click Browse.
- Browse to the file you want to use for target discovery.
The following file types are supported: .txt and .csv.
- Click Open.
Refer to Defining Targets Within an Imported File for additional information on file types.
- Add targets to the wizard list. This list indicates whether defined targets are included in or excluded from the job.
Use one of the following methods.You must include at least one target for Next to become available. You can also delete targets from the list by selecting the applicable check boxes and clicking Remove.
- To include defined targets in the job, click Add to Scan.
- To exclude defined targets in the job, click Exclude from Scan.
- [Optional] Edit the Targets list.
- To remove targets from the list, select the list item(s) and click Remove.
- To edit targets on the list, select the list item(s) and click Edit.
For additional information on editing, refer to Editing Targets.
- Click Next.
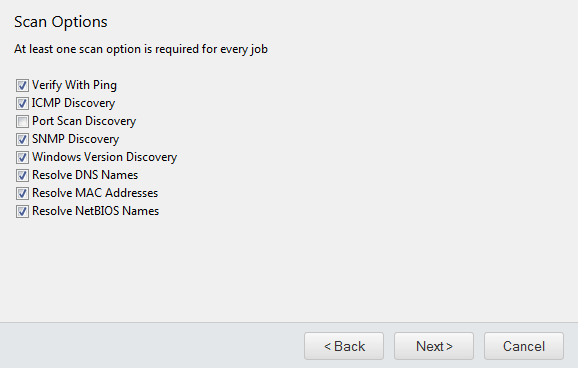
The Scan Options page opens.
- Select or clear the desired Scan Options.
The following table defines each Scan Option. - Click Next.
The Agent Options page opens. - Select the desired Agent Options.
These options control which version of the agent is installed on Windows-based endpoints.
- Select an agent version from the Agent version list.
The agent versions available for selection are defined by the Agent Version Options, which you can edit from the Options page Agents tab within the Ivanti Endpoint Security Web console. For additional information, refer to the Agents Tab section in the Endpoint Security Help.
- Select the modules you want to install with the agent.
Select the check boxes associated with the modules you want to install. - [Optional] Select the Overwrite existing agents check box.
This option reinstalls the agent on endpoints.Attention: Selecting this option will cause data loss when an endpoint's Ivanti Endpoint Security Agent is overwritten. However, you may select Agent Versions on the Manage Endpoints page to upgrade agents without losing data. Refer to Upgrading Agents From the Web Console for details.
- Click Next.
If a dialog opens that notifies you that an endpoint reboot is required following agent installation, click Continue to dismiss the dialog.
- Define Windows credentials for the target.
Type the applicable information in the following fields.When configuring an Agent Management Job, you must define valid Windows credentials.
- Click Next.
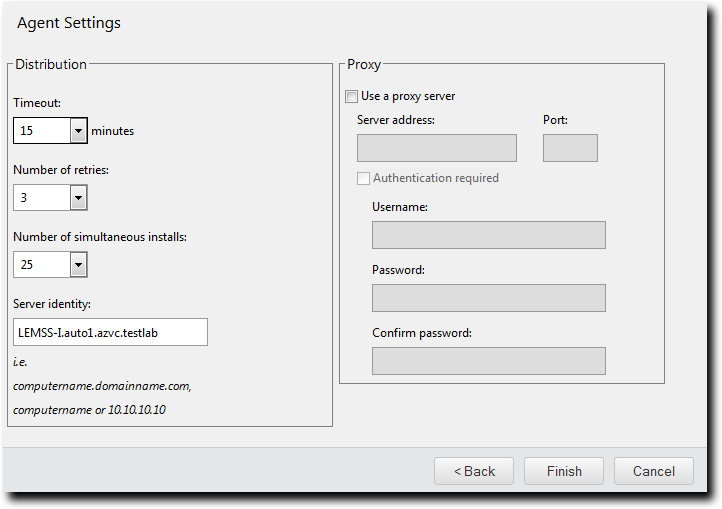
The Agent Settings page opens.
- Define the Distribution options.
The following table describes each list their available values. - Define the Ivanti Endpoint Security server that the agent will report to using the Server Identity field.
Define the Server identity using one of the following formats.- DNS name (computername.domainname.com)
- Computer name (computername)
- IP address (10.10.10.10)
Tip: The wizard fills this field with the server computername by default.
- If the target endpoints will communicate with the Ivanti Endpoint Security server through a proxy server following initial agent installation, select the Use a proxy server check box and define the following fields.
In many network environments, although a proxy is used for Internet access, a proxy bypass is used for all access within the corporate network. Therefore, only enter proxy information if your agents will be required to use a proxy to access your Ivanti Endpoint Security server.
- Server address: the applicable proxy IP address
- Port: the applicable proxy port number used to communicate
- If the target endpoints will use a proxy for agent to server communication, and that proxy requires authentication, select the Authentication required check box and define the following fields:
- Username: a user name that authenticates with the proxy
- Password: the password associated with the Username
- Confirm Password: the Password retyped
- Click Finish.
The Install Agents Wizard closes. Depending on how you configured the job, it moves to either the Scheduled tab or Active tab on the Job Results page. The job will run at the applicable time, installing agents on the defined targets, and move to Completed tab when finished.After the Agent Management Job completes, install agent modules. For additional information, refer to Managing Endpoint Modules in the Endpoint Security Help.
|
Method |
Steps |
|---|---|
|
To schedule an immediate job: |
Select the Immediate option. |
|
To schedule a one-time job: |
Type the date in a mm/dd/yyyy format. Type the time in hh:mm format followed by AM or PM (if necessary). This field supports both 12- and 24-hour time. Tip: Scheduling a one-time job for a past date and time will launch the job immediately. |
|
To schedule a recurring weekly job: |
Type the date in a mm/dd/yyyy format. Type the time in hh:mm format followed by AM or PM (if necessary). This field supports both 12- and 24-hour time. |
|
To schedule a recurring monthly job: |
Type the date in a mm/dd/yyyy format. Type the time in hh:mm format followed by AM or PM (if necessary). This field supports both 12- and 24-hour time. |
Tip: One-time and recurring jobs scheduled for the last day of a 31-day month are automatically rescheduled for the last day of shorter months.
|
Method |
Steps |
|---|---|
|
To define targets using a single IP address: |
|
|
To define targets using an IP range: |
|
|
To define targets using a computer name: |
|
|
To define targets using network neighborhood: |
|
|
To define targets using active directory: |
|
|
To define targets using an imported file: |
|
Tip: Repeat this step to add additional targets to the list.
|
Option |
Description |
|---|---|
| Verify With Ping |
Jobs using this option send ping requests to all network endpoints targeted for discovery. Endpoints that respond to the request are flagged for scanning; unresponsive endpoints are skipped. Endpoints unresponsive to Verify With Ping are not scanned by other selected discovery options. Anti-virus software and host firewalls may block Verify With Ping. If necessary, adjust any antivirus and firewall configurations to permit ping requests. |
| ICMP Discovery |
Jobs using this option request a series of echoes, information, and address masks from endpoints. Endpoint responses are then compared to a list of known ICMP fingerprints to identify endpoint operating systems. ICMP Discovery is ineffective on endpoints configured to ignore ICMP requests. For best results identifying Windows operating systems, use this option in conjunction with Windows Version Discovery. |
| Port Scan Discovery |
Jobs using this option perform a limited scan on endpoint FTP, Telnet, SSH, SMTP, and HTTP ports. Based on the application banners found in these ports, endpoint operating systems are generically identified. For best results in identifying Windows operating systems, use this option in conjunction with Windows Version Discovery. |
| SNMP Discovery |
Jobs using this option request system properties for SNMP devices (routers, printers, and so on) from the management information base. Following credential authentication, SNMP devices are identified. Without authenticated credentials, SNMP devices ignore SNMP Discovery requests. In this event, one of two outcomes occur: the SNMP device is misidentified as a UNIX endpoint or the SNMP device is not detected. Jobs with no SNMP credentials use the public credential by default. |
| Windows Version Discovery |
Jobs using this option identify an endpoint's specific version of Windows following generic operating system identification during ICMP or Port Scan Discovery. Correct operating system identification is contingent upon authenticated credentials. This option must be used in conjunction with either ICMP or Port Scan Discovery. |
| Resolve DNS Names |
Jobs using this option acquire the endpoint DNS name through a local DNS server query. These names are displayed in job results for easy endpoint identification. |
| Resolve MAC Addresses |
Jobs using this option acquire endpoint MAC addresses through endpoint queries. These addresses are displayed in job results for easy endpoint identification. Monitor network inventory reports to prevent MAC address spoofing that may alter the Resolve MAC Addresses results. |
| Resolve NetBIOS Names |
Jobs using this option acquire endpoint NetBIOS names through WINS NetBIOS mapping. These names are displayed in job results for easy endpoint identification. |
The Credentials page opens.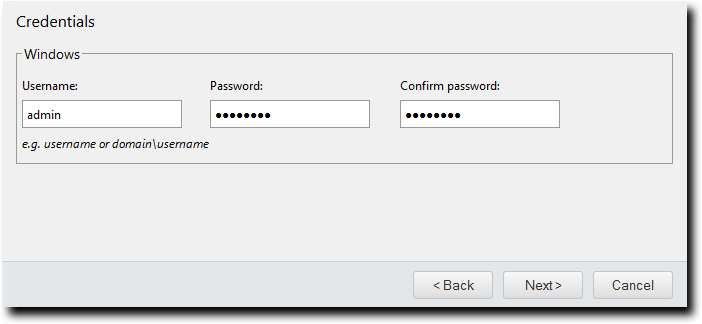
|
Field |
Description |
|---|---|
|
Username |
A user name that authenticates with Windows-based endpoints. Type the user name in a local format (UserName) or a domain format (DOMAIN\UserName). When configuring Agent Management Jobs, Ivanti recommends using the built-in Administrator account. |
|
Password |
The password associated with the Username. |
| Confirm password |
The Password retyped. |
|
List |
Description |
|---|---|
| Timeout (list) |
Defines the number of minutes before the Agent Management Job terminates an install attempt due to a non-responsive agent installation or removal (0-30). |
| Number of retries (list) |
Defines the number of attempts an agent installation or removal will retry if the initial attempt fails (1-10). |
| Number of simultaneous installs (list) |
Defines the maximum number of agents that can installed or removed simultaneously during the job (1-25). A value of 1 indicates that serial installs or removals should occur. |
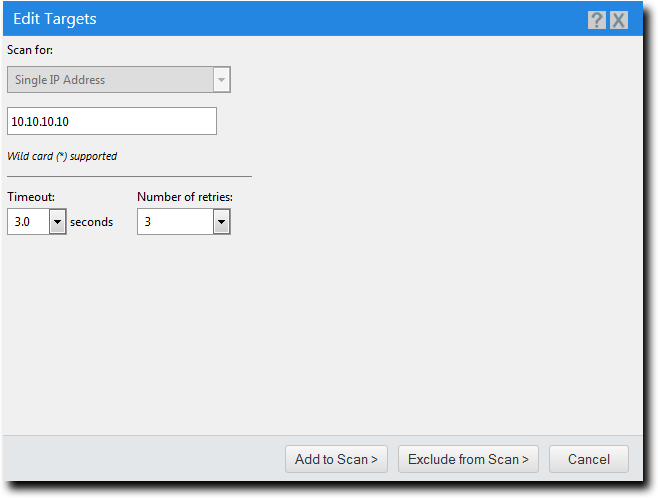
Editing Targets
While configuring jobs, you can edit items included in the Targets list in the Install Agents Wizard.
Edit Target list items from the Targets page of the wizard.
- From the Targets list, select the check box associated with the item you want to edit.
The Edit button becomes active. - Click Edit.
The Edit Targets dialog opens.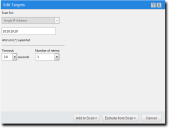
- Based on the type of discovery method, edit the item.
- Type a new IP address in the field. Wildcards are supported. For additional information, refer to Defining Targets Using Wildcards.
- If necessary, edit the Timeout list.
The Timeout list defines the number of seconds before a scan fails due to inactivity. Under most network conditions, the Timeout field does not require editing. - If necessary, edit the Number of retries list.
The Number of retries list defines the number of times a discover assets scan retries if the scan times out. - In the field, type the beginning of IP range. Wildcards are supported. For additional information, refer to Defining Targets Using Wildcards.
- In the field, type the ending of the IP range.
- If necessary, edit the Timeout list.
The Timeout list defines the number of seconds before a scan fails due to inactivity. Under most network conditions, the Timeout field does not require editing. - If necessary, edit the Number of retries list.
The Number of retries list defines the number of times a discover assets scan retries if the scan times out. - In the Fully-qualified domain name field, type the DNS domain name of the domain controller you want to scan. For example, if your domain controller's DNS name was box.domain.company.local, you would type domain.company.local in this field.
- Optionally, in the Organizational Unit field, type the active directory organizational unit string from specific to broad, separating each string with front slashes (such as Techpubs/ Engineering/Corporate). The omission of this field returns job results containing the full contents of all the active directory organizational units. View the following figure for an example of how to enter data using Active Directory.
- In the Domain controller field, type the domain controller's IP address.
- In the Username field, type user name that will authenticate with the domain controller. Type the user name in one of the following formats: domainname\username or username.
- In the Password field, type the password associated with the user name.
- Add targets to the wizard list. This list indicates whether defined targets are included in or excluded from the job.
Use one of the following methods:- To include defined targets in the job, click Add to Scan
- To exclude defined targets in the job, click Exclude from Scan
- Review the Targets list.
The Targets list reflects your changes.
|
Discovery Method |
Steps |
|---|---|
|
Single IP Address |
|
|
IP Range |
|
|
Computer Name |
In the empty field, type a new endpoint name in one of the following formats: endpointname or domain\endpointname. |
|
Network Neighborhood |
From list, select the desired network neighborhood. |
|
Active Directory |
|
Defining Targets Using Wildcards
When configuring a Discovery Scan Job or Agent Management Job, you can define scan targets using wildcard IP addresses. Wildcards are characters that can be used to substitute for any other character or characters in a string. In other words, you can use wildcards to scan for numerous IP address instead of just one. Use wildcards to scan specific IP address ranges.
The following table lists examples of how to define targets using wildcards.
|
Discovery Method |
Step |
Example |
Targets Defined |
|---|---|---|---|
|
To define wildcard IP addresses: |
Type a wildcard IP address using commas (,). Type a wildcard IP address using dashes (-). Type a wildcard IP address using asterisks (*). |
10.1.1.2,9 10.1.1.2-5 10.1.1.* |
10.1.1.2 and 10.1.1.9 10.1.1.2, 10.1.1.3, 10.1.1.4, and 10.1.1.5 10.1.1.0 through 10.1.1.255 |
|
To define wildcard IP addresses using dashes in various octets: |
Type a wildcard IP address using dashes, placing the dashes where applicable. You can use dashes in any octet. |
10.2-4.5.9 |
10.2.5.9, 10.3.5.9, 10.4.5.9 |
|
To define wildcard IP addresses using asterisks in various octets: |
Type a wildcard IP address using asterisks, placing the asterisks where applicable. You can use asterisks in any octet. |
*.6.65.92 10.25.*.* |
1.6.65.92 through 255.6.65.92 10.25.0.0 through 10.25.255.255 |
|
To define wildcard IP addresses using commas in various octets: |
Type a wildcard IP address using commas, placing the commas where applicable. You can use commas in any octet. |
10,12,19.2.5.9 |
10.2.5.9, 12.2.5.9, 19.2.5.9 |
|
To define wildcard IP addresses using a combination of wildcard characters: |
Type a wildcard IP address using dashes, commas, and asterisks. |
10-13.*.12.2,4,7 10.2-4.5,23.* |
10, 11, 12, 13.0-255.12.2, 4, 7 10.2, 3, 4.5, 23.0-255 |
Defining Targets Within an Imported File
Using imported files, you can define job targets using a combination of single IP addresses, wildcard IP addresses, IP ranges, DNS names, NetBIOS names, and so on. To create a file containing targets, open a text editor that allows you to create .txt or .csv (like Notepad). This topic also explains how to use wildcards for any job type.
Using the Install Agents Wizard within an Agent Management Job you may define targets using an imported file.
The following table lists the methods you can use to define discovery methods within an importable file type, and then follows those methods with examples. Use one method per line.
Basic use
|
Discovery Method |
Step |
Example |
Targets Defined |
|---|---|---|---|
|
To define single IP addresses: |
Type a single address. |
10.1.1.2 |
10.1.1.2 |
|
To define wildcard IP addresses: |
Type a wildcard IP address using commas (,). Type a wildcard IP address using dashes (-). Type a wildcard IP address using asterisks (*). |
10.1.1.2,9 10.1.1.2-5 10.1.1.* |
10.1.1.2 and 10.1.1.9 10.1.1.2, 10.1.1.3, 10.1.1.4, and 10.1.1.5 10.1.1.0 through 10.1.1.255 |
|
To define IP ranges: |
Type two IP addresses separated by a greater-than sign (>). Type two IP addresses separated by a dash (-). |
10.1.1.2 > 10.1.1.9 10.1.1.2 - 10.1.1.9 |
10.1.1.2 through 10.1.1.9 10.1.1.2 through 10.1.1.9 |
|
To define DNS names: |
Type a DNS host name for an endpoint. |
DNS.dom.com |
The defined DNS name. |
|
To define NetBIOS names: |
Type a NetBIOS name for an endpoint. |
NetBIOSname |
The defined NetBIOS name. |
Advanced Use
|
Discovery Method |
Steps |
Examples |
Targets Defined |
|---|---|---|---|
|
To define wildcard IP addresses using dashes in various octets: |
Type a wildcard IP address using dashes, placing the dashes where applicable. You can use dashes in the first, second, and last octet. |
10.2-4.5.9 |
10.2.5.9, 10.3.5.9, 10.4.5.9 |
|
To define wildcard IP addresses using asterisks in various octets: |
Type a wildcard IP address using asterisks, placing the asterisks where applicable. You can use asterisks in any octet. |
*.6.65.92 10.25.*.* |
1.6.65.92 through 255.6.65.92 10.35.0.0 through 10.35.255.255 |
|
To define wildcard IP addresses using commas in various octets: |
Type a wildcard IP address using commas, placing the commas where applicable. You can use commas in first, second, and last octet. |
10,12,19.2.5.9 |
10.2.5.9, 12.2.5.9, 19.2.5.9 |
|
To define wildcard IP addresses using a combination of wildcard characters: |
Type a wildcard IP address using dashes, commas, and asterisks. You can use the dash and comma wildcards in the first, second, and lost octets. The asterick can be used in all octets. |
10-13.*.12.2,4,7 10.2-4.5,23.* |
10, 11, 12, 13.0-255.12.2, 4, 7 10.2, 3, 4.5, 23.0-255 |