Working with Local Authorization
Local Authorization is a trust mechanism that allows a specified user to temporarily or permanently authorize an application that is not currently on a whitelist or permitted by another trust mechanism.
In Ivanti Application Control, an authorized application is either on a whitelist or is permitted by a trust mechanism, while a denied application is on the blacklist. A non-authorized application is one that is neither authorized nor denied.
An application that is neither authorized or denied (by being put on the blacklist) is sometimes said to be on the graylist.
An end user may need to run a non-authorized application. If the Ivanti Endpoint Security administrator trusts the end user's abilities, the administrator can assign a Local Authorization policy to that user.
This enables the user to run non-authorized applications when needed. This can greatly reduce the administrative workload.
Local Authorization in Practice
Local Authorization is different from other Application Control policies in that it delegates the responsibility to run non-authorized files to selected end users.
With other Application Control policies, the Ivanti Endpoint Security administrator decides which applications are authorized and which are blocked. When an end user is assigned a Local Authorization policy, however, that user has the option of temporarily or permanently authorizing a non-authorized application.
The administrator should be careful when assigning a Local Authorization policy to an end user because of the power being delegated. But an experienced end-user may have a better knowledge of the applications that are available for use. Responsible use of Local Authorization provides benefits for both the end user and the administrator.
Local Authorization for the End User
An end user assigned a Local Authorization policy can interact with the system to authorize or deny non-authorized applications.
When the end-user user attempts to execute a non-authorized application, Ivanti Application Control displays a dialog which indicates that the application is non-authorized and presents several options to the user.
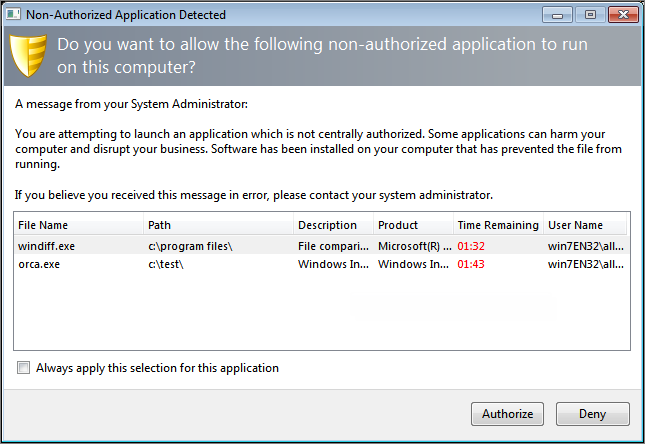
The Non-Authorized Application Detected dialog displays the details of the non-authorized file, including its name, path, description, and the product it is a part of. These details help the end user decide whether to authorize the application file or to deny it.
The user is allowed two minutes to decide whether to authorize or deny the file. The time counts down in the Time Remaining column. If the time runs out, the application file is denied permission to run.
The user can apply the authorize/deny decision permanently by selecting the Always apply this selection for this application check box. Leaving the check box deselected means that a decision has to be made each time the non-authorized file attempts to execute.
More than one executable file can be displayed in the dialog simultaneously. For example, an application's initial executable could be followed by associated DLLs. The end user can make a decision on each file.
In Windows 8, applications can be launched from the Modern interface or from the Desktop. The Local Authorization dialog can only be displayed on the Desktop, however. If a user who is assigned a Local Authorization policy tries to launch an unauthorized application from the Modern interface, that user will not see the Local Authorization dialog unless he or she switches to the Desktop.
Local Authorization and Easy Auditor
Easy Auditor normally allows non-authorized applications to run on an endpoint. If Local Authorization is also applied, however, the user has to explicitly authorize such applications to run.
When Easy Auditor is applied to an endpoint, a user can launch and run an application that is not authorized. This happens transparently to the user (although the event will be logged if logging is enabled).
If a Local Authorization policy is then applied to that endpoint, however, the behavior changes. When the user tries to launch a non-authorized application, Ivanti Application Control displays the Non- Authorized Application Detected dialog. The user must click Authorize to run the application.
If the application file is not authorized within two minutes it times out and is denied permission to run. But if the user launches the application again, the dialog will reopen and it can be authorized at that point.
Creating a Local Authorization Policy
A Local Authorization policy can specify one or more users that are allowed to run non-authorized applications on specific endpoints or endpoint groups.
This type of policy links specific users with specific endpoints. This means that a specified user can only run non-authorized applications when logged in to a specified endpoint.
- Select Manage > Application Control Policies.
- Click the Trusted Change tab.
- Click Create > Local Authorization.
The Local Authorization Policy Wizard opens.
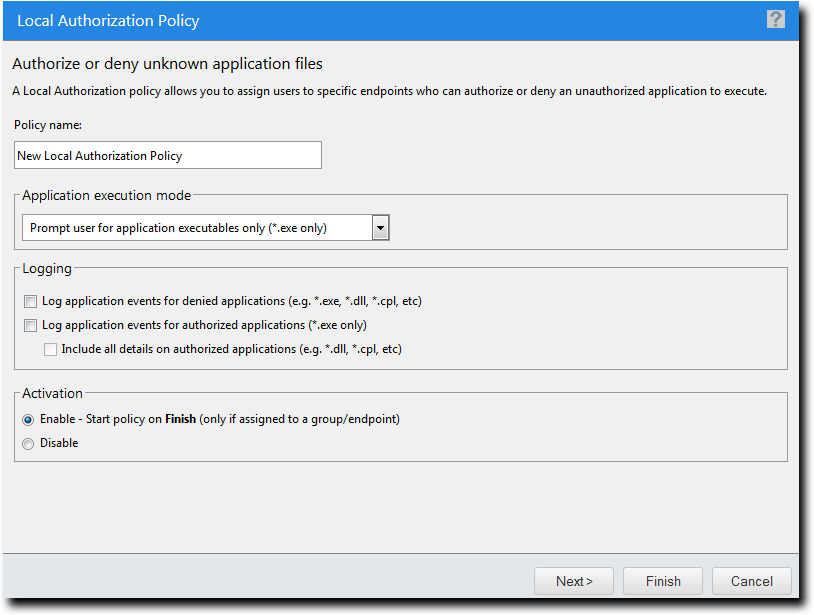
- Type a name for the new policy in the Policy Name field.
- Select the Application execution mode.
- Select the Logging options.
- Select an option under Activation.
- Click Next to assign the policy to users and endpoints.
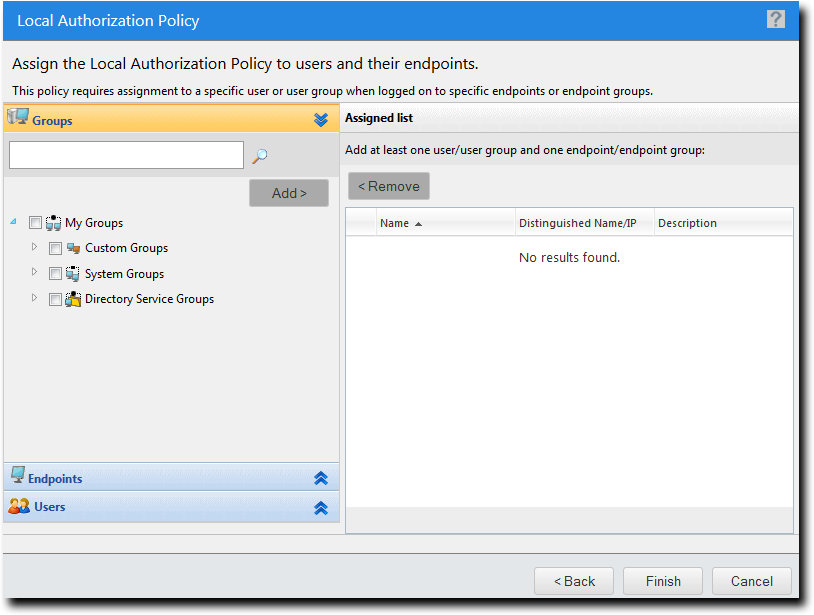
- The policy must be assigned to at least one endpoint or endpoint group. Assign the policy to endpoints:
- Select a group or groups from the Groups list.
- Click Add >.
- Select an endpoint or endpoints from the Endpoints list.
- Click Add >.
- Select a group or groups from the Assigned list.
- Click < Remove.
- Select an endpoint or endpoints from the Assigned list.
- Click < Remove.
- The policy must be assigned to at least one user or user group. Assign the policy to users:
- Select one or more users from the Users list.
- Click Add >.
- Select one or more users from the Assigned list.
- Click < Remove.
- Click Finish.
The Local Authorization policy is created and assigned to a combination of user(s) and endpoint(s).
Give the policy a descriptive name. For example, if this Local Authorization policy relates to the IT Support group, you could name it IT Support.
|
Option |
Description |
|---|---|
|
Prompt user for application executables only (*.exe only) |
The user is only asked to authorize the application's initial executable. |
|
Prompt user for all application file types (*.exe, *.dlls, *.cpls, etc) |
The user is asked to authorize all the application's executable file types. Important: Selecting this option may cause a large number of prompts to be presented to the user when installing certain applications. Due to this impact, you should use this setting with caution. |
An authorized application is one that is authorized by the end user and a denied application is one that is denied by the end-user, when prompted.
|
Option |
Description |
|---|---|
|
Log application events for denied applications (e.g. *.exe, *.dll, *.cpl, etc.) |
Log attempts to run the application denied by the end user. This includes details of all the application's executable file types, not just the original executable (*.exe). |
|
Log application events for authorized applications (*.exe only) |
Log running of the application authorized by the end user. Only the initial executable (*.exe) is logged. Use the Include all details option below to log subsequent executable files or dependent libraries loaded by the initial executable. |
|
Include all details on applications (e.g. *.dll, *.cpl, etc.) |
Detailed information on the granted application is logged (including every executable file and library loaded). This option is only available if the Log application events for authorized applications option is selected. |
To create a log query and view the log results refer to Using Application Control Log Queries.
These logging options can affect other Application Control policies. See Logging Managed Policies for more information.
|
Option |
Description |
|---|---|
|
Enable |
The policy will be enabled once it is created, as long as you assign it to a group or endpoint. |
|
Disable |
The policy will be disabled once created, even if it is assigned to a group or endpoint. You can enable it at a later time. |
If you click Finish at this point, the policy will be created but will not have any assignment.
The Local Authorization Policy Wizard opens to the Assign Local Authorization policy to groups, endpoints and/or users page.
|
Method |
Steps |
|---|---|
|
To add groups of endpoints: |
|
|
To add individual endpoints: |
|
|
To remove groups of endpoints: |
|
|
To remove individual endpoints: |
|
Use the double-arrows (![]()
![]() ) to switch between groups and endpoints.
) to switch between groups and endpoints.
The selected groups and/or endpoints are displayed in the Assigned list.
|
Method |
Steps |
|---|---|
|
To add users: |
If you cannot locate a specific user, click the Add Individual User button. See Adding an Individual User to a Policy for more information. |
|
To remove users: |
|
Important: Both a user/user group AND an endpoint/endpoint group must be assigned.
The selected users are displayed in the Assigned list.
Some applications will not install or run unless they are assigned to the Local System and Network Service accounts, in addition to the required user or user group.
Assigning a Local Authorization Policy
You can select a Local Authorization policy and assign it to endpoints/endpoint groups and users/user groups.
- Select Manage > Application Control Policies.
- Click the Trusted Change tab.
- Select a Local Authorization policy.
- Click Assign.
The Local Authorization dialog is displayed. - The policy must be assigned to at least one endpoint or endpoint group. Assign the policy to endpoints:
- Select a group or groups from the Groups list.
- Click Add >.
- Select an endpoint or endpoints from the Endpoints list.
- Click Add >.
- Select a group or groups from the Assigned list.
- Click < Remove.
- Select an endpoint or endpoints from the Assigned list.
- Click < Remove.
- The policy must be assigned to at least one user or user group. Assign the policy to users:
- Select one or more users from the Users list.
- Click Add >.
- Select one or more users from the Assigned list.
- Click < Remove.
- Click OK.
The Local Authorization policy is assigned to endpoints/endpoint groups and users/user groups.
Filter the Policy Name and Policy Type columns to locate the policy.
The selected policy is highlighted.
|
Method |
Steps |
|---|---|
|
To add groups of endpoints: |
|
|
To add individual endpoints: |
|
|
To remove groups of endpoints: |
|
|
To remove individual endpoints: |
|
Use the double-arrows (![]()
![]() ) to switch between groups and endpoints.
) to switch between groups and endpoints.
The selected groups and/or endpoints are displayed in the Assigned list.
|
Method |
Steps |
|---|---|
|
To add users: |
If you cannot locate a specific user, click the Add Individual User button. See Adding an Individual User to a Policy for more information. |
|
To remove users: |
|
Important: Both a user/user group AND an endpoint/endpoint group must be assigned.
The selected users are displayed in the Assigned list.
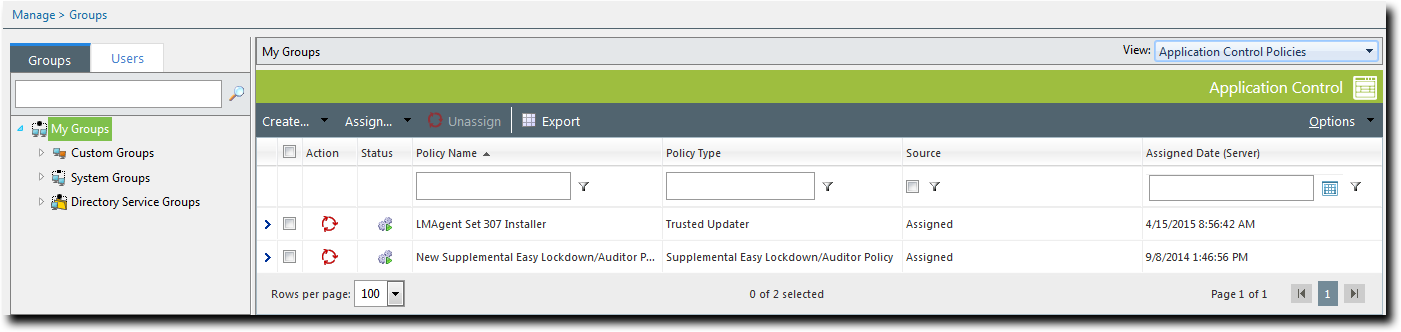
Assigning a Local Authorization Policy to a Group
You can assign a Local Authorization policy to a group of endpoints using the Assign Policy dialog.
The Assign Policy dialog is also used to assign a Local Authorization policy to a selected endpoint. See Assigning a Local Authorization Policy to an Endpoint if you are assigning the policy to an endpoint.
- Select Manage > Groups.
The Groups page is displayed. - Select a group from the Browser tree.
- From the View list, select Application Control Policies.
The Application Control policies for the selected group are displayed.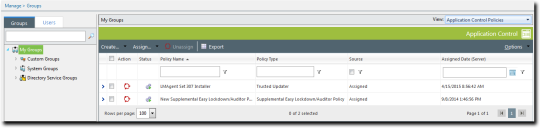
- From the toolbar, select Assign > Local Authorization.
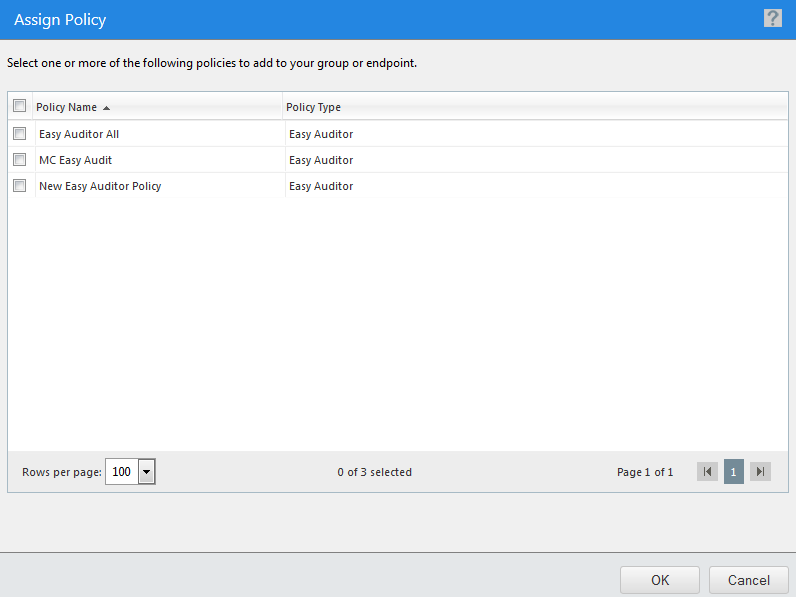
The Assign Policy dialog is displayed.
- Select one or more Local Authorization policies.
- Click OK.
One or more Local Authorization policies are assigned to the group.
Inherited policies can not be selected. In addition, the Source column reads Inherited.
The purpose of a Local Authorization policy is to enable one or more specified users to temporarily authorize files and applications on a locked-down endpoint. You should ensure that the policy you are assigning to the group is already assigned to the relevant user(s).6.
Assigning a Local Authorization Policy to an Endpoint
You can assign a Local Authorization policy to a selected endpoint.
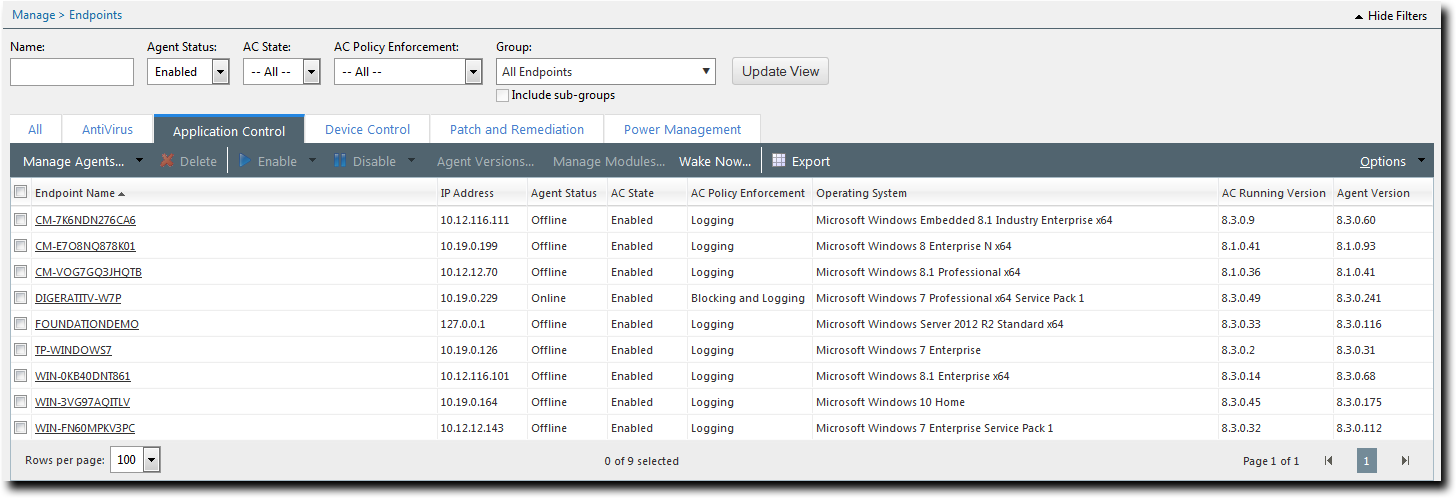
- Select Manage > Endpoints.
The Endpoints page opens to the All tab. - In the Endpoint Name column, click an endpoint link.
Detailed information for the selected endpoint is displayed. - Select the Application Control Policies tab.
A list of Application Control policies assigned to the endpoint is displayed.
- From the toolbar, select Assign > Local Authorization.
The Assign Policy dialog is displayed. - Select one or more Local Authorization policies.
- Click OK.
One or more Local Authorization policies are assigned to the endpoint.
The purpose of a Local Authorization policy is to enable one or more specified users to temporarily authorize files and applications on a locked-down endpoint. You should ensure that the policy you are assigning to the endpoint is already assigned to the relevant user(s).
Editing a Local Authorization Policy
You can edit a Local Authorization policy. For example, you may want to add or remove users, or change the endpoints it is assigned to.
- Select Manage > Application Control Policies.
- Click the Trusted Change tab.
- Select a Local Authorization policy.
- Click Edit.
The Local Authorization Policy Wizard opens. - [Optional] Edit the Policy Name
- [Optional] Change the Application execution mode.
-
[Optional] Change the Logging options.
- [Optional] Select an option under Activation.
- [Optional] Click Next to change the user and endpoint assignment.
The Local Authorization Policy Wizard opens to the Assign Local Authorization policy to groups, endpoints and/or users page.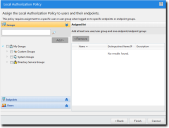
- The policy must be assigned to at least one endpoint or endpoint group. Assign the policy to endpoints:
- Select a group or groups from the Groups list.
- Click Add >.
- Select an endpoint or endpoints from the Endpoints list.
- Click Add >.
- Select a group or groups from the Assigned list.
- Click < Remove.
- Select an endpoint or endpoints from the Assigned list.
- Click < Remove.
- The policy must be assigned to at least one user or user group. Assign the policy to users:
- Select one or more users from the Users list.
- Click Add >.
- Select one or more users from the Assigned list.
- Click < Remove.
- Click Finish.
The Local Authorization policy has been edited.
Filter the Policy Name and Policy Type columns to locate the policy.
The selected policy is highlighted.
|
Option |
Description |
|---|---|
|
Prompt user for application executables only (*.exe only) |
The user is only asked to authorize the application's initial executable. |
|
Prompt user for all application file types (*.exe, *.dlls, *.cpls, etc) |
The user is asked to authorize all the application's executable file types. Important: Selecting this option may cause a large number of prompts to be presented to the user when installing certain applications. Due to this impact, you should use this setting with caution. |
An authorized application is one that is authorized by the end-user and a denied application is one that is denied by the end-user, when prompted.
| Option | Descrition |
|---|---|
|
Log application events for denied applications (*.exe) |
Log the denial of an application by the user. This includes details of all the application's executable file types, not just the original executable (*.exe). Only the initial executable file will be logged. |
|
Log application events for granted applications (*.exe) |
Log the authorization of an application by the user. Only the initial executable (*.exe) is logged. Use the Include all details option below to log subsequent executable files or dependent libraries loaded by the initial executable. |
|
Include all details on applications (e.g. *.dll, *.cpl, etc.) |
Detailed information on the granted application is logged (including every executable file and library loaded). This option is only available if the Log application events for authorized applications option is selected. |
To create a log query and view the log results refer to Using Application Control Log Queries.
These logging options can affect other Application Control policies. See Logging Managed Policies for more information.
|
Option |
Description |
|---|---|
|
Enable |
The policy will be enabled once it is created, as long as you assign it to a group or endpoint. |
|
Disable |
The policy will be disabled once created, even if it is assigned to a group or endpoint. You can enable it at a later time. |
|
Method |
Steps |
|---|---|
|
To add groups of endpoints: |
|
|
To add individual endpoints: |
|
|
To remove groups of endpoints: |
|
|
To remove individual endpoints: |
|
Use the double-arrows (![]()
![]() ) to switch between groups and endpoints.
) to switch between groups and endpoints.
The selected groups and/or endpoints are displayed in the Assigned list.
|
Method |
Steps |
|---|---|
|
To add users: |
If you cannot locate a specific user, click the Add Individual User button. See Adding an Individual User to a Policy for more information. |
|
To remove users: |
|
Important: Both a user/user group AND an endpoint/endpoint group must be assigned.
The selected users are displayed in the Assigned list.
Disabling a Local Authorization Policy
You can disable a Local Authorization policy without deleting it. The policy details are retained and you can enable it again at a later time.
- Select Manage > Application Control Policies.
- Click the Trusted Change tab.
- Select the enabled Local Authorization policy or policies that you want to disable.
- Click Disable.
One or more Local Authorization policies are disabled.
Filter the Policy Name and Policy Type columns to locate policies.
The selected policies are highlighted.
Enabling a Local Authorization Policy
You can enable a Local Authorization policy that is currently disabled.
- Select Manage > Application Control Policies.
- Click the Trusted Change tab.
- Select the disabled Local Authorization policy or policies that you want to enable.
- Click Enable.
One or more Local Authorization policies are enabled.
Filter the Policy Name and Policy Type columns to locate policies.
The selected policies are highlighted.
Deleting a Local Authorization Policy
You can delete a Local Authorization policy, as long as it is not assigned to an endpoint or a user.
- Select Manage > Application Control Policies.
- Click the Trusted Change tab.
- Select a Local Authorization policy that is not assigned to an endpoint or user (Assigned column value of Not Assigned).
- Click Delete.
A confirmation dialog is displayed. - Click Yes.
The Local Authorization policy is deleted.
Filter the Policy Name and Policy Type columns to locate policies.
The selected policy is highlighted.
If the policy is currently in use, a message is displayed telling you that the policy can not be deleted until it has been unassigned.
Exporting Local Authorization Policies
You can export a list of Local Authorization policies to a CSV (Comma Separated Value) file. To export data, refer to Exporting Data.
The list of policies is saved as a CSV file with the following columns:
|
Name |
Description |
|---|---|
|
Status |
Enabled or Disabled |
|
Policy Name |
The name of the policy |
|
Assigned |
Assigned/Not Assigned (if assigned, export includes the groups and endpoints that the policy is assigned to) |
|
Policy Type |
The type of policy (Easy Lockdown, Trusted Updater, and so on) |
|
Last Updated Date (Server) |
The date and time (on the server) that the policy was last changed |