Service Manager powered by HEAT
Using the Inventory Settings Workspace
•Creating a New Community String
•Adding Files to Audit to the Software Files Tab
•Adding Information About the Gateway Proxy
•Creating a New WiFi Configuration
•Creating a New Audit File Type
•Excluding Files and Folders From Being Audited
•Limiting the Number of Times a Retry Message is Sent
•Working with Inventory Setting Quick Actions
About Inventory Settings
Within the Inventory Settings workspace you can specify and manage the auditing of assets for an organizational unit.
Use the Inventory Settings workspace to:
•Specify audit frequency for scheduled audits.
•Specify purging of audit history.
•Collect software usage information (and software execution data).
•Define if software updates and patches on clients should be collected.
•Enable LanProbe.
•Define SNMP community strings for LanProbe.
•Use LanProbe to query IP addresses for SNMP V1, V2, and V3 devices .
•Specify the types or executable files to be returned as part of the software inventory by using wild cards such as *.exe or *.dll. For more information see Using Audits.
•Assign inventory settings to organizational units.
•Update your gateway proxy.
•Audit specific file types.
•Exclude folders from being audited.
The system makes changes to the records the next time the machines are audited or when you click Audit Inventory on the toolbar.
Viewing Inventory Settings
1.Log into the Service Desk Console.
2.Open the Inventory Settings workspace. The system displays a list of inventory settings records.
Inventory Settings Workspace
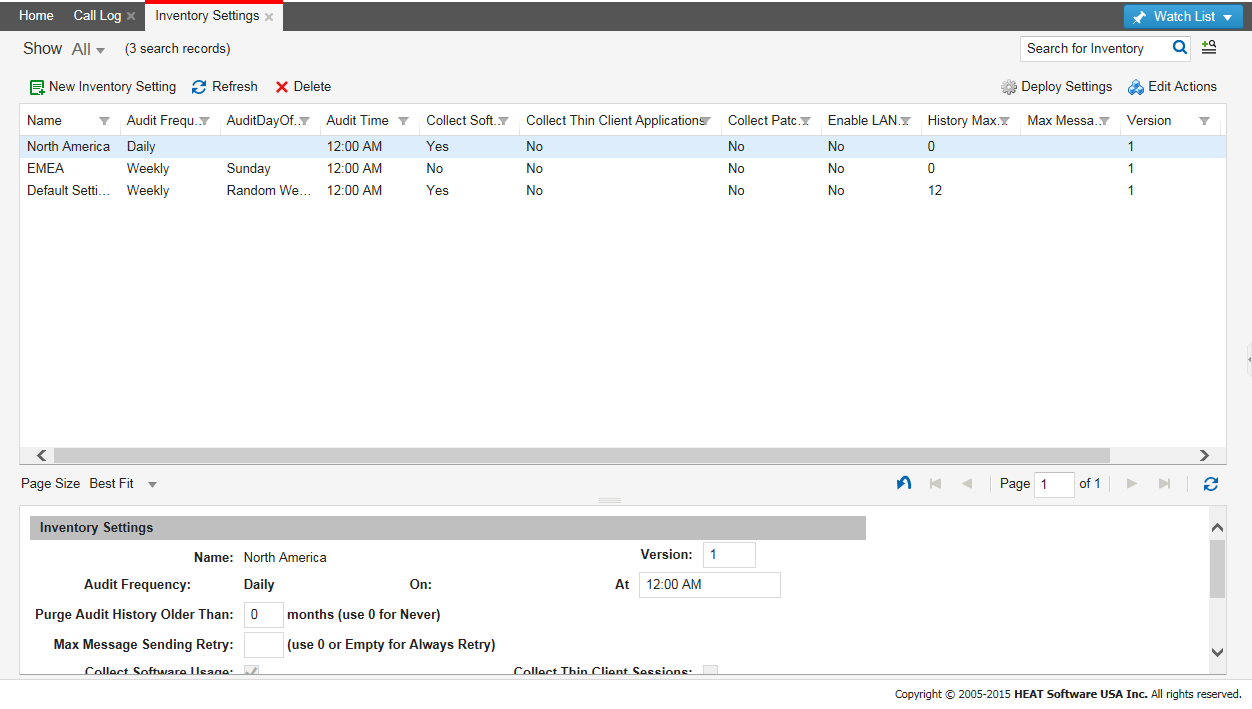
3.Open a record to view its details.
Defining Inventory Settings
Use the following steps to configure the inventory settings:
1.Log in to the application as a ISM Discovery Manager or Configuration Manager.
2.Open the Inventory Settings workspace. By default, the system lists one record.
Inventory Settings Workspace
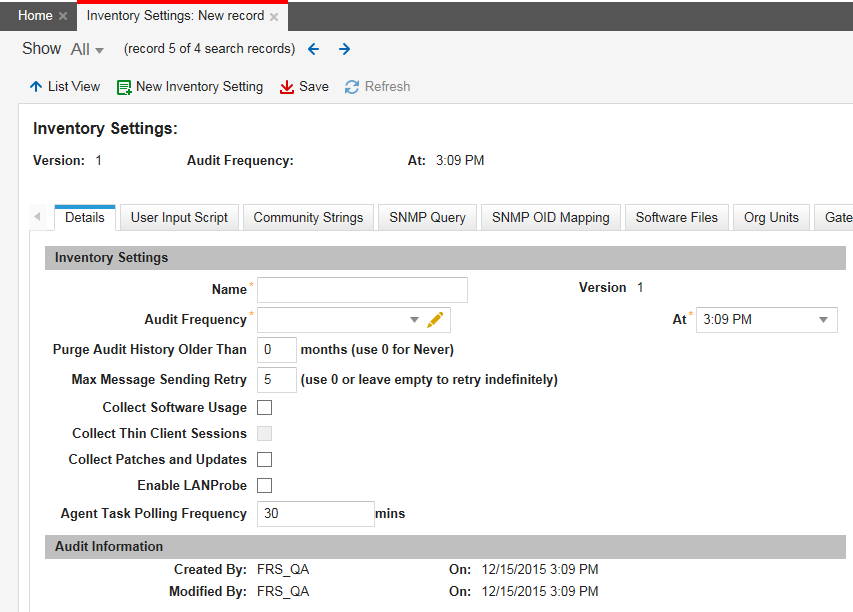
3.From the toolbar, click New Inventory Setting. The system displays a blank Inventory Settings window. The following default options and tabs appear, although results may vary depending upon your system setup.
•Details: See the information in Enter information into the fields under the Details tab.
•User Input Script: See About the User Input Script .
•Community Strings: See Creating a New Community String.
•SNMP Query: See Creating an SNMP Query.
•SNMP OID Mapping See Creating SNMP OID Mappings
•Software Files: See Adding Files to Audit to the Software Files Tab.
•Org Units: See Adding Organizational Units.
•Gateway Proxy: See Adding Information About the Gateway Proxy.
•WiFi Configuration: Creating a New WiFi Configuration.
•Audit File Types: Creating a New Audit File Type.
•Audit Excluded Folders: Excluding Files and Folders From Being Audited.
•Audit Subnet Configurations: Specifying Subnets to Audit.
•Max Message Sending Retry: Limiting the Number of Times a Retry Message is Sent.
4.Enter information into the fields under the Details tab.
| Field | Description |
|---|---|
| Name | A unique name for the new setting. |
| Version | Automatically updated by the system each time you click Deploy Settings to make a change and then save the changes. |
| Audit Frequency |
The frequency of the audit.
Select an option from the drop-down. We recommend selecting Random Weekday, which means that each computer associated with the Inventory Settings record in the network is audited on a different random weekday. |
| On | The day of the week on which to run the audit. Appears when the audit frequency is set to weekly. |
| At | The time at which to run the audit. |
| Purge Audit History Older Than | How often to delete the audit data from the system. Specify the value in months. |
| Max Message Sending Retry |
The number of times a client machine should send the same message if the inventory management server is unable to process it. This option will suspend the agent after the specified number of retries. When the agent is suspended, it no longer sends messages. To reactivate the agent, send a resume agent task for the server. See Limiting the Number of Times a Retry Message is Sent.
If you set this value to 0, all associated suspended agents resume sending messages automatically. |
| Collect Software Usage |
Audits the software usage on client machines (such as used, used once a week, used once a month, not used, etc.). |
| Collect Thin Client Sessions |
Audits terminal (virtual) sessions. See About Viewing Remote and Virtual Software Execution.
If you check this option, the Collect Software Usage option is also selected by default. |
| Collect Patches and Updates | Audits patches and software updates on client machines. |
| Enable LANProbe |
The check box to enable (or disable) LanProbe, which is installed on client machines as part of the client agent installation is available only for Ivanti Service Manager version 2016.1 and earlier. By default, this option is not checked. If you do not wish to enable LanProbe for all machines, you can optionally enable and disable it for certain machines such as a gateway by using the Turn on lanprobe or Turn off lanprobe quick actions. For version Ivanti Service Manager version 2016.2 and later use the quick actions as described in Working with LanProbe. |
| Agent Task Polling Frequency | The frequency, in minutes, that the client agent polls for tasks. The default frequency is 30 minutes. |
5.Click Save.
About the User Input Script
The user input script allows you to create an executable that runs on a client. Using the script you can configure a dialog box that requires input from the user. This is useful when you need to collect information that is not available by any online discovery method, such as a user's name, department, supervisor, or an asset tag number associated with a machine or device. The script also contains information about how to collect registry key data for specific Windows versions. You can view an example script by clicking Insert Example.
Any data collected in this manner is stored in the Custom Data tab for the configuration item, in key-value pairs.
This feature is currently only available for use with Windows operating systems.
You can modify the following sections:
| Section | Description |
|---|---|
| Dialog | Defines the general dialog characteristics for the executable, such as dialog title, explanatory text, and flags. You can require data entry or allow the user to cancel the operation. The dialog displays on the next system start up of the client. |
| Field1 |
Use to configure a data entry field from the available choices such as drop-down, free-form text, or a numeric text fields. You can also specify the length of the field and set flags as needed. |
| Field2 |
Similar options to Field1. |
| Field3 | Use this option to configure a drop-down from which the user must select a value. |
| Registry | Allows for additional logging and discovery of information that was not captured by any other ISM Discovery method. If implemented, the registry key values are retrieved in the next scheduled audit. |
Creating a New Community String
This tab lists the SNMP community strings defined for LANProbe.
Perform the following steps to create a new community string:
1.Log in to the application as a ISM Discovery Manager or Configuration Manager.
2.Open the Inventory Settings workspace.
3.From the toolbar, click New Community String. The system displays the Community String workspace.
4.Enter the community string to use for accessing the SNMP devices.
When LANProbe is aware of a new IP or MAC address, it investigates the device-type using SNMP. Contact your network administrator if you are unsure of the values to enter.
5.Click Save.
Creating an SNMP Query
This tab allows you to search for SNMP devices (such as routers, switches, and printers) through LanProbe by using IP addresses. Select the SNMP Query tab to create a new query.
1.Log in to the application as a ISM Discovery Manager or Configuration Manager.
2.Open the Inventory Settings workspace.
3.From the toolbar click New SNMP Query to open the Query dialog box.
4.Enter one or more IP addresses to query.
5.Select the SNMP version from the list and enter the information. The fields change depending on your selection.
| Field | Description |
|---|---|
| Device IP Address |
The IP address of the device. If more than one, enter a semicolon delimited list of IP addresses. If you select SNMP v3, ensure that all devices use the same authentication credentials, or the system cannot discover them. |
| SNMP Version | The SNMP version. Select a version from the list. |
| Port | The port number. |
| Community String (V1, V2) | The community string (the password to read SNMP data). See Creating a New Community String for more information. |
| User Name (V3) | User name. |
| Security Level (V3) | The security level. Select an option from the list. |
| Authentication Protocol (V3) | The authentication protocol. Select an option from the list. |
| Authentication Password (V3) | The authentication password. |
| Privacy Protocol (V3) | The privacy protocol. Select an option from the list. |
| Privacy Password (V3) | The privacy password. |
| Context Name (V3) | Optional. The context name. |
| Context Engine ID (V3) | Optional. The context engine ID. |
6.Click Save.
LanProbe discovers the devices by capturing broadcasted packets. If a new device is detected, the system checks it against the configured SNMP and the address resolution protocol queries to discover the MAC address and host name. If no matches are found, the system creates a configuration item.
7.From the CI workspace, search for the IP addresses that you entered to view the information.
Creating SNMP OID Mappings
This tab allows you map an object identifier (OID) to a device type. Normally, an object identifier picked up by LanProbe allows the SNMP host to discern the device-type from the universal list. If a device shows up as an unknown device-type and you know what the type should be, use this tab to map the OID to a device, such as a switch, router, or phone. After you map an OID, any other devices with the same OID are also mapped to that device type.
1.Log in to the application as a ISM Discovery Manager, ISM Discovery Analyst, or Configuration Manager.
2.Open the Inventory Settings workspace and open a setting from the list. If you have more than one inventory setting, you may need to add the OID mapping data to all of them.
3.Select the SNMP OID Mapping tab and click the New System OID Mapping icon.
4.Enter the system OID and map it to a device type. Both fields are mandatory.
5.Click Save.
Adding Files to Audit to the Software Files Tab
This tab lists the software programs set up for auditing.
To add files to audit to the list, do the following:
1.Log in to the application as a ISM Discovery Manager or Configuration Manager.
2.Open the Inventory Settings workspace.
3.Open an item from the list.
4.From the toolbar click the link icon  to display a list of files.
5.Navigate to the file to add to the list and click Select.
6.Click Save.
Adding Organizational Units
This tab lists the organizational units that are assigned inventory settings.
The default configuration is one inventory setting that is applicable to all audited computers. Creating new inventory settings and assigning them to organizational units allows computers in different organizational units to have different settings, should this be necessary.
When the task processor service gets a request for client tasks (from the client agent), it checks whether there are any changes in the inventory settings of the computer by comparing the version of the Inventory settings. The version change when the Deploy Setting button is clicked, and a new setting is deployed and saved.
When you add a new computer, it is usually not linked to an organizational unit. The task processor searches for a root organizational unit that is linked to the computer. If the root organizational unit does not have linked inventory settings, the processor tries to locate default inventory settings to link to the root organizational unit. If default settings are not found, the processor creates new inventory settings and links it to the root organizational unit.
If the organizational unit that is linked to a computer is not the root organizational unit and it does not have inventory settings, then the task processor recursively follows the organizational unit parent links until it finds a root organizational unit or an organizational unit with inventory settings and then applies the settings to the organizational unit in question.
To add organizational units to the list, do the following:
1.Log in to the application as a ISM Discovery Manager or Configuration Manager.
2.Open the Inventory Settings workspace.
3.From the toolbar, click the link icon  .
.
4.Select an organizational unit.
Adding Information About the Gateway Proxy
The Gateway Proxy tab lists any gateway proxies defined for Windows, Linux, Unix, and OSX clients. (Mac clients are defined in the server address within the saas.ini file on the local installation.) However, the Gateway Data Center Edition can only be installed on a Windows operating system.
To enter information about the gateway proxy, do the following:
1.Log in to the application as a ISM Discovery Manager or Configuration Manager.
2.Open the Inventory Settings workspace.
3.Enter information into the fields.
| Field | Description |
|---|---|
| Endpoint Address |
The address of the endpoint URL.
The default proxy port 8097 is used unless defined in the endpoint address. For example, enter http://company/users:8113. |
| Priority | The priority number of this address. |
4.Click Save.
5.To remove a gateway, select the gateway from the list and click the delete icon  .
.
Creating a New WiFi Configuration
The WiFi Configurations tab lists any WiFi configurations used.
1.Log in to the application as a ISM Discovery Manager or Configuration Manager.
2.Open the Inventory Settings workspace.
3.To create a new WiFi configuration, click New MDI_WiFiConfiguration. The system displays the New MDI_WiFiConfiguration window.
4.Enter information into the fields.
| Field | Description |
|---|---|
| Network Name | The name of the network. |
| Encryption |
The encryption type. Choose from the drop-down list. None WEP WPA/WPA2 Any |
| Password | The network password. |
| Active | Makes this configuration active. |
5.Click Save.
Creating a New Audit File Type
The Audit File Types tab allows you to check machines for the number of occurrences of a specified file-type by its extension (such as gz, EXE, dll, or html). The audit reports the number of occurrences and the total size of all files of the specified file type. The top 50 occurrences of file types are listed by default. You can create a specific file type to audit. However, creating a new audit file type overrides the top 50 defaults and only lists the file types that you specify.
To create a new or specific file type to audit, do the following:
1.Log into the Service Manager Application.
2.Open the Inventory Settings workspace.
3.Click the Audit File Types tab.
4.Click New Audit File Type. The system displays the New Audit File Type window.
5.Enter the extension of the file type. You do not need to enter a dot (.) before the extension type. The file type is case-insensitive.
6.Click Save. You can enter multiple file types.
7.Click Deploy Settings.
The file type data is available in the Extension Histogram tab of the configuration item.
Excluding Files and Folders From Being Audited
The Audit Excluded Folders tab allows you to specify files and folders to not audit. In most instances you must specify a full path.
1.Log into the Service Manager Application.
2.Open the Inventory Settings workspace.
3.Click the Audit Excluded Folders tab.
4.Click New Audit Excluded Folder. The system displays the New Audit Excluded Folder window.
5.Enter the folder name or full path. This is a required field. You can use wildcard characters such as ? and *. For Windows, folder CLSIDs and environment strings such as {d20ea4e1-3957-11d2-a40b-0c5020524153} and %ProgramFiles% are also supported.
6.Select a platform (such as AIX, Windows, or OSX) from the drop-down list.
7.Click Save. You can enter multiple paths or folders to exclude from being audited.
8.Click Deploy Settings.
Specifying Subnets to Audit
The Audit Subnet Configs tab allows you to specify subnets of specific switches to either be included or excluded from LanProbe audits. For example, you can enter 10.1.2.3/24 or 172.16.33.9/24.
1.Log into the Service Manager Application.
2.Open the Inventory Settings workspace.
3.Click the Audit Subnet Configs tab.
4.Click New Switch Subnet Config. The system displays the New Switch Subnet Config window.
5.Enter the IP address.
6.Select an option from the include or exclude drop-down list.
7.Click Save. You can enter multiple IP addresses.
8.Click Deploy Settings.
Limiting the Number of Times a Retry Message is Sent
Sometimes a client agent sends a message that cannot be processed by the server. If the message was sent due to a failure or other error, the agent tries to resend the message an indefinite number of times.
You can modify the number of retries from the Inventory Settings workspace, by doing the following:
1.Log into the Service Manager Application.
2.Open the Inventory Settings workspace.
3.Select an organizational unit.
4.In the Max Message Sending Retry field, enter the number of retries to allow. The default value is 5. However, we recommend that you do not modify this value for existing configurations as this enables Ivanti to troubleshoot specific problems.
5.Click Save. Any machine that displays an agent status of suspended indicates that it is no longer sending messages to the server since it has retried the specified number of times. It no longer processes any tasks and the client agent task must be resumed. Changing the Max Message Sending Retry value to 0 automatically restarts the client agents.
6.Open the configuration item and select Resume Client Agent on the task bar to allow the machine to resume sending messages.
Working with Inventory Setting Quick Actions
Ivanti Service Manager has a number of quick actions that you can use to quickly perform a task. You can call some quick actions from the toolbar and you can access others from the Action Menu. If you cannot call a quick action due to the current status of the selection, the option is dimmed.
| Action/Toolbar Icon Name | Where Available | Description |
|---|---|---|
| Change Device Type | Toolbar, Action Menu > Configuration Management, and from a CI record |
Launches a dialog box that allows you to select and apply a different device type to the highlighted item. |
| Run Baseline | Toolbar, Action Menu > Configuration Management, and from a CI record |
Launches a dialog box from which to enter the baseline information. |
| Deploy Agent | Toolbar, Action Menu > Audit, and from a CI record |
Allows you to deploy a client agent to the item selected in the list. |
| Audit Inventory | Toolbar, Action Menu > Audit, and from a CI record |
Audits the inventory for the item selected (for example, for a computer it audits all hardware, software, and usage statistics). |
| Remote Scan | Toolbar, Action Menu > Audit, and from a CI record |
Runs a WMI scan to collect hardware and software information for the select items. Only available for Windows machines. |
| Resume Client Agent | Toolbar, Action Menu > Audit, and from a CI record |
Restarts the suspended client agent for the item. |
| Remove Agent | Toolbar, Action Menu > Audit, and from a CI record |
The client agent is removed from the system. |
| Reset Agentless Scan | Toolbar, Action Menu > Audit, and from a CI record |
Resets the agentless scan for the selected item. |
| Scan Remotely / Remote Scan | Action Menu > Audit, and from a CI record |
Sets up remote scan for the item selected. |
| Set Daily Agentless Scan | Action Menu > Audit, and from a CI record |
Sets a daily agentless scan for the item selected. |
| Set Weekly Agentless Scan | Action Menu > Audit, and from a CI record |
Sets a weekly agentless scan for the item selected. |
| CI List | Action Menu > Configuration Management, and from a CI record |
Creates a .xls file of one item, several selected items, or all items listed in the CI workspace. |
| Show CI Map | Action Menu > Configuration Management, and from a CI record |
Displays the CI map for the item selected. |
| Turn on lanprobe | Action Menu > Configuration Management, and from a CI record |
Turns on LANprobe for the item selected. |
Was this article useful?
The topic was:
Inaccurate
Incomplete
Not what I expected
Other
Copyright © 2017, Ivanti. All rights reserved.