Service Manager powered by HEAT
Using Audits
•Requesting an Additional Inventory Audit
•About Running Agentless Audits
•Viewing Discovered Assets and Changing the Type
•Viewing Unknown Devices and Changing Their Type
•Viewing Applications Installed by HEAT DSM
•About Viewing Remote and Virtual Software Execution
•Working with Terminal Servers and Remote Software Execution
•Generating Reports and Exporting Data
•Automatically Updating the Location for Networked Devices
•Using the Merge CI Quick Action
About Audits
An audit collects software and hardware configuration information from the computers and network devices in your organization. ISM Discovery Managers and ISM Discovery Analysts can view the audit results.
An initial full audit is performed immediately after you deploy the agent. Subsequent recurring delta audits are performed as defined by the Audit Frequency parameter in the Inventory Settings workspace. You can change the frequency of audits. For example, you may like to audit daily or weekly.
After the auditing is completed, the Audit Source field is populated.
Audit Source Field

The audit source is the result of deploying an agent and then auditing. Audit sources can also be manual, import, WMI (or agentless), LanProbe, and SCCM.
As you perform more audits, the results build up as an audit history, so that you have a picture of changes over a period of time.
Requesting an Additional Inventory Audit
An audit automatically runs when the agent is first deployed, and then by the schedule specified by the Audit Frequency parameter in the Inventory Settings workspace.
Perform the following steps to request an additional audit:
1.Log into the Service Manager Application.
2.Open the workspace for a configuration item.
3.Select the device to audit.
4.Click Audit Inventory. The Audit Inventory quick action is only available for the following types of configuration items: Server, VirtualSever, VirtualWorkstation, Workstation, and Computer.
5.Click Yes to proceed.
The system creates an audit task. It can take a while for the agent to receive the task and act on it (up to 30 minutes with the default settings), and then a while longer for the resulting data to be processed into the configuration management database. When the audit has finished, any changes since the last audit are recorded. If there are no changes since the last inventory, no additional information is recorded.
You can continue to work while the audit is being processed.
6.To check the progress of the audit, click the Agent Task tab and view the Status field for the relevant task.
About Running Agentless Audits
•Scheduling an Agentless Audit
•Activating the Agentless Scan Workflow
About Agentless Audits
Agentless audits can be used where it is not feasible to install a client agent, for example on a mission critical server. Agentless auditing allows you to audit a computer and collect its inventory data without deploying an agent to that computer. Agentless audits use the Microsoft Windows Management Instrumentation (WMI) infrastructure to gather information.
For auditing software licenses running remotely on thin clients, see About Viewing Remote and Virtual Software Execution.
Make sure that the gateway has administrator rights and permissions on the remote machines. You have to be granted the right to act as part of the operating system under the target machine's local security policy. WMI must be allowed on the target computer.
Running an Agentless Audit
You can only run an agentless audit on Windows computers. They are not supported on UNIX, LINUX, or Mac OS computers.
1.Log into the Service Manager Application.
2.Open the Gateway workspace.
3.Click Scan Active Directory. This ensures that all unaudited computers (those without a client agent installed) are listed.
4.Click the Configuration Item tab, and select one or more devices to audit.
The Agent Status column should not read installed and the IP Address field should be populated.
5.Click the Remote Scan quick action from the toolbar or go to the action menu and select Audit > Scan Remotely. This quick action is only available for the following types of configuration items: Server, VirtualServer, VirtualWorkstation, Workstation, and Computer.
This creates a task for the gateway for a WMI-based audit, which must be picked up and processed (up to 30 minutes delay). When the audit has finished, any changes since the last audit are recorded. If there are no changes since the last audit, no additional information is recorded.
You can continue to work while the audit is being processed.
6.To check the progress of the audit, select the Agent Task tab.
7.Search for the machine name. You see the text "Remote Scan of machine name". The initial status is pending, which advances to in progress and then complete.
8.Go back to the computer record and view the updated information.
Scheduling an Agentless Audit
1.Log into the Service Manager Application.
2.Open the Configuration Item workspace.
3.Select the computer for which to specify an audit schedule. The Agent Status column should not read installed.
4.From the action menu, choose Audit, then Set Daily Agentless Scan or Set Weekly Agentless Scan.
The scan interval you specify is shown in the Agentless Scan Interval field on the Details tab of the record.
5.To set the time when the daily or weekly scan runs, click the and select More > Schedule Entry.
Two default schedules called Daily Agentless Scan and Weekly Agentless Scan are listed.
6.Depending on your selected scan interval, select either the daily record or the weekly record.
7.Specify the start time and end time, the recurrence, and the start time and end time or select No End Date.
8.Click Save to set up your scan schedule.
Activating the Agentless Scan Workflow
1.From the Configuration Console, click Build > Business Objects to open the Business Objects workspace.
2.Click View Workflows under Manage Object Workflows.
3.Under ScheduleEntry, select either Agentless Scan Run Daily or the Agentless Scan Run Weekly (depending on the schedule selected earlier).
4.To activate the workflow, do the following:
| a. | Check the workflow version. |
| b. | Click More Actions > Activate Version. |
5.Click Yes to dismiss the confirmation message. The active workflow version is highlighted in green.
Viewing Agent Tasks
1.Log into the Service Manager Application.
2.Open the Agent Task workspace to view a list of agent tasks.
Tasks that are in a status of pending or in progress are set to expired if not processed within the default expiration time (7 days).
Canceling an Agent Task
Many of the tasks you perform within inventory management are scheduled as agent tasks, for example updating gateway settings. You may choose to cancel an agent task if it has not yet started or in pending status.
1.Log into the Service Manager Application.
2.Open the Agent Task workspace.
3.Select the task that is currently pending.
4.Click Cancel Task.
5.Click Yes to confirm cancellation of the task.
If you confirm after the task has been picked up by the agent, the task will still be performed.
Viewing Discovered Assets and Changing the Type
Ivanti Service Manager obtains device details by a variety of means, including agent scan, WMI, SNMP, Netscan, and Active Directory.
Depending on the amount of detail that is obtained, the system can also identify the device class. When using SNMP and Active Directory, the system can usually identify workstations and server based on the operating system, but to identify virtual machines (and therefore virtual workstations and virtual servers) you must use an agent or WMI scan.
If the system does not find any relevant data, it classifies the devices as CI.UnknownDevice.
On the CI.UnknownDevice record, use the Change Device Type quick action to convert the CI.UnknownDevice to the correct one, as described Viewing Unknown Devices and Changing Their Type.
If a workstation or server record is not correctly identified, you can go to the workstation or server record and change the device type, as appropriate.
Only ISM Discovery Managers can change a device type.
Viewing Unknown Devices and Changing Their Type
1.Log in to the Service Desk Console as a ISM Discovery Manager.
2.Open the CI workspace.
3.Sort by Type:UnknownDevice to view all of the unrecognized devices.
4.Select one or more devices to change, then click Action Menu > Configuration Management > Change Device Type.
5.From the Select Type menu, select the device type.
6.Click OK to save your change.
Discovered servers and workstations as well as unknown devices can be further classified into its associated business objects after a remote scan or audit on the device.
Viewing Applications Installed by HEAT DSM
HEAT Desktop and Server Management (HEAT DSM) aids IT organizations automate, regulate, and simplify how desktops and servers are managed.
HEAT DSM features are only available to those Ivanti Service Manager customers who have purchased the HEAT DSM product. The HEAT DSM client must be installed on the client machine.
As a ISM Discovery Manager, you can view the software deployed by NetInstall so that you can quickly view the installed software that is managed by HEAT DSM, which might not be found in the Add/Remove Programs folder.
1.Log in to the Service Desk Console as a ISM Discovery Manager.
2.Open the Software Inventory workspace. The software list appears.
3.Expand a manufacturer name, then double-click a software record. The Software Identity workspace appears.
4.Select the Installed On tab for a list of machines the software is installed on. If the software has been installed by HEAT DSM, the DSM Installed column flag is set to yes. Otherwise, the column is blank.
5.Open the CI workspace. The list of configuration items appears.
6.Double-click to open a server, virtual server, workstation, or virtual workstation record.
7.From the Software tab, view a list of software that is installed on the configuration item.
If the software has been installed by HEAT DSM, the column flag is set to yes.
About Viewing Remote and Virtual Software Execution
To view remote and virtual software execution and terminal server guest-host relationships, open the Inventory Settings workspace and make sure that Collect Software Usage and Collect Thin Client Sessions are checked on the Details tab. See Using the Inventory Settings Workspace.
Select these settings to show the guest-host relationships and the software execution environments in the guest or host machines.
Working with Terminal Servers and Remote Software Execution
•About Terminal Servers and Remote Software Execution
•Viewing Guest-Host Relationships
•Examples of Guest-Host Relationships
•Viewing Software Execution Environments
About Terminal Servers and Remote Software Execution
A software application run remotely on a terminal server will be detected if the Ivanti Service Manager agent is installed on the terminal server. Software applications that are run remotely are associated with the client computer or terminal.
The system creates a configuration item record for the client computer or terminal if one does not exist, with the configuration item type set to workstation. The client computer or terminal configuration item shows the terminal server configuration item as a host. The terminal server configuration item shows the client computer or terminal as a guest.
The system displays any software applications run remotely on the Software tab of the configuration item record for the client computer with execution environment set to remote.
Software applications run remotely from a client computer are included in the installation counts shown in the Software Inventory workspace. For example, if an application is installed on a terminal server and is run remotely from two clients, the installation count is three.
The system detects and shows remote applications in the same way as local applications (such as occasionally, monthly, weekly, and daily).
About Virtual Applications
Virtual applications run in a self-contained virtual environment rather than being installed on the host computer.
Virtual applications count towards installation counts. Virtual application usage is detected in the same way as local applications.
When the Ivanti Service Manager agent detects a virtual application, the system displays the software application on the Software tab of the configuration item record with execution environment set to virtual.
Viewing Guest-Host Relationships
1.Log into the Service Desk Console.
2.Click the CI tab.
3.Sort and select any of the following configuration item types:
•Workstation
•Server
•Virtual Workstation
•Virtual Server
4.Click the Guest tab to view all of the clients of the current computer. If the machine you are on is a server, the Guest tab might be populated.
5.View the Relationship Type field.
6.Click the Host tab to view all of the host machines of the current computer.
If the machine you are on connects to a host, the Host tab is populated.
7.View the Relationship Type field.
Ivanti Service Manager manages inserts and updates by auditing the host computer. Remote applications and guest relationships do not disappear after a full audit is received by a computer. However, the system removes any remote applications that have not been used for more than 90 days. After all the remote applications are removed from the guest computer and if remote applications are not run in a host, their associated guest-host relationship is also removed.
Examples of Guest-Host Relationships
The following is the Host tab for the virtual server, which shows its hosts and indicates that they are virtual machines:
Guest-Host Relationship
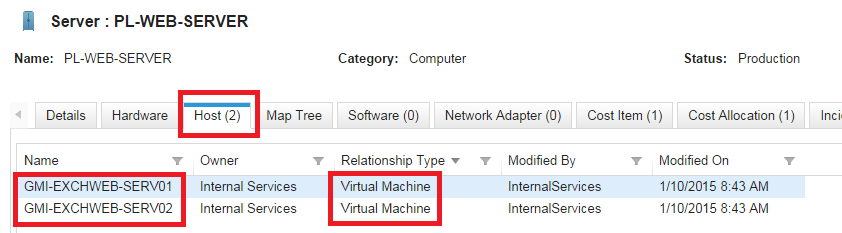
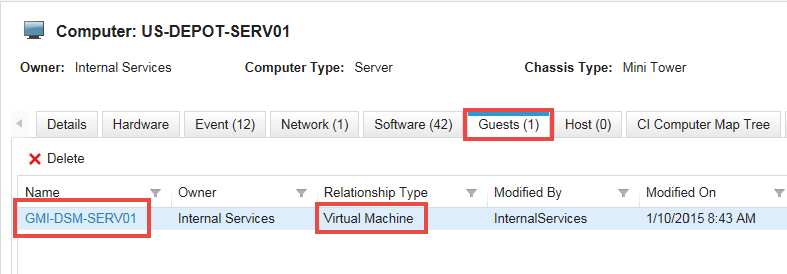
The following is one of the Guests tab for the host server, which shows its clients (notice that the machine PL-WEB-SERVER is now shown as the guest:
Host Server Guest Tab
Viewing Software Execution Environments
1.Log into the Service Desk Console.
2.Click the CI tab.
3.Sort and select any of the following configuration item types:
•Workstation
•Server
•Virtual Workstation
•Virtual Server
4.Click the Software tab to view all the execution environments. The execution environments can be as follows:
•Local software is installed locally. The following shows locally installed software on a terminal server:
Software Execution Environment for a Host

•Remote software is installed and run on a remote machine. Note that desktop software run remotely on a terminal server still requires a license.
•Virtual software is contained in its own virtual execution environment. This virtual environment can be stored locally or remotely.
Generating Reports and Exporting Data
You can define and publish reports to specific roles such as ISM Discovery Managers or Service Desk Managers. Certain reports, such as Agent Deployment and Audit Summary, Gateway Status Summary, or Hardware Changes, are useful for ISM Discovery Managers or ISM Discovery Analysts. You can view a list of reports and the roles to which they apply in the Reports workspace.
The Asset Details report displays the complete information about a specific asset (configuration item). You can run this report for a selected configuration item from the CI workspace by going to Quick Action > Configuration Management > Asset Details. The report can be printed to a variety formats including to Microsoft Excel.
Access reports using the following procedure:
1.Log into the Service Desk Console.
2.Open the Report workspace.
3.Click the Category column to sort by category.
4.Click a report name. The system displays the report in the Report Viewer window.
5.Select a date and time from the Start Date and End Date menus.
6.Click the navigation arrow to view the reports if you have selected multiple reports.
7.To export the report to another application, do the following:
| a. | From the Select a format menu, select a format in which to view the report. |
| b. | Use the arrow keys, if necessary, to page through the report data. |
| c. | Click Export. You can view, save, or print the output file. |
8.To print the report, do any of the following:
•If you are using Microsoft Internet Explorer, click Print.
When printing from Internet Explorer, make sure to add the website to your trusted sites; otherwise, the application might unexpectedly close. From the Tools menu > Internet Options, click the Security tab, click Trusted Sites, click Sites, and click Add to add the current website to your trusted site.
•If you are using Mozilla Firefox, select a format and click Print.
Automatically Updating the Location for Networked Devices
•About Automatically Updating the Location for Networked Devices
•Creating Locations and Assigning IP Address Ranges
•Applying the IP Ranges to the Configuration Items
•Overriding a Specified IP Range Location
About Automatically Updating the Location for Networked Devices
You can create user-defined locations and assign these locations to networked devices by specifying IP address ranges that are applicable to the location. After assigning an IP address range to a location, you can autofill this location to associated devices and computers. The Ivanti Service Manager server uses these ranges to identify which configuration items should be automatically mapped to the given location. You can provide multiple ranges for a location.
If you provide multiple ranges, the asset processor tries to find the smallest IP range that matches. If there is more than one match, then it takes the one with the lowest start address. If there is still more than one match, for example, if two locations have the same range specified, then the location is picked randomly.
You can also specify a range to exclude within a given IP range.
You also have the ability to override default locations for specific devices and disable automatic location updates for them.
The process for automatically updating the location of a configuration item is as follows:
•Create locations and assign IP addresses to them. See Creating Locations and Assigning IP Address Ranges.
•During an audit, the network or IP addresses are populated, which allows the devices to be automatically linked to locations. Or you can run a quick action to apply new IP ranges to the configuration items in the location, as described in Applying the IP Ranges to the Configuration Items.
•If appropriate, override the defined subnet location for a configuration item and choose another location to assign to it, as described in Overriding a Specified IP Range Location.
Creating Locations and Assigning IP Address Ranges
1.Log in to the application as a Configuration Manager or ISM Discovery Manager.
2.Open the CI Location workspace. The system displays the existing location records in the list view.
3.Click New CI Location.
4.In the Location field, enter a location name.
5.Click IP Range Mapping.
6.Click New Device Subnet.
7.In the window that appears, do the following:
•Specify the IP address range in the Address Range Start and Address Range End fields.
•Click Save.
•To exclude a range within the range you specified, click New Device Subnet again.
•In the Address Range Start and Address Range End fields, specify the range that should be excluded from within the IP range you specified earlier.
•Check Exclude to exclude the range.
For example, if you specify a range from 192.172.0 to 192.172.255, but you want to exclude a range within the specified range, you can create another location mapping from 192.172.200 to 192.172.250 and check Exclude.
8.Click Save.
Applying the IP Ranges to the Configuration Items
1.Create locations and map IP ranges to them, as described in Creating Locations and Assigning IP Address Ranges.
2.From the Action Menu, select Location Mapping and then select Apply Now.
3.If you open a configuration item record to which this subnet is associated, the system populates the CI Location field with the location that you assigned. Check Override IP Range Location to override the assigned location, then select another configuration item location, as described in Using Audits.
Overriding a Specified IP Range Location
1.Log in to the application as a ISM Discovery Manager.
2.Open the CI workspace.
3.Search for the configuration item with the configuration item location to override.
4.Select the record and open it.
5.Check Override IP Range Location.
6.Click Save.
Using the Merge CI Quick Action
You can merge two configuration items if they are duplicates but contain different information. During the merge process you need to assign precedence to one of the configuration items so that it is recognized as the master business object. Information from the other configuration item will be merged into the master. Existing data in the master configuration item is not overwritten. The action merges data from the secondary configuration item into empty data fields in the master. Once the configuration item data is merged, the secondary configuration item is marked as disposed and may no longer appear on the list.
Use the following procedure to merge configuration items:
1.Log in to the application as an administrator or ISM Discovery Manager.
2.Open the CI workspace to view the records.
3.Search for and select two configuration items by using Ctrl-click. You can sort by any column such as Type or Status.
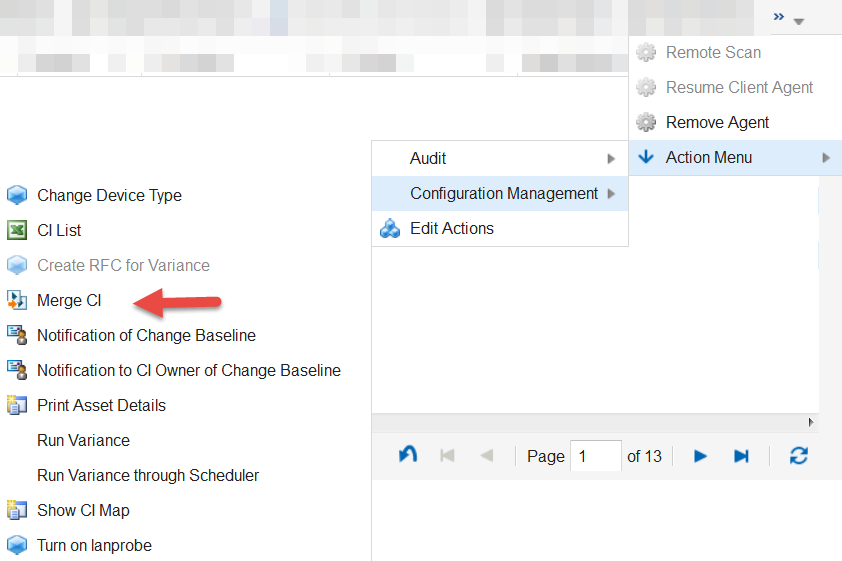
4.After you select the configuration items, click the workspace toolbar drop-down arrow (on the right), and select Action Menu > Configuration Management > Merge CI.
Merge CI Quick Action
5.Select a master or primary configuration item. By default, the system selects the first configuration item.
6.Click Submit.
Was this article useful?
The topic was:
Inaccurate
Incomplete
Not what I expected
Other
Copyright © 2017, Ivanti. All rights reserved.