Service Manager
Data Import Connections
Before you configure any Data Import Connections, make sure that the Asset Processor Configuration is defined. For more information, refer to Asset Processor Configuration.
Use the Data Integration Wizard to import data from a predefined source into the Service Manager database.
• Viewing, Cloning, and Deleting Data Import Connections
•Setting Up a Data Import Connection
•Setting the Data Import or Web Service Connection Schedule
•Reviewing and Publishing Import or Web Service Connection Data
•Example: Importing Configuration Item Relationships
Viewing, Cloning, and Deleting Data Import Connections
1.From the configuration console, click Extend > Integration Tools > Data Import Connections to open the Data Source Manager page.
Data Source Manager
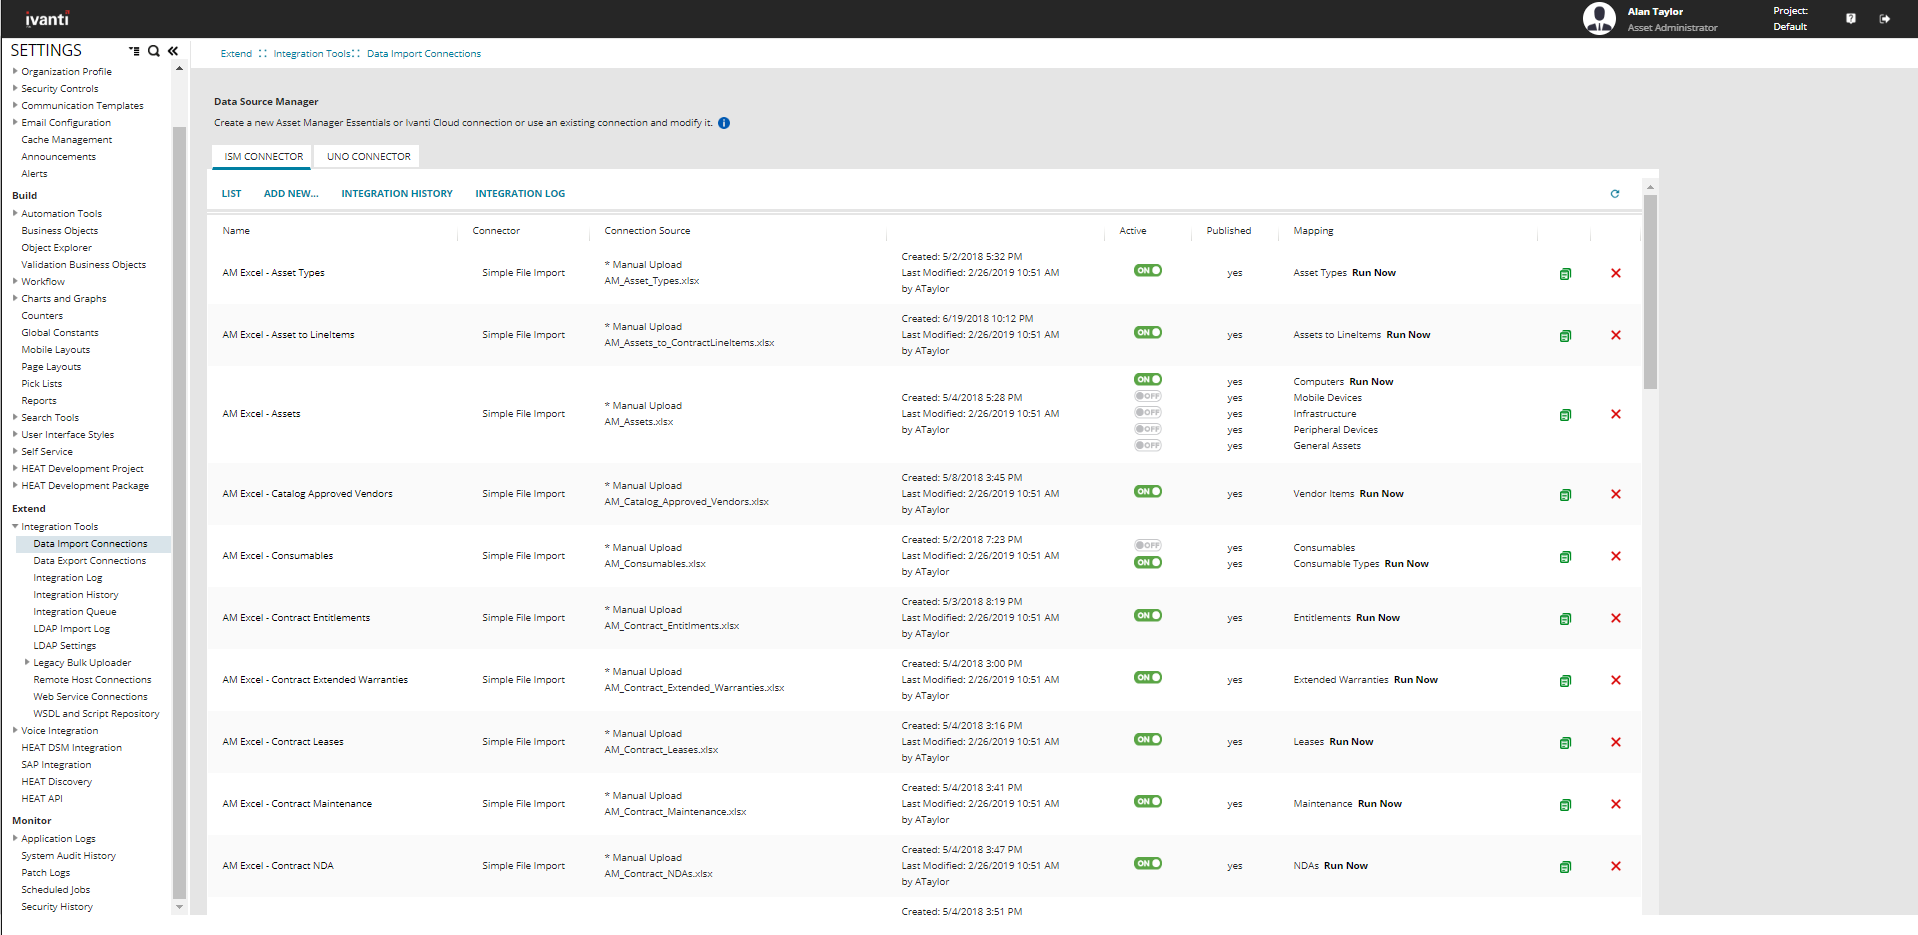
The Data Source Manager page has the following fields:
| Field | Description |
|---|---|
| Name | The name of the data import connection. |
| Connector |
The connection import type: SCCM Email import Simple file import (FTP, file) Advanced file import (Secure FTP, hierarchical XML) Discovery (for Release 9.3.x and later) |
| Connection Source | Source information such as server name and database name (for SCCM and Discovery Release 9.3.x and later) or server path and file name (for FTP and file). |
| -- | Contains details about when the data import connection was created and last modified. |
| Active | Specifies if the connection is active or not. Only published connections can be active. To activate the data import connection, click ON. To deactivate the data import connection, click OFF. |
| Published | Specifies if the data import connection is published. |
| Mapping | The name of the integration job. |
2.To clone a data import connection, including all of its mappings and schedules, do the following:
| a. | Click the clone icon  at the end of the row. at the end of the row. |
| b. | In the confirmation message, click OK. |
The new data import connection appears in the list as unpublished.
3.To delete a data import connection, do the following:
| a. | Click the delete icon  at the end of the row. at the end of the row. |
| b. | In the confirmation message, click OK. |
| c. | If there are any mappings associated with this data import connection, a second confirmation message appears. Click OK. |
The data import connection is no longer displayed.
4.To submit the integration job to be executed by the integration server, do the following:
| a. | Click Run Now at the end of the row. |
| b. | In the confirmation message, click Yes. |
For a manual upload, the application prompts you to upload the file before submitting the job.
Setting Up a Data Import Connection
Use this process to set up a connection to the server where the data is located.
If you import data on a schedule, the options are defined in the Schedule Entry workspace. See About the Schedule Entry and Scheduled Jobs Workspaces for more information. For example, for Endpoint Manager Integration, define a daily CMDB import schedule using the Schedule Entry Workspace before selecting it on the Import wizard. The schedule setting option only appears if Discovery 9.x, File on Shared Folder, FTP, SCCM, (EPM, Secure FTP (SSH), or Ivanti Cloud Connector is selected as the connection type, or if you create a new web service connection. The basic steps shown below, are followed by specific set ups for different connectors.
Data Import Setup Sequence -- Connection Setting

1.From the configuration console, click Extend > Integration Tools > Data Import Connections, to open the Data Source Manager page.
The page lists all the connections that are already defined for your installation.
2.Click Add New... to add a new connection and to open the Settings page.
Connection Settings Page
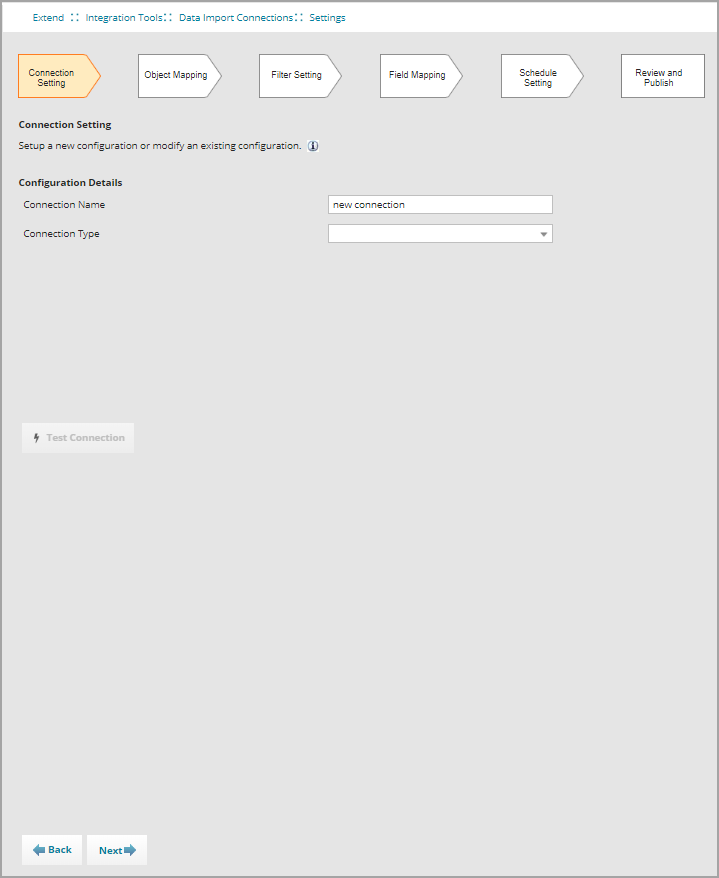
3.In the Connection Name field, enter a unique name for the connection.
4.Select a Connection Type from the drop-down list:
•Email Import. See Email Import.
•Discovery 9.x. (Only applicable for Discovery Release 9.3.x and later). See Ivanti HEAT Discovery File.
•File on Shared Folder. See File on Shared Folder. (File share is only available for on-premise deployments.)
•FTP. See FTP Connection Type.
•Manual File Upload. See Manual File Upload.
•SCCM. See About Importing Data from SCCM into ISM.
•Secure FTP (SSH). See Secure FTP (SSH)
•EPM. See Endpoint Manager (EPM) Connector.
•Ivanti Cloud Connector. See Feature Preview: Ivanti Cloud Connector.
Email Import
Select this option to import data from an email message.
•Continue to Enter information about the specific file. Select the file type to import:
Ivanti HEAT Discovery File
Select this option to import data from a Discovery Release 9.3.x and later database.
| a. | Enter information into the fields. |
| Field | Description |
|---|---|
| Connection Name |
The connection name. Always use Discovery 9.x. Do not change the name unless you are setting up a new configuration or modifying this one for your import. |
| SSL Encryption | Specifies if the connection uses SSL encryption. |
| Server Name |
The server path, such as Servername or IP Address, where the database is located. |
| Database Name | The database name. Enter Ivanti HEAT Discovery. |
| b. | Continue to Importing Data from Ivanti HEAT Discovery Release 9.3.x or Later to set the object mapping, field setting, field mapping, and schedule settings. |
File on Shared Folder
File share is only available for on-premise deployments.
Select this option to import data from a shared network file.
| a. | Enter information into the fields. |
| Field | Description |
|---|---|
| Data File Name |
The name of the data file. See About Importing Multiple Files for information about using the * wildcard to import multiple files at once. |
| Template File Name |
Optional. The name of the file that is a subset of the mapping file. If your mapping file is large, you might want to create a smaller file containing only the columns or fields for mapping, to create a map before data import. |
| b. | Continue to Enter authentication information if required. |
FTP Connection Type
Select this option to connect to a file server (not a web server) to transfer data. The FTP protocol is used to upload files from a workstation to a specified FTP server.
| a. | Enter information into the fields. |
| Field | Description |
|---|---|
| SSL Encryption | Specifies if the connection uses SSL encryption. |
| Active Mode | FTP supported mode. By default, this is set to passive mode (that is, this box is not checked). To enable Active mode, check the box. |
| Data File Name |
The name of the data file. |
| Template File Name |
Optional. The name of the file that is a subset of the mapping file. If your mapping file is large, you might want to create a smaller file containing only the columns or fields for mapping, to create a map before data import. |
| b. | Continue to Enter authentication information if required. |
Manual File Upload
Select this option to create a non-scheduled one-time data import. You can import data from a local file source into your database. This import configuration can be saved to your list of integration connections, but cannot be scheduled, due to the nature of a manual import. You must manually import the data file each time you run the connection. Supported file types are .CSV, .XLS, and .XML
| a. | Enter information into the fields. |
| Field | Description |
|---|---|
| Data File Name |
The name of the data file. See About Importing Multiple Files for information about using the * wildcard to import multiple files at once. |
| b. | Continue to Enter information about the specific file. Select the file type to import: |
Secure FTP (SSH)
Select this option to connect to a secure file server (not a web server) to transfer data. The Secure FTP protocol is used to upload files from a workstation to a specified secure FTP server.
| a. | Enter information into the fields. |
| Field | Description |
|---|---|
| Data File Path |
The path of the data file. |
| Template File Path | Optional. The path of the file that is a subset of the mapping file. If your mapping file is large, you might want to create a smaller file containing only the columns or fields for mapping, to create a map before data import. |
| b. | Continue to Enter authentication information if required. |
Endpoint Manager (EPM) Connector
Select this option if you are using Ivanti Endpoint Manager (EMP) and you want to import data from the Endpoint Manager database into Ivanti Service Manager.
| a. | Enter information into the fields. |
| Field | Description |
|---|---|
| Server Name |
The name or the IP address of the server where the Endpoint Manager data is located. |
| Database Name |
Use the default of EPM. |
| b. | Enter authentication information as seen in Enter authentication information if required. , |
| c. | Next, test the connection: Test the data import connection . As specified, do not click Close or move to the next step until the connection test is successful. |
| d. | If the connection is successful, click Close then click Next to specify Object-level Mappings. See Object Mapping and Mapping Fields for Import. When creating a mapping for this connector, select EPM Connector from the drop-down. |
Use the wizard to identify the next step in the process to map fields or objects, use transitions, and to schedule your import.
Use the following steps only as indicated by the Connector.
5.Enter authentication information if required.
| Field | Description |
|---|---|
| Use global constants for login and password | Specifies if the login and password information are global constants. If you check this option, you must create the login and password global constants before you can use them. See Using Global Constants to Hide Login ID and Password Information. |
| Login |
The login ID used to access the server. Enter a value if you did not check Use global constants for login and password. Select a value from the drop-down list if you checked Use global constants for login and password). |
| Password |
The password used to access the server. Enter a value if you did not check Use global constants for login and password. Select a value from the drop-down list if you checked Use global constants for login and password). |
6.Enter information about the specific file. Select the file type to import:
•Excel Spreadsheet (XLS, XLSX)
•XML
Comma Delimited (CSV)
This format can be read by most applications, such as Microsoft Word or Microsoft Excel. This format does not support line breaks.
Do not include commas within the data of the last column of your CSV file. CSV treats a comma within quotes as a separator if it is in the last column.
For example: "Initials", "mail", "telephoneNumber", "givenName", "company", "Wilma", "wasselt", "Asselt, van"
The last field is lastName with the format of "Asselt, van". If this field is not the last column, then the data import is able to import it correctly as "Asselt, van". However, when it is in the last column, the data import only sees "Asselt" and not the data after the comma.
| Field | Description |
|---|---|
| Delimiter |
The field delimiter. Do one of the following: Select an option from the drop-down list: •Comma (,) •Colon (:) •Semicolon (;) Enter a custom value. |
Excel Spreadsheet (XLS, XLSX)
This format can be read by Microsoft Excel or other compatible applications. You can only import a single-page Microsoft Excel worksheet.
About Multiple Role Support for CSV and XLS files
Add a Role column to the input file that contains the role display names. If you are updating an existing employee record during the upload, any new roles are added to the roles already assigned to the employee in the employee record. The application separates roles by commas.
The Role column should be named *Role* (with the asterisks included) and should include the role display name and not the actual role name. For example, include Self Service and not SelfService. All role names should be in the column and separated by commas.
•The application does not add roles. The role must already exist before it can be assigned to an employee.
•By default, it is always merge behavior. For example, if an employee already has two roles (for example, Service Desk and IT),and we assign three roles in the import (for example, IT, admin, and service owner), the end result is four roles (Service Desk, IT, admin, and service owner).
XML
Imports generic XML data.
| Field | Description |
|---|---|
| Table Element | The name of the table object. |
| Row Element | The name of the row object. |
| Include Header Row |
Inputs an XML file in legacy GBU format. In this format, the table element is "Rows", and row element is "Row". <Rows> Do not check this option to use the flexible two-level format. In this example,the table element is "Employee_Info", and the row element is "Employee". The field names for this "Employee" object can be an element (such as Name) or a row-level attribute (such as Employee_Number). <Employee_Info xmlns:xsi="http://www.w3.org/2001/XMLSchema-instance" xsi:noNamespaceSchemaLocation="employee.xs"> <Employee Employee_Number="105"> <Name>Masashi Okamura</Name> <Department>Design Department</Department> ... </Employee> |
Data with null values do not appear in the XML file, which can cause problems when exporting data.
For example, consider the following XML. Note the data for the second employee contains an email cell with no attributes. This cause the data to import incorrectly.
<Employee_Info>
<Employee Employee_Number="105">
<Name>Masashi Okamura</Name>
<Department>Design Department</Department>
<Email>[email protected]</Email>
<Phone>408.555.1234</Phone>
</Employee>
<Employee Employee_Number="106">
<Name>Frank Smith</Name>
<Department>Design Department</Department>
<Email></Email>
<Phone>408.555.1235</Phone>
</Employee>
</Employee_Info>
To alleviate this issue, create an empty string:
<Employee_Info>
<Employee Employee_Number="105">
<Name>Masashi Okamura</Name>
<Department>Design Department</Department>
<Email>[email protected]</Email>
<Phone>408.555.1234</Phone>
</Employee>
<Employee Employee_Number="106">
<Name>Frank Smith</Name>
<Department>Design Department</Department>
<Email>""</Email>
<Phone>408.555.1235</Phone>
</Employee>
</Employee_Info>
Hierarchical XML
Imports a structured XML file.
| Field | Description |
|---|---|
|
Table Element Row Element Include Header Row |
These options are disabled because the values are automatically picked up by the XML file. |
| Main XSLT |
Optional. Defines a template to apply to your XML file. Click Upload and navigate to your template file. |
| Additional XSLT | Click to add additional XSLT files. |
See also Importing Hierarchical XML Data.
Large files (over 50 MB) take longer to preview, because the entire file is downloaded before the first batch can be shown. In other types, the copy/download occurs when moving from the connection to the object mapping page. In hierarchical XML, the application bypasses all mapping pages. Hence, the copy/download only occurs when a user wants to preview the file.
Enter hierarchical information into the fields.
| Field | Description |
|---|---|
| Decimal separator |
The decimal separator symbol. Enter a value or choose one from the drop-down list. |
| Encoding |
The character standard of your file. Select from the drop-down list. |
|
Date Format Time Format Time Zone |
The date, time, and time zone format of your file. Select values from the drop-down lists. This ensures that your data is imported correctly into the database. If your data does not contain date or time fields, use the default settings. |
Test the data import connection
1.Click Test Connection.
If your connection is set up correctly, the application displays a success confirmation message and updates the connection date and time.
If the connection fails, do not click Next until the test connection shows the success message. The connection could fail because of various reasons such as incorrect authentication, restricted or no FTP access, or restricted file permissions.
2.Click Next.
Depending on the data import connection type, the next page in the Data Integration Wizard appears. The next page is as follows:
| Connection Type | Additional Pages |
|---|---|
| Email Import |
none |
|
Discovery 9.x (only for Discovery Release 9.3.x and later) |
Object Mapping Filter Setting Field Mapping Schedule Setting Review and Publish |
|
File on Shared Folder (Only available for on-premise deployments) |
Object Mapping Filter Setting Field Mapping Schedule Setting Review and Publish |
| FTP |
Object Mapping Filter Setting Field Mapping Schedule Setting Review and Publish |
| Manual File Upload |
Object Mapping Filter Setting Field Mapping Review and Publish |
| SCCM | |
| Secure FTP (SSH) |
Object Mapping Filter Setting Field Mapping Schedule Setting Review and Publish |
| EPM Connector |
Object Mapping Filter Setting Field Mapping Schedule Setting Review and Publish |
Object Mapping
Data Import Setup Sequence -- Object Mapping

1.Enter information into the fields. Some fields do not appear on all options.
| Field | Description |
|---|---|
| Mapping | The mapping. Select the default mapping or select Add New from the drop-down list. |
| Name |
The mapping name. Use the default name, modify the name, or choose Add New from the drop-down list to create a new mapping. To modify the existing name, click Save as New. The application creates a clone of the mapping, which you can then modify. This button is only enabled if you select an existing mapping. |
| Source Mapping Tables | For EPM Connector |
| Max file size | Read only. Shows the maximum file size that you can import. The default maximum file size is 250 MB. |
| Max size | For EPM Connector: Enter the number of records that should be retrieved each time the database is queried. |
| Root Table | For EPM Connector: Select the table that contains the records which can uniquely identify the computers or other machines in your organization. |
| Source File Name | Read only. Taken from the value in the File Name field. |
| Source Unique Key/Unique Key | Lists the fields containing keys that uniquely identify your record. The fields that appear in the list are taken from the first record in your source file. Select the field that is primary in identifying your records, which can be used to retrieve additional information. |
| Change Time column |
For EPM Connector: Select TimeKey this records the time when a record is updated. Keep the default Computer since this is a top-level object equivalent to the CI Business object in IS |
| Target Business Object |
The primary business object in Service Manager into which the data is imported. Highlight the business object in the list.
The list shows all the business objects in Service Manager. Use the Target Business Object field to enter a few letters of the target business object and then click Filter by Name or Filter by Object to narrow your search. For example, if you are importing a list of employee records into Service Manager, the primary business object you need to map to is the Employee business object. |
2.Click Next. The application displays the Filter Setting page.
Setting Filter Conditions
Data Import Setup Sequence -- Filter Setting

After mapping the business object tables to query, you can optionally specify filter conditions for the root business object.
1.Click Create Filter. The filter fields appear. If the Create Filter button is not visible, delete the default mappings on the previous page.
2.Select a condition.
3.Enter the fields and operators into the form.
Filter Manager Conditions and Fields
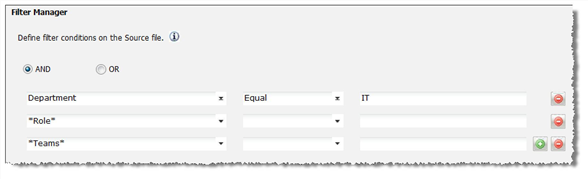
4.Click the add icon to add another row.
Mapping Fields
•About Transformation Functions
•About Mapping Files with Currency Data
Mapping Fields for Import
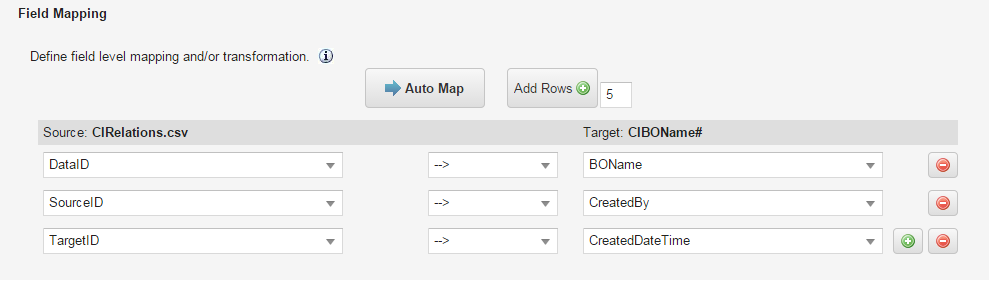
Data Import Setup Sequence -- Field Mapping

Use this page to define the field level mapping and transformation. The left column shows the source file name and the right column shows the target business object field name. It is assumed that the Source mapping names are known or identified in advance.
For Endpoint Manager (EPM) The first 5 field mappings: Audit.TimeStamp, Audit.RequestID, Audit.FirstSequence, Audit.LastSequence. Audit.Type are required.
Map Fields for Import
1.If appropriate, select a transformation function from the middle column. See About Transformation Functions for a list of the transformation functions.
2.Select the field names to map between the source file and the target business object in Service Manager.
For example: an EPM Connector (EPM) field CompSystem.Manufacturer would map to the ISM ComputerSystem.Property.Manufacturer asset identifier.
3.If the target field is a link field, determine the name of the field to use. See About Mapping Link Fields.
4.(Optional) Click Auto Map to map the source file column header to the target field name. Remapping the source column header does not change your existing mapping.
5.Click Next. The application displays the Schedule Setting page or the Review and Publish page.
About Transformation Functions
The following table lists the transformation functions.
|
Function Name |
Category |
Description |
Input |
Output |
|
--> |
None |
Returns the source value (does nothing). |
||
| Abs | Math | The absolute value of input value. | Double | Double |
|
AssetIdentifier |
Special |
Creates a unique identifier from the SCCM or EPM Connector machine ID and the instance key. |
SCCM machineID SCCM InstanceKey |
|
| Avg | Math | The arithmetic mean or average of all the input values. | Double | Double |
| Cbrt | Math | The cube root of the input value. | Double | Double |
|
Ceiling |
Math |
Smallest integer value less, greater than, or equal to the given value. |
Double |
Double |
| Century | DateTime | Returns the century part of the input date time value. | DateTime | Double |
|
CIType |
Special |
Returns configuration item types from the SCCM or EPM mappings and role. See Example 1: Mapping CI Type. If role = SQLServer, return Server If role=not defined or does not exist, return default value Computer If role=LM_Workstation, return Workstation. |
SCCM Mapping and Role EPM Mapping and role. |
|
| CIType2 | Special |
Returns configuration item types from the SCCM mappings, role, model and virtual keywords. |
SCCM Mapping and Role EPM Mapping |
|
|
Concat |
String |
Concatenates string values together. |
String Array |
String |
|
ConvertToLocal |
DateTime |
Converts a DateTime value to a local DateTime value. |
DateTime |
DateTime |
|
ConvertToUTC |
DateTime |
Converts a DateTime value to a UTC DateTime value. |
DateTime |
DateTime |
|
DateTimeNow |
DateTime |
Current date and time in yyyy-MM-ddThh:mm:ss format. |
None |
String |
|
DateTimeUTCNow |
DateTime |
Current UTC date and time in yyyy-MM-ddThh:mm:ss format. |
None |
String |
| DayOfMonth | DateTime | Returns the day of the month of the input DateTime value. | DateTime | Double |
| DayOfWeekNo | DateTime |
Returns the day number of the week of the input DateTime value. 0: Sunday 1: Monday 2: Tuesday 3: Wednesday 4: Thursday 5: Friday 6: Saturday |
DateTime | Double |
| DayOfWeekStr | DateTime |
Returns the day string of the week of the input DateTime value. Sunday Monday Tuesday Wednesday Thursday Friday Saturday |
DateTime | String |
| DayOfYear | Returns the day of the year of the input DateTime value. | DateTime | Double | |
|
Diff |
Math |
Subtracts all the values from the first value. |
Double Array |
Double |
|
Div |
Math |
Divides the first value by the remainder of the values. |
Double Array |
Double |
|
Floor |
Math |
Largest integer value less, greater than, or equal to the given value. |
Double |
Double |
| Hour | DateTime | Returns the hour part of the input DateTime value. | DateTime | Double |
| IsoWeek | DateTime | Returns the ISO week number of the input DateTime value. | DateTime | Double |
| Leap | ||||
| Length | String | The length of the string. | String | Double |
| Max | ||||
| Min | ||||
| Minute | DateTime | Returns the minute part of the DateTime value. | DateTime | Double |
|
Mod |
Math |
Remainder after dividing first value by the second value. |
Double, Double |
Double |
| Month | DateTime | Returns the month part of the input DateTime value. | DateTime | Double |
| Pow | Math | The number raised to the power. | Double | Double |
|
Product |
Math |
Product of all values. |
Double Array |
Double |
| Quarter | DateTime | Returns the quarter of the input DateTime value. Quarter ranges from 1 to 4. | DateTime | Double |
| RegexMatch | String | Returns a matched value from the input value for a pattern in a position (zero-based). | String | |
| RegexReplace | String | Returns a string that has been replaced with a string that matches a pattern in the input string. | String | |
|
Replace |
String |
Replaces the part of a string with given value. |
String |
String |
|
Round |
Math |
Rounds a double-precision floating-point value to the nearest integer. |
Double |
Double |
| Second | DateTime | Returns the second part of the DateTime value. | DateTime | Double |
|
Select |
Special |
Return the first item in the list where the corresponding predicate is equal to a given value. |
String | String |
| SelectNotNull | Special | Returns the first input value that is not empty or not null for the group of items. | String | String |
|
Split |
String |
Returns a specific part of a string split using a separator. |
String |
String |
| Sqrt | Math | The square root of the input value. | Double | Double |
|
Substring |
String |
Returns part of a string. |
String |
String |
|
Sum |
Math |
Sum of given values. |
Double |
Double |
| Switch | Special | Returns the string based on the input value and corresponding mappings (delimiter is ':') | String | String |
|
TimeDiff |
DateTime |
Returns the period between two DateTime values. |
DateTime, DateTime |
TimeSpan |
|
ToLower |
String |
Converts to lowercase text. |
String |
String |
|
ToProper |
String |
Converts to proper case text. |
String |
String |
|
ToUpper |
String |
Converts to uppercase text. |
String |
String |
|
Trim |
String |
Removes all leading and trailing white spaces. |
String |
String |
|
TrimLeft |
String |
Removes the leading white spaces. |
String |
String |
|
TrimRight |
String |
Removes the trailing white spaces. |
String |
String |
| Truncate | Math | The integral part of the value. In other words, rounds up or down towards zero. | Double | Double |
| Week | DateTime | Returns the standard week number of the input DateTime value. | DateTime | Double |
| Year | DateTime | Returns the year part of the input DateTime value. | DateTime | Double |
About Mapping Link Fields
When specifying links to a related business object as part of data import, note the following:
•Data import can only be linked when using link fields such as OrgUnitLink or ManagerLink. Only a one-to-one link is supported.
•For CSV files, the data should display the name of a business object. For example, for organization unit, use the name of the organization. For employee, use the display name of the employee (for example, Marcia S Hendric) rather than the login ID (MHendric).
When mapping link fields, such as OrgUnitLink or ManagerLink, note the following:
•For the source value, on the left, use the value of the Display field under the Special Purpose Fields section and not the value of the Display Name field. You need to determine this field name before mapping the fields.
Linked Field Reference
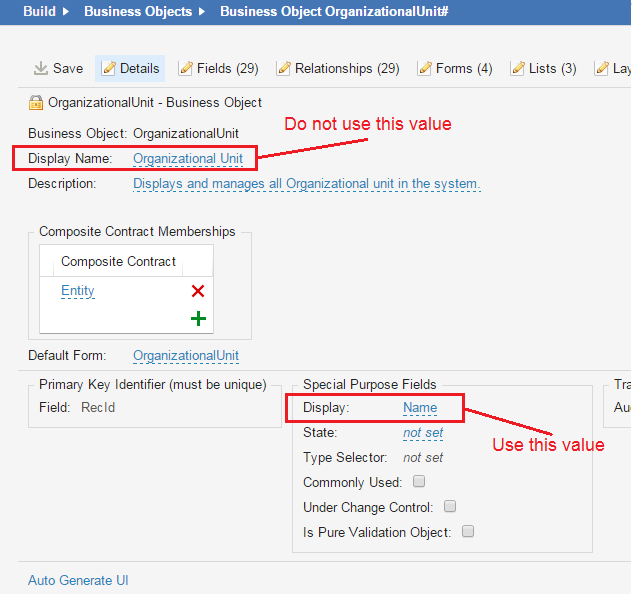
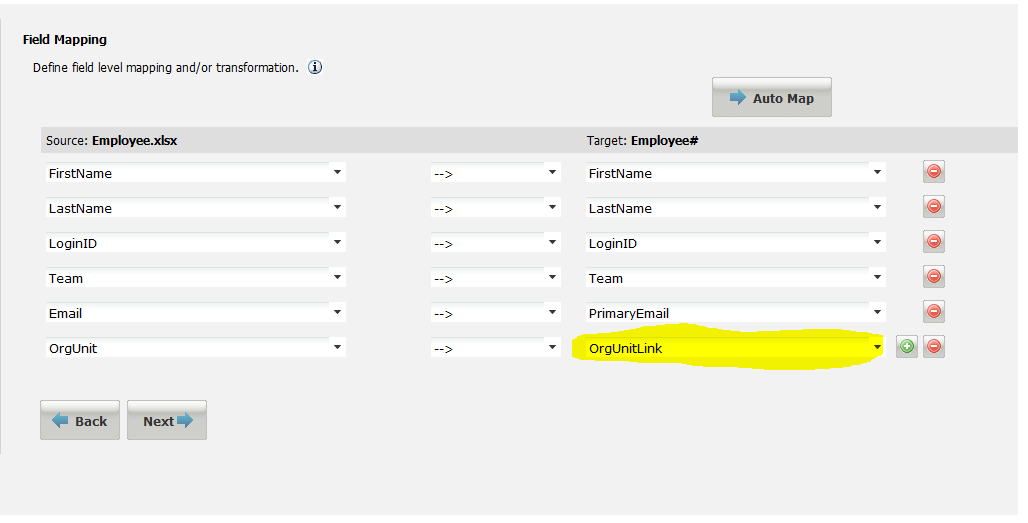
•For the target value, on the right, use the name of the link field, such as OrgUnitLink or ManagerLink.
The following shows mapping a linked field using the field name:
Field Mapping Example - Linked Field
About Mapping Files with Currency Data
To prevent errors while importing files containing currency data, map the currency value and the currency type separately.
For example, if your file contains a currency code value such as NNN.NN GBP (for example, 8999.00 GBP), create a column for the numeric value (NNN.NN) and another column for the currency type (GBP).
If that is not practical, then you can use the Split function on the Field Mapping page:
"Currency", , 0 - Split - "Currency"
"Currency", , 1 - Split - "Currency_Currency"
Field Mapping for Currency

Setting the Data Import or Web Service Connection Schedule
After mapping the fields you must schedule the import and associate the mapping with one or more existing or previously created schedule entries.
Data Import Setup Sequence -- Schedule Setting

This option only appears if you select one of the following connection types: Discovery 9.x, File on Shared Folder, FTP, SCCM, EPM Connector, or Secure FTP (SSH), or if you create a new web service connection.
As noted in Setting Up a Data Import Connection, the schedule options are defined and can be viewed in the Schedule Entry workspace . See About the Schedule Entry and Scheduled Jobs Workspaces for more information.
Data Import Schedule
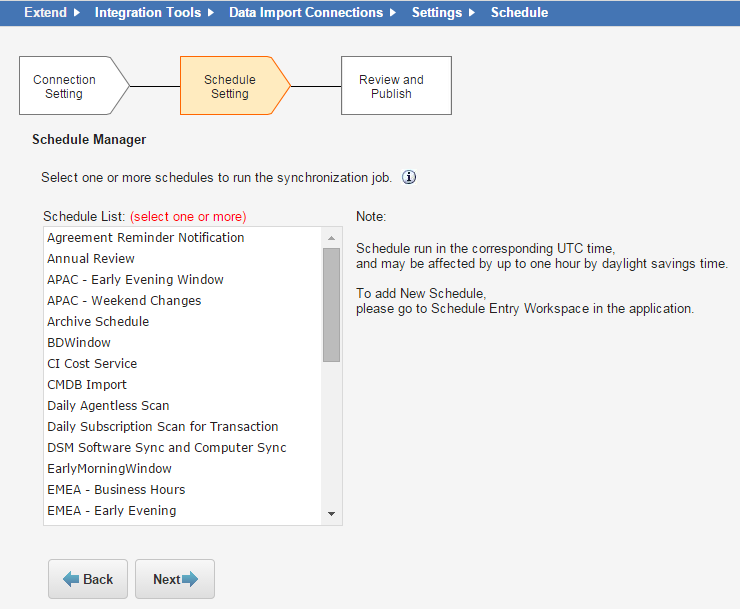
Schedules determine when the import or data connection is added to the queue for processing. You can create multiple entries in the Schedule Entry table to run multiple imports of the same data each day.
1.Select one or more schedules from the schedule list. (Use the Ctrl key to select more than one schedule.)
The application displays information about each schedule that you select at the bottom of the page.
If you are not the owner of a schedule that you have selected, and the schedule is changed by the owner, your import time might be affected.
The supported schedule types are: Daily, Weekly (once a week), or Monthly (once a month with a date).
2.Click Next. The application displays the Review and Publish page.
Reviewing and Publishing Import or Web Service Connection Data
Data Import Setup Sequence -- Review and Publish

Click the Test Transformation button in order to view all the mappings specified by you. The mapping configurations appear in a pop-up window as an xml file. If desired, you can copy and paste the information from this window to another file.
You have four options to review or publish your import data:
•Preview: Views the form with your field mappings. All records from the first batch appear showing the mapping configuration and the associated data. You can check these records for import errors before beginning import.
•Publish: The application only shows this option if there is a schedule involved, like with the File on Shared Folder, FTP, and Secure FTP (SSH) connection types. Activates the connection so that it can run according to the schedule.
•Publish & Run Now: Runs the import immediately and places it on the import schedule.
•Publish & Test Run: Runs the import with only the first batch of records. A batch is 200 records. If errors or problems occur in this job, you can go back to your data and troubleshoot before running the entire job.
The application automatically saves all field mappings even if they are not immediately published. After you publish the data, the job runs based on the schedule/s you selected.
Viewing, Changing or Deactivating a Published Connection
1.Log in to the Service Manager application.
2.Open the Integration workspace.
3.Select a record to open and view the settings.
4.To deactivate a Published connection, uncheck the Active check box then click Save.
You can resume the imports by checking the Active checkbox if needed.
Troubleshooting
Troubleshoot your connections using one of the following methods:
View the Integration Log
Use the log to view details of the job from the Integration workspace.
1.Log in to the Service Manager application.
2.Open the Integration Log workspace.
3.Select a log to view the details.
| Field | Description |
|---|---|
| Name | Name of the mapping. |
| Start Time/ EndTime | Indicates the time the job should run and the time the job should end. |
| Log Type |
Queued: Indicates that the source ID from SCCM has been queued in the inventory management asset data processor. Verified: Indicates that the source ID from SCCM has been successfully created in the Service Manager database. Stats: Displays statistics about the number of rows processed. |
| Total Processed | Total number of records processed. If no new mappings were added, no records will be processed. |
| Source ID | The root table key shown on the Object Mapping page of the wizard. |
| Failed Count | Displays the number of records that failed to process. |
| Target ID | The Asset ID derived from the asset identifier mapping function on the Field Mapping page of the wizard. |
| Message | Varies based on the log type. the messages can be viewed wile the job is being processed |
View the Integration Queue
While the job is being processed, you can view the record from the Integration Queue workspace. After the job is complete you can only view it from the Integration Log workspace.
Questions and Answers
Q.I made attribute mapping changes to the SCCM integration. Whenever I run the integration, it appears to be pulling information for all computers that have been audited since the last SCCM integration was run.
Is it possible to perform a complete import of all computers regardless of when they were last audited by SCCM?
A. Yes. Follow these steps:
1.Log in to the Service Manager application.
2.Open the Integration workspace.
3.Open the integration to update.
4.In the Last Data Changed Time field, set the last scanned date to a really old date, such as January 1, 1949.
Setting an Arbitrary Date for the Last Audit
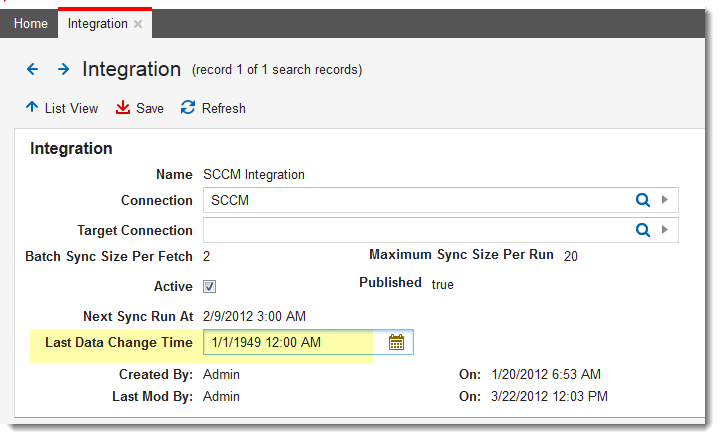
5.Run the job as scheduled.
The application captures all information.
Example: Importing Configuration Item Relationships
The following is a specific example of importing data for a configuration item (CI) map tree.
In the past, if you wanted to define a relationship between a configuration item and the application, you used the Map Tree tab to link related configuration items, based on a specific named relationship. This process still works, but can be time-consuming if there are many configuration items to map.
In Service Manager Release 2015.1, we have added a new feature that uses data integration to link multiple configuration items from a CSV or Microsoft Excel file. To use this feature, you must have the DataIDs, SourceIDs, and TargetIDs of the configuration item records to link as well as the RecID of the CINamedRelConstraints record that defines the name of the relationship between the configuration items (such as "managed by" or "runs on").
To use this feature, you must have the CINamedRelLink business object which is new in Service Manager Release 2015.1. If you do not have that business object, contact Ivanti.
To import the relationship records, follow the steps in Setting Up a Data Import Connection. Follow these steps:
1.Follow steps 1-4 in Setting Up a Data Import Connection.
2.In the Connection Type field, select Manual File Upload.
3.In the Data File Name field, click Upload to navigate to the file that contains the configuration item relationship information. In this example, the file is called CIRelations.csv.
4.Test the data import connection by clicking Test Connection and click Close to close the dialog box.
5.Click Next. The application displays the Object Mapping screen.
6.Enter the following:
•In the Mapping field, select Add new....
•In the Name field, enter a name, such as CI Name Relation mapping.
•In the Source Unique Key field, select all three keys (DataID, SourceID, TargetID).
•In the Target Business Object field, enter CINamedRelLink [CINamedRelLink#].
7.Click Next. The application displays the Filter Setting screen.
8.Enter the following values:
| Source: CIRelations.csv | Target: CINamedRelLink# | |
|---|---|---|
| DataID | --> | DataID |
| SourceID | --> | SourceID |
| TargetID | --> | TargetID |
9.Click Next. The application displays the Field Mapping screen.
10.Enter values. See Mapping Fields.
11.Click Next. The application displays the Review and Publish screen.
12.Click Publish & Run Now.
Was this article useful?
Copyright © 2019, Ivanti. All rights reserved.