Service Manager
Working with Employees
•About Creating an Incident for an Employee
•Adding an Employee to a Contact Group
•Adding Employees Through Incoming Messages
•Inserting Non-LDAP Authentication Providers to Employee Profiles
About Employees
Service Manager contains a user named InternalServices by default to support the workflow and escalation engines. This user is linked to the admin role. You cannot delete this user. Do not link it to other roles or unlink it from the admin role. Doing so will disable the workflow and escalation features.
An employee is an internal customer who uses Service Manager. The application provides employees with an account that defines the login access and available roles. The application assigns at least one role to all employees and they use this role to log into the application.
Employee accounts include general information (login and role information) and extended information (personal information).
To add a large number of users within Active Directory, use the LDAP Active Directory Import tool. See Configuring LDAP Settings.
Accessing the Employee List
1.Do one of the following:
•From the Configuration Console, click Configure > Users and Permissions > Users to open the Users workspace.
•Log in to the application and open the Employee workspace.
2.Open an employee record to view its properties.
Creating an Employee
Employee information is stored in the StandardEmployee business object. Edit this business object to track information to capture about each employee in your application.
1.From the Configuration Console, click Configure > Users and Permissions > Users to open the Users workspace.
2.Click New Employee from the toolbar. The application displays an empty employee form. The following default tabs appear (results may vary depending on your application setup):
•Details: Continue to the next step.
•Roles: The roles to which the employee belongs. See Working with Roles.
•Incident: Incidents in which the employee is the customer. See About Creating an Incident for an Employee.
•Change: Changes in which the employee is the requester. See Creating a Change Request.
•Contact Group: See Adding an Employee to a Contact Group.
•CI: Configuration items in which the employee is the owner. See About Creating a Configuration Item.
•Activity History: See About Activity History
•Attachment: See Working With Attachments and URLs.
•Team: The teams to which the employee belongs. See Working with Teams.
•Recurring Service Subscription:
•Client:
•Slave Tenants: See Creating a Slave Tenant.
•Audit History: See About Accessing the Audit History.
3.Enter information into the fields.
Contact Information
| Field | Description |
|---|---|
| Prefix | The prefix of the user. |
| First Name | The first name of the user. |
| Middle Name | The middle name or initial of the user. |
| Last Name | The last name of the user. |
| Suffix | The suffix of the user. |
| Primary Email |
The email address of the user. This field is used in part to verify the user when logging in. If Open ID authentication is set up for the user, enter the email address of the user from the provider. |
| Primary Phone | The phone number of the user. |
| Primary Address | The street address of the user. |
| City | The mailing city of the user. |
| State | The mailing state of the user. |
| Zip | The mailing zip code of the user. |
| Country | The mailing country of the user. |
| Photo | A photo of the user. Click Upload to attach a photo to this record. The photo appears in messages in the Social Board. |
The EmployeePhotoRevision business rule (a new saving business rule in the Employee business object) increments the value by 1 each time that the record is saved. This might cause earlier versions of Service Manager to not update the employee photo correctly.
Organizational Information
| Field | Description |
|---|---|
| Organizational Unit | The organization unit associated with the user. Enter Default if this employee is not assigned to any business units. |
| Department | The work department of the user. See Working with Departments. |
| Cost Center | A cost center. Select None if this employee is not assigned to any business units. |
| Default Charging Account | Select a default charging account from the list. The Org Unit must have default charging accounts set up before one can be assigned to an employee. |
| Title | The job title of the user. |
| Manager | The reporting manager of the user. |
| Location | The work location of the user. Defined in the Location workspace. |
| Floor | The work floor number for the user. |
| Room | The work room number for the user. |
Status & Team
| Field | Description |
|---|---|
| Status |
Status of the user. The default statuses are: Active New On Leave Terminated |
| Team | Team associated with the user. |
Authentication Information
| Field | Description |
|---|---|
| Disabled | Disables the ability to log in. Their information still appears in the user list. |
| Login ID |
The login ID name of the user. This field is used in part to verify the user on log in. If you use internal authentication to log employees in, this identification is also used as the official login ID. If you use internal authentication, the login ID is limited to 30 characters. If the employee is using NT authentication, the limit does not apply. A login ID should be meaningful, such as a role in the application (Admin) or a first initial/last name (JSmith). |
| Enable Internal Auth |
Performs login authentication for this employee. If selected, internal authentication is available for the employee. Otherwise, it is disabled. Local authentication requires employees to enter an application-specific login ID and password when accessing the application. Enter a password for the login, then reenter the password to confirm; the ID automatically fills from the login ID defined previously. LDAP authentication verifies employee login information for employees imported using the LDAP Active Directory integration. Employees enter their active directory employee name ([domain name]/[employee ID]) and password to log in. To use LDAP authentication, you must specify the LDAP server path to authenticate against as well as the employee name and password required to access that server (if applicable); specify this information in the LDAPInfo.xml configuration file located in the messaging folder of your application installation directory. |
| Internal Auth PWD | The password used to access the application using the internal login ID. |
| Enable External Auth |
Select this option to enable the user to access the application using operating system authentication. Authentication is supported via Open ID, OpenID Connect, SAML/ADFS, and LDAP, which allows users to access the application from another website. |
| Login for External Auth |
The external login ID. Used if the user is authorized to login from outside the organization. You can employ multiple external authentication providers. Click Add New, then provide the user's login and select to select a new authentication provider. In some cases (for example, Google), this may be a profile URL. This field is populated the first time the user logs in using the external authentication. Users cannot use the same external account for authorization purposes. |
| Disable PWD Expiration | Overrides the password expiration setting specified by the administrator. |
| Enable Voice | Uses Ivanti Voice and enables the Ivanti Voice toolbar. Adds the Voice-Agent Properties and Voice - Agent Skill tabs to the employee record. See Working with HEAT Voice. |
| Is Named User |
Designates the user as a named user. Tracks named user licenses. Once a user is designated as a named user, a named user license is consumed, whether the user is logged in or not. |
| Is Auto Provisioned |
Designates the user as auto provisioned. When an employee first logs into the application using an authentication provider URL, then a new employee record is created and the application displays this option as selected. To add new users via authentication, you must select the auto provisioning option in the authentication provider record. this checkbox, you also have the options to auto provision the new user's role, status, and team. |
| Creation Method |
Choose from the drop-down list: Auto provisioned through Open ID Auto provisioned through OpenID Connect Auto provisioned through SAML Created by the email listener Created by LDAP Import Manually created The first two methods of creation are populated automatically if the user is created via auto provisioning. The authentication method depends on the identity provider protocol. For the created by email listener method, the employee record is created when the user sends an incoming email to , then the record is created. The option to create or link to an employee must be selected for the business object, referenced in the incoming email, in the inbox settings of the tenant email configuration record. If the employee record is created when the user is imported via LDAP, the record is created via LDAP import. |
|
IVR PIN Code |
The PIN assigned to employees of certain Ivanti Voice applications. This code is frequently the last four digits of an employee Social Security number. |
Miscellaneous
| Field | Description |
|---|---|
| Network Username | The name that appears on the network. |
| Customer ID | The customer ID. |
| Hired Date |
The hiring date of the employee. |
| Terminated Date |
The termination date of the employee. |
4.Click Save.
Modifying Employees
1.From the Configuration Console, click Configure > Users and Permissions > Users to open the Users workspace.
2.Open an employee record.
3.Edit the employee fields and tabs as described in Creating an Employee.
4.Click Save.
Deleting Employees
Employees can not be deleted from the application. To remove an employee from the active list, set their status to terminated.
1.From the Configuration Console, click Configure > Users and Permissions > Users to open the Users workspace.
2.Open an employee record.
3.From the Status field, select Terminated from the drop-down list.
4.Click Save.
Linking Roles to an Employee
An employee must be linked to a role before they can access Service Manager. You can link multiple roles to an employee record. Upon logging in, the employee can select a role from the list defined in this workspace.
1.From the Configuration Console, click Configure > Users and Permissions > Users to open the Users workspace.
2.Open the employee record.
3.Click the Roles tab.
4.From the toolbar, click Link. The application displays the Link Roles dialog box.
5.Choose a role from the list, then click Select. The role appears on the list.
6.Click Save. The role is added to the list for the user. Repeat to assign additional roles.
About Creating an Incident for an Employee
You can immediately create an incident on behalf of an employee when creating the employee record. For existing employee records, you can view the list of incidents for that employee. See Managing Incidents.
Adding an Employee to a Contact Group
For information about contact groups, see Using Contact Groups.
1.From the Configuration Console, click Configure > Users and Permissions > Users to open the Users workspace.
2.Open an employee record.
3.Click the Contact Group tab. The group list appears.
4.From the toolbar, click Link. A list of contact groups appears.
5.Choose a group name from the list, then click Select. The contact group appears on the employee's list.
6.Click Save.
Adding Employees Through Incoming Messages
You can set your email listener parameters to add employee accounts when an incoming email message is received from a trusted domain. For more information, see Working with Email Servers.
Adding an Employee to a Team
For information about teams, see Working with Teams.
1.From the Configuration Console, click Configure > Users and Permissions > Users to open the Users workspace.
2.Open an employee record.
3.Click the Team tab. The team list appears.
4.From the toolbar, click Link. A list of teams appears.
5.Choose a team name from the list, then click Select. The team appears on the employee's team list.
6.Click Save.
Inserting Non-LDAP Authentication Providers to Employee Profiles
To provide non-LDAP authentication providers to employee profiles, you can configure a workflow triggered whenever an employee record is created or modified. This workflow simply executes a quick action. The quick action adds a child record to the FRS_ExternalLoginAssocProfileEmployee business object with AuthProvider and Login fields. Get the RecID from the authentication provider table to add this child record to the Employee business object.
Creating a Call-Back Method
You can create a field in which users can select their preferred method of call-back contact.
1.Create a validation business object containing the values that the customer can choose from. See Using Validation Business Objects for a description on how to do this.
2.From the Employee business object, create a new text field called CallbackMethod.
3.Check Validated under Pick List and select the validation business object that you created above. See Working with Fields for a description on how to do this.
Sample Callback Field
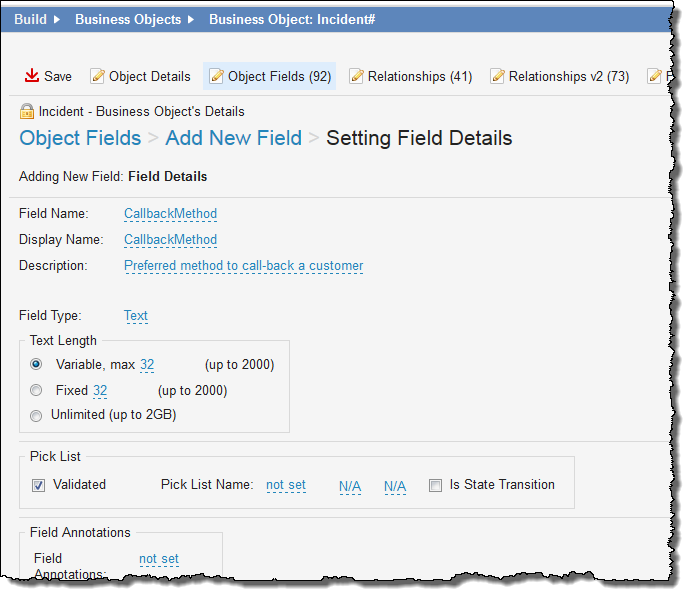
4.Add this field to the Profile.Employee form. See Using Forms for a description on how to do this.
5.Click Save.
When the customer refreshes their screen, the new field appears in their employee record. They can then choose their preferred call-back method from the drop-down list.
Creating an Employment Type
Use the Employment Types workspace to define various types of employees.
The default types of employees are:
•Permanent
•Contractor
•Contractor - Part Time
1.From the Configuration Console, click Configure > Organization Profile > Employment Types to open the Employment Types workspace.
2.Click New Employment Type. The application displays a blank field.
3.Enter a unique name for the employment type.
4.Click Save. The employment type now appears on the list.
Was this article useful?
Copyright © 2019, Ivanti. All rights reserved.