Enterprise Self Service Welcome Page
The Enterprise Self Service Welcome page is a hub for all Ivanti Service Manager Self Service needs. It's the Self Service Mobile landing page from which you can navigate to different Self Service Mobile portals based on the category you need to access. You can tailor the content in a way that Self Service Mobile users who want to view and access content specific to HR, IT, or facilities, can choose and view content specific the selected category.
For example, if the end user chooses the HR category in the Enterprise Self Service Welcome page, the user will be redirected to the Self Service Mobile portal where the content (Announcements, Alerts, Knowledge Articles, and Service Catalogs) specific to HR will be displayed. This way the Self Service Mobile content is organized and spares the end users from content they might not be interested in.
Configuring the Enterprise Self Service Welcome Page
For the end user to be able to login to the Enterprise Self Service Welcome page and navigate from there to the Self Service Mobile portal based on the category and user persona such as the HR, Facilities, or IT, the Administrator has to configure the feature and curate the content based your the organization's business need.
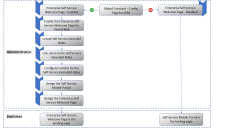
Configuring the Enterprise Self Service Welcome Page - Workflow
1.Open the Configuration console and select Global Constants.
2.Set the Config Home page for ESM option as True.
The global constant Config Home page for ESM is used to turn on or off the Enterprise Self Service Welcome page feature. If you do not want this feature, and wish to use just the Self Service Mobile portal, do not enable this global constant.
You need to enable the Enterprise Self Service Welcome page for the parent Self Service Mobile role. Only that role will be able to access the Enterprise Self Service Welcome page as their Self Service Mobile landing page. Apart from the Self Service Mobile role you give access to, Administrator will have access to the Enterprise Self Service Welcome page by default. Because only an Administrator can configure the data, create extended roles, and set other permissions required to use this feature.
In this example, we are considering the Self Service Mobile role as the parent role and giving access to the Enterprise Self Service Welcome page to it. But you can choose any role based on your need.
1.Open the Configuration console > Users and Permissions > Roles and Permissions.
2.Select the Self Service Mobile role and select the New Self Service UI checkbox.
3.Select the Enterprise Self Service Welcome Page checkbox. This option is enabled only when you select the New Self Service UI checkbox.
4.Click Save.
You have now allowed the Self Service Mobile role to access the Enterprise Self Service page which serves as the parent role for all Self Service extended roles.
You need to create one or more Self Service extended roles based on your business need. In this example, Self Service HR is created.
1.Open the Configuration console > Users and Permissions > Roles and Permissions.
2.Click Clone for the Self Service Mobile role.
3.Type a name for the role, for example, Human Resources and click Ok.
4.Open the role you just created.
5.Select the Self Service Extended Role checkbox.
This role will be an extended/child role of the Self Service Mobile role.
6.Repeat steps 3 through 5 to created more extended roles.
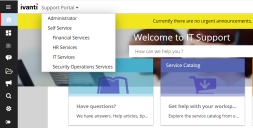
The Self Service extended roles are not available in the role selection page like other roles. They are only available in the Self Service Mobile portal as shown in the below figure.
Extended role in Self Service Mobile portal
Link users to the Self Service extended roles.
1.Open the Configuration console > Users and Permissions > Users.
2.Open an existing user or create a new one by clicking New Employee.
3.Link one or more Self Service extended roles to the user.
4.Click Save.
5.Repeat steps 2 through 4 to link more users to the Self Service extended roles.
You now have to curate the content for the Self Service extended roles by adding appropriate filters. This step determines how the data should be segregated and what content should be displayed for the Self Service extended roles in the Self Service Mobile portal.
1.Open the Configuration console > Users and Permissions > Roles and Permissions.
2.Open the Self Service extended role - Human Resources that you created in the Create Self Service Extended Roles section.
3.Select Object Permissions and add necessary filters for the Business Objects based on the role and category.
The following Business Objects are supported for Self Service Mobile. You can add necessary filters for these Business Objects:
•Alert
•Announcements
•FAQ
•FRS_Knowledge
•ServiceReqCategory
•FRS_MyItems - This Business Object is configured in Saved Search. Following are the steps to configure:
| a. | From the Configuration console select Business Objects > FRS_MyItems > Saved Searches. |
| b. | Edit an existing Saved Search. |
| c. | Modify the Saved Search as need be and click Save As to save it as a new saved search. |
4.Repeat steps 2 through 3 for all Self Service Extended roles.
For more information on filtering and configuring Business Objects and Saved Searches, see Object Permissions and Saved Search.
After creating the Self Service extended roles, linking users, and curating content, you now have to configure the Self Service Mobile Portal for all the Self Service extended roles you have created.
1.Open the Configuration console, User Interface Styles > Style Editor > Self Service.
2.Select the role for which you wish to edit the Self Service Mobile portal and click Edit Self Service Widgets.
• Although this option is available for all roles, it is applicable only for Self Service Mobile and extended roles. As in, if you click the Edit Self Service Widget for a non Self Service Mobile role, the Self Service Mobile role opens in edit-mode for the Administrator role. But if you select the Edit Self Service Widget for a Self Service Mobile or extended role, the Self Service Mobile page opens in edit-mode for the selected role.
• You can also change the role in the Self Service Mobile portal.
3.Design the Self Service Mobile portal for all the Self Service extended roles based on your business needs. For more information, see Configuring the Self Service Mobile Portal.
Now you have to design the Enterprise Welcome page and add cards so that the end user can select the category and navigate to the Self Service Mobile portal (for the selected category) from this page.
1.Open the Configuration console > User Interface Styles > Style Editor > Self Service.
2.Click Edit Enterprise Self Service Page. This option is available only for the Administrator role.
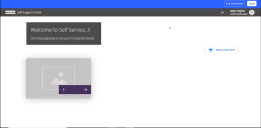
The Enterprise Self Service Welcome page opens in the edit-mode. For the first time, this page is displayed without any cards, logos, and images. You can design it as per your preference and business need.
Sample image of the Self Service Welcome Page before designing
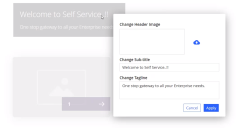
3.You can design the following elements for the page:
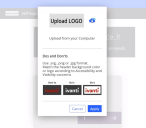
•Logo
Sample of uploading a logo
•Header Image
•Sub-title
•Tagline
Sample Image of the designing the page elements
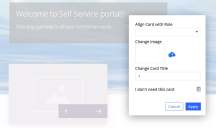
4.Click Add Card and select the role to be aligned to the card.
Sample image of designing a card
A role cannot be aligned to more than one card.
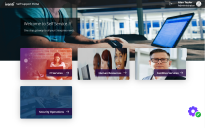
5.Add more cards based on the number of extended roles you have created.
Sample of image of the Enterprise Welcome page after designing all the elements and cards
The following are the preferred sizes for the images:
•Enterprise Self Service Welcome page background image:
•width 1920 x height 550 pixels.
•In case of using image with a different dimension, then use it in this ratio - width/height should be 3.50.
•Images on Cards:
•width 976 x height 600 pixels.
•In case of using image with a different dimension, then use it in this ratio - width/height should be 1.63.
