About Importing Data from SCCM into ISM
Use this section in conjunction with the information in Data Import Connections.
For on-premise deployments, you must install Discovery to use SCCM to import data. For Cloud customers SCCM used the Discovery asset processor when importing data.
•How the SCCM Integration Works
•Data Imported by the ISM Database
•Setting Up the SCCM Integration
About SCCM
You can import data from your Microsoft System Center Configuration Manager (SCCM) database into a Service Manager configuration management database. This is a one-way import of data. Once you have mapped the fields, you can import data on a scheduled basis.
The configuration management database is a database that stores configuration records of configuration items. In Service Manager, all configuration item records are stored in the Service Manager database. A configuration item can be anything such as an asset, service component, or other item that is controlled by configuration management. Inventory management manages the service assets and configuration items to support the other service management processes.
Although Ivanti has not officially certified SCCM 2012, we consider it to be compliant with Service Manager, assuming that it is backward compatible from the vendor to the certified version.
How the SCCM Integration Works
When you create the connection between the SCCM and Service Manager databases and map the fields, the Data Integration Wizard automatically imports the data from the SCCM database into the Service Manager database. You can schedule this import operation to occur periodically.
Each time the data is imported, it is automatically mapped directly into Service Manager. No other plug-ins or applications are required.
Data Imported by the ISM Database
By default, the Service Manager database imports the following information from SCCM data objects. The application is flexible, however, and you can define other objects.
| Source SCCM | Method | Target |
|---|---|---|
| DateTimeNow | --> | Audit TimeStamp |
| SCCM | --> | Identity Property.ScanMethod |
| Computer_System_DATA.AgentID | --> | Identity Property.AgentVersion |
|
Computer_System_DATA.MachineID Computer_System_DATA.InstanceKey |
AssetIdentifier | Identity Property.ClientID |
| Computer_System_DATA.Description0 | --> | Identity Property.DeviceDescription |
|
Computer_System_DATA.Domain0 Computer_System_DATA.Name0 |
Concat | Identity Property.FullyQualifiedDomainName |
| Computer_System_DATA.Domain0 | --> | Identity Property.DomainName |
| Computer_System_DATA.Name0 | --> | Identity Property.HostName |
|
Network_DATA.IPAddress0 Network_DATA.IPEnabled00 1 |
Select | Identity Property.IPaddress |
|
Network_Data.IPSubnet0 Network_Data.IPEnabled00 1 |
Select | Identity Property .SubnetMask |
|
Network_Data.IPSubnet0 Network_Data.IPEnabled00 1 |
Select | Identity Property.MACaddress |
| PC_BIOS_DATA.SerialNumber00 | --> | Identity Property.SerialNumber |
| Computer_System_DATA.UserName0 | --> | Identity Property.UserName |
| System_Enclosure_DATA.ChassisTypes00 | --> | ComputerSystem Property.ChassisType |
| Physical | --> | ComputerSystem Property.ExecutionEnvironment |
| Computer_System_DATA.Manufacturer00 | --> | ComputerSystem Property.Manufacturer |
| Computer_System_DATA.Model0 | --> | ComputerSystem Property.Model |
| Operating_System_DATA.Caption0 | --> | ComputerSystem Property.OperatingSystem |
| Operating_System_DATA.Caption0 | --> | ComputerSystem Property.OSEdition |
| Operating_System_DATA.Version0 | --> | ComputerSystem Property.MajorVersion |
| Operating_System_DATA.Version0 | --> | ComputerSystem Property.MinorVersion |
| Operating_System_DATA.BuildNumber0 | --> | ComputerSystem Property.BuildNumber |
|
Processor_DATA.Name0 Processor_DATA.Status0 OK |
Select | ComputerSystem Property.CPUArchitecture |
|
Computer_System_DATA.Roles0 LM_Server Server Server_NT Server SQLServer Server LM_Workstation Workstation Workstation |
CIType |
ComputerSystem Property.CIType |
|
Computer_System_DATA.Roles0 Computer_System_DATA.Model0 .*Virtual.* LM_Server > Server Server_NT > Server SQLServer > Server LM_Workstation > Workstation |
CIType2 | ComputerSystem Property.CIType |
| Logical_Disk_DATA.Size0 | Sum | ComputerSystem Property.TotalDiskSpace |
| Logical_Disk_DATA.FreeSpace0 | Sum | ComputerSystem Property.FreeDiskSpace |
| Computer_System_DATA.NumberOfProcessors | --> | ComputerSystem Property.CPUCount |
| Operating_System_DATA.CSDVersion0 | --> | ComputerSystem Property.ServicePack |
| Network_DATA.InstanceKey | --> | Category.Component.Property-Hardware.NetworkAdapter.ID |
| Network_DATA.IPAddress0 | --> | Category.Component.Property-Hardware.NetworkAdapter.IPAddress |
| Network_DATA.IPEnabled00 | --> | Category.Component.Property-Hardware.NetworkAdapter.IPEnabled |
| Network_DATA.MACAddress0 | --> | Category.Component.Property-Hardware.NetworkAdapter.MACaddress |
| Network_DATA.IPSubnet0 | --> | Category.Component.Property-Hardware.NetworkAdapter.SubnetMask |
| Logical_Disk_DATA.InstanceKey | --> | Category.Component.Property-Hardware.LogicalStorage.ID |
| Logical_Disk_DATA.DeviceID0 | --> | Category.Component.Property-Hardware.LogicalStorage.DiskNumber |
| Logical_Disk_DATA.Description0 | --> | Category.Component.Property-Hardware.LogicalStorage.Description |
| Logical_Disk_DATA.FileSystem0 | --> | Category.Component.Property-Hardware.LogicalStorage.Format |
| Logical_Disk_DATA.FreeSpace0 | --> | Category.Component.Property-Hardware.LogicalStorage.FreeSpace |
| Logical_Disk_DATA.Size0 | --> | Category.Component.Property-Hardware.LogicalStorage.Size |
| PC_BIOS_DATA.InstanceKey | --> | Category.Component.Property-Hardware.BIOS.ID |
| PC_BIOS_DATA.ReleaseDate0 | --> | Category.Component.Property-Hardware.BIOS.Date |
| PC_BIOS_DATA.Manufacturer0 | --> | Category.Component.Property-Hardware.BIOS.Manufacturer |
| PC_BIOS_DATA.Version0 | --> | Category.Component.Property-Hardware.BIOS.Version |
| Processor_DATA.InstanceKey | --> | Category.Component.Property-Hardware.Processor.ID |
| Processor_DATA.Name0 | --> | Category.Component.Property-Hardware.Processor.ProcessorName |
| Processor_DATA.NormSpeed00 | --> | Category.Component.Property-Hardware.Processor.Manufacturer |
Setting Up the SCCM Integration
Service Manager currently supports SCCM Release 2007. The data flow from SCCM to Service Manager is unidirectional.
The connection from the integration server can be either through your VPN or through the internet with or without SSL encryption for the SCCM database server connection.
Before attempting to make the connection, ensure the following:
•SCCM is running.
•Your firewall is open for the Microsoft SQL server connection, for either Internet or VPN.
The default port for the Microsoft SQL server connection is TCP/IP port 1433. However, you can set up any TCP/IP port.
To enable encrypted connections to the Microsoft SQL server, see http://msdn.microsoft.com/en-us/library/ms189067%28v=sql.105%29.aspx.
Importing Data from SCCM
Getting Started
To import data from SCCM into Service Manager, follow these steps:
1.Perform steps 1 to 5 in the section called Setting Up a Data Import Connection.
2.In step 5, select SCCM.
3.Enter information into the fields.
| Field | Description |
|---|---|
| Server Name | The name of the server where the SCCM database is located. |
| SSL Encryption | Specifies if the server supports SSL encryption. |
| Database Name | Name of the SCCM database. |
4.Proceed to Object Mapping.
Object Mapping
1.Enter information into the fields.
| Field name | Description |
|---|---|
| Mapping | The default mapping. Select the default or select Add New from the drop-down list. |
| Name | The mapping name. Use the default name, modify the name, or enter a new name for the mapping. To modify the existing name or add a new name, click Save as New. |
| Max file size | Read only. Shows the maximum file size that you can import. The maximum file size is 50 MB. |
| Source File Name | Read only. Taken from the value in the File Name field. |
| Source Mapping Objects |
The source mapping objects. Select all objects that should be included. Ensure that Computer_System_Data is selected. |
| Batch size | Specifies the number of records that should be retrieved each time the database is queried. The default is 200. Do not make this number too small as it could cause excessive database activity. |
| Max size | Specifies the total number of records to process for any given job. |
| Root Table | The table that contains records that uniquely identify the computer systems in your organization. Keep the default as Computer_System_DATA. This is the top-level object, which is equivalent to the configuration item business object in the Service Manager database. |
| Unique Key | The field that contains the key that uniquely identifies a computer record. This is essentially the primary key, which can be used to retrieve additional information about a computer. |
| Change-Time column |
The date and time when a record is updated. Select TimeKey. |
2.Proceed to Filter Manager.
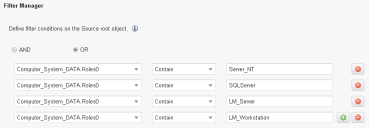
Filter Manager
1.To view the column values of a SCCM database schema, run a Microsoft SQL query.
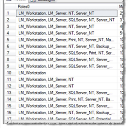
For example, to get the values for the Roles0 column from the Computer_System_Data.Roles0 root table, enter the query: Select distinct Computer_System_DATA.Roles0, *from Computer_System_DATA.
The application displays the following results:
Sample Mapping Results
SCCM Filter Manager
2.Proceed to Field Mapping.
Field Mapping
For additional information about field mapping, see Mapping SCCM Fields
After setting up the filters for the table rows, map the fields and transformation. The first five mapped fields are required. Do not delete these.
1.If appropriate, select a transformation function from the middle column or leave it as is.
2.Select the field names to map between SCCM and Service Manager.
The left column shows the fields from the root table column Computer_System_DATA.Roles0, which was selected on the previous page. The right column shows the asset identity of the matching fields in Service Manager.
3.Proceed to Setting the Data Import or Web Service Connection Schedule.

