Configuring SAP® Solution Manager Settings
This topic describes the SAP Solution Manager (SolMan) settings used when integrating Service Manager with SAP Solution Manager Release 7.1. This topic contains these sections:
•About the SAP Solution Manager
•Installing the Required Components
•Setting Up the SAP Solution Manager
The information in this topic is from OneResource and is included in the Service Manager online help as a courtesy.
If after reviewing this topic, you need assistance with integrating Service Manager with SAP Solution Manager, Ivanti recommends using OneResource. OneResource has experience in this area and would be happy to be of assistance.
Contact OneResource at [email protected] for a consultation.
About the SAP Solution Manager
The SAP Solution Manager is a central support and application management suite that can include many SAP and non-SAP systems. Service Manager is one such non-SAP application. Use this integration to manage incidents.
Before performing the procedures in this topic, install and configure the SAP Solution Manager Release 7.1 according to their documentation. Older versions of SAP Solution Manager may work with this integration but they have not been tested.
Installing the Required Components
Install the following SAP Solution Manager components:
| Component | SAP Version | Patch Level |
|---|---|---|
|
SAP_BASIS |
702 |
15 |
|
SAP_ABA |
702 |
15 |
|
CTS_PLUG |
200 |
13 |
|
PI_BASIS |
702 |
15 |
|
ST-PI |
2008_1_700 |
10 |
|
BI_CONT |
707 |
7 |
|
GW_CORE |
200 |
8 |
|
SAP_BS_FND |
702 |
13 |
|
SAP_BW |
702 |
15 |
|
UISAPUI5 |
100 |
7 |
|
UI_INFRA |
100 |
7 |
|
IW_GIL |
100 |
4 |
|
SAP_AP |
700 |
31 |
|
WEBCUIF |
701 |
12 |
|
BBPCRM |
701 |
12 |
|
CPRXRPM |
500_702 |
11 |
|
IW_BEP |
200 |
8 |
|
IW_FND |
250 |
8 |
|
ST |
710 |
12 |
|
ST-BCO |
710 |
10 |
|
RTCISM |
100 |
0 |
|
SOCO |
101 |
3 |
|
ST-A/PI |
01R_700 |
0 |
|
ST-ICC |
200 |
0 |
|
ST-ICO |
150_700 |
41 |
|
ST-SER |
701_2010_1 |
23 |
Older versions of these components may work with this integration but they have not been tested.
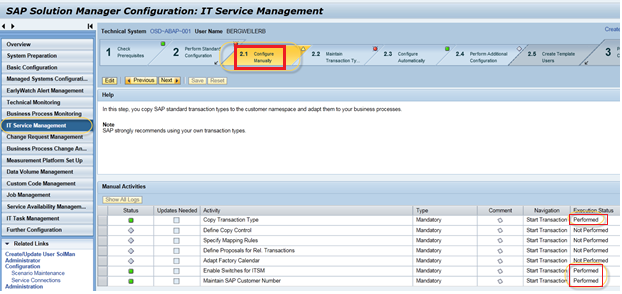
Setting Up the SAP Solution Manager
To set up the SAP Solution Manager, follow the guided procedures in the "IT Service Management" section of the SAP Solution Manager Implementation Guide.
Under IT Service Management, configure the following tabs:
2.1 Configure Manually
Configure Manually
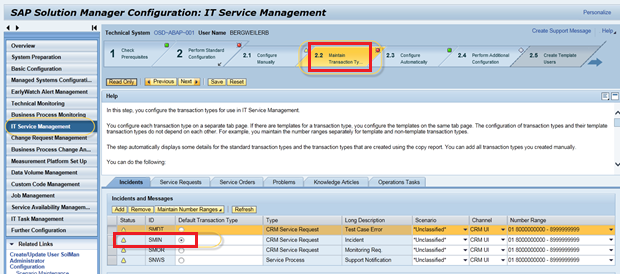
2.2 Maintain Transaction Types
Maintain Transaction Types
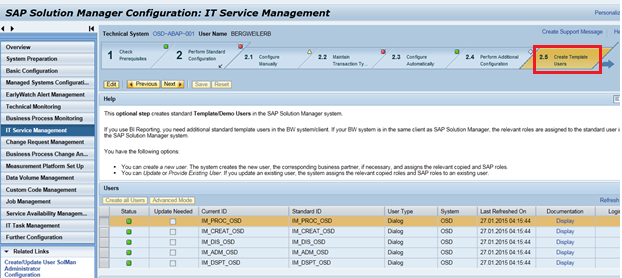
2.5 Create Template Users
Create Template Users
Be sure to name the SMIN incident with a customer-specific nomeclature so that it does not get confused with the SAP Solution Manager incidents during an upgrade. For example, you might name your SMIN incident (Z)SMIN.
For the networking department, you must open the HTTP ports in both directions. Service Manager uses HTTP port 80, whereas the SAP Solution Manager uses port 8000. If there are any firewalls or VPN tunnels in between, ensure that both parties can connect bi-directionally to each other.
Configuring the SAP Solution Manager
•About the SAP Solution Manager Web Service API
•Authorizing the Web Service API
•Activating the Web Service API
•Administering the Web Service API
•Setting Up the Service Provider
•Setting Up the Consumer Proxy
•Configuring the Backend External Service Desk Configuration
•Configuring Post Processing Framework
About the SAP Solution Manager Web Service API
The SAP Solution Manager contains a web service API to make the integration with outside applications, such as Service Manager easier. See https://support.sap.com/content/dam/library/SAP%20Support%20Portal/support-programs-services/solution-manager/knowledge-transfer/White%20Papers/ITSMWebSerAPI-2a.pdf for more information about it.
Execute the procedures described in the "Web Service-Based Configuration" topic in the SAP Solution Manager Implementation Guide.
Authorizing the Web Service API
In the SAP user interface, to access the workcenter (to get access to the IT Service Management functionality) execute the SM_WORKCENTER transaction. This gives you authorization to view and edit the workcenter in a browser. You must have the following roles to log in to the IT Service Management user interface:
•SAP_SM_CRM_UIU_SOLMANPRO
• ZSAP_SMWORK_BASIC
•SAP_SMWORK_INCIDENT_MAN
•SAP_SUPPDESK_ADMIN
•SAP_SM_CRM_UIU_SOLMANREQU (only for closing incidents)
To call the web service API as an application user, you must have the following roles:
•SAP_SUPPDESK_INTERFACE
• SAP_SUPPDESK_ADMIN
We recommend that you create a separate application user for calling the web service API, to limit authorization when logging in to the SAP Solution Manager user interface.
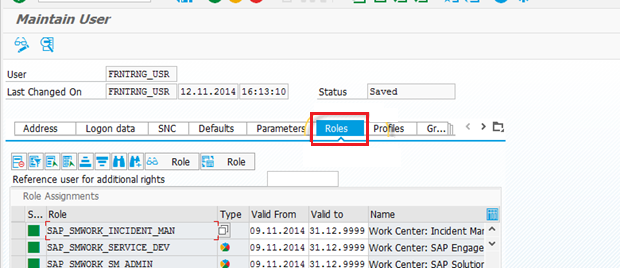
To edit user authorizations, call the SAP SU01 transaction and enter the authorizations under the Roles tab.
SAP Solutions Manager Roles Tab
Activating the Web Service API
To activate the web service API, do the following:
1.Call the SICF transaction.
SICF Transaction
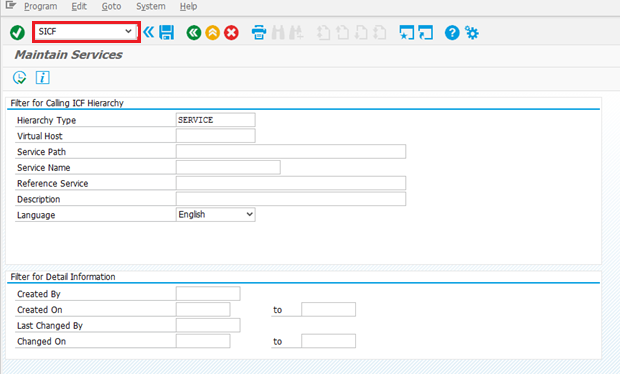
2.Click the green arrow to execute the transaction. The application displays the Maintain service screen.
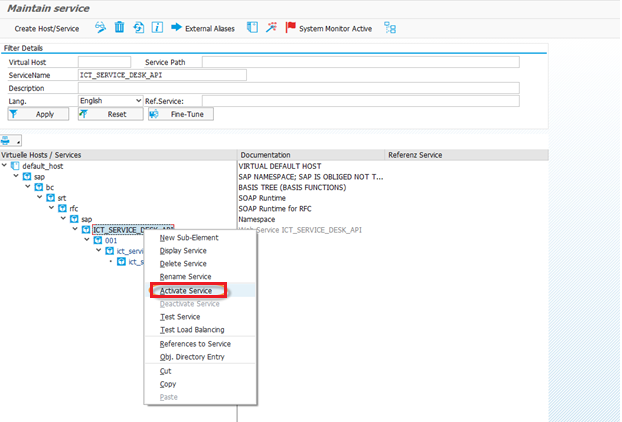
3.Drill down to the service name called ICT_SERVICE_DESK_API. Right click and click Activate Service.
Maintain Service Screen
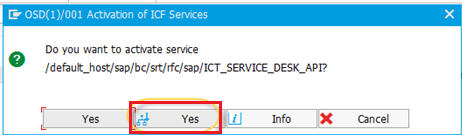
4.In the resulting dialog box, click the second Yes button to activate the web service and all of its subnodes.
Activate the Web Service and Subnodes
Administering the Web Service API
Follow these steps to administer the web service API. These steps are performed in the SOA Management application.
1.Open the SOA Management application.
SOA Management Application
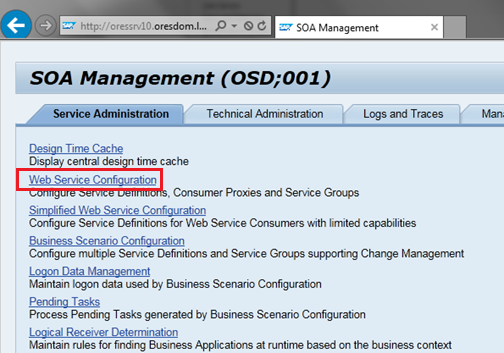
2.Click Web Service Configuration, then click Link Web Service Configuration.
3.Click the Configuration Search tab.
Web Service Configuration
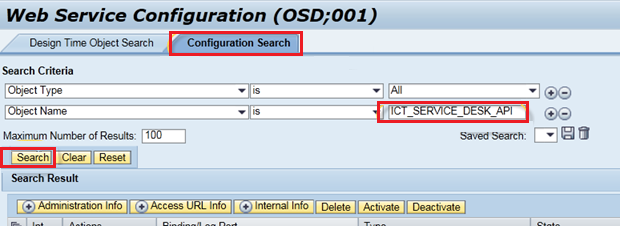
4.For the object name, enter ICT_SERVICE_DESK_API and click Search.
Setting Up the Service Provider
Follow these steps to set up the service provider, which in this case is Service Manager. The service provider accepts the web service call. You need to create a new logical port.
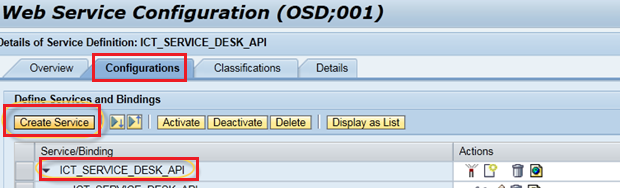
1.Click the Configurations tab.
2.In the Define Services and Bindings section, click Create Service.
3.Select the ICT_SERVICE_DESK_API service.
Configuration Tab -- Creating a Service
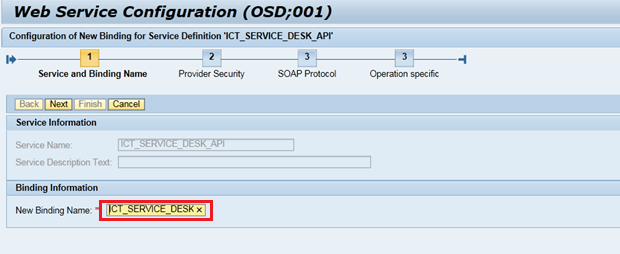
4.Click the New Service/Binding icon.
5.On the Service and Binding Name screen, enter a name for the new binding, such as ICT_SERVICE_DESK and click Next.
Service and Binding Name Screen
6.On the Provider Security screen, for the Transport Level Security section, select None (http). In the Transport Channel Authentication section, select User ID/Password.
Provider Security Screen
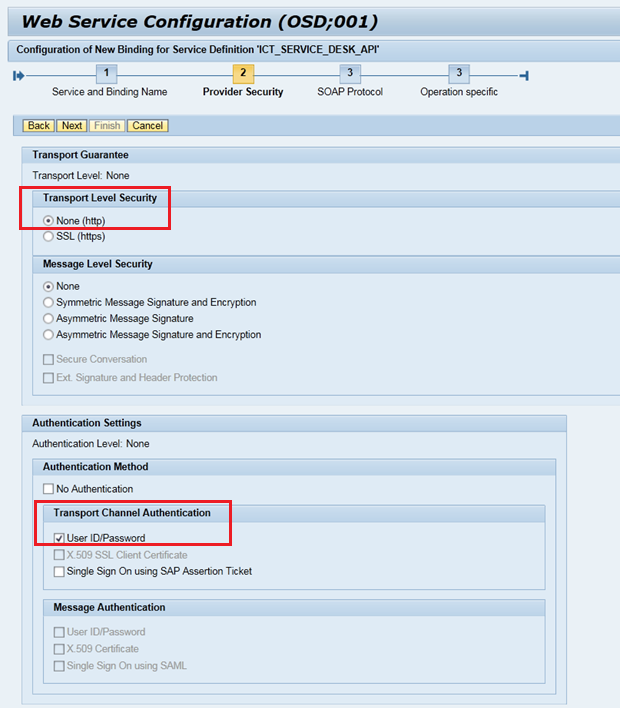
7.Leave the other settings as is. Click Next until you finish the configuration.
Setting Up the Consumer Proxy
Follow these steps to create a new logical port for the consumer proxy.
1.Click the Configuration Search tab.
2.For the object name, enter CO_PCICT_SERVICE_DESK_API and click Search.
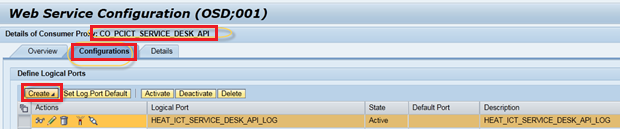
3.Click the Configurations tab.
4.In the Define Logical Ports section, click Create.
5.Select the HEAT_ICT_SERVICE_DESK_API_LOG logical port.
Configuration Tab -- Creating a Logical Port
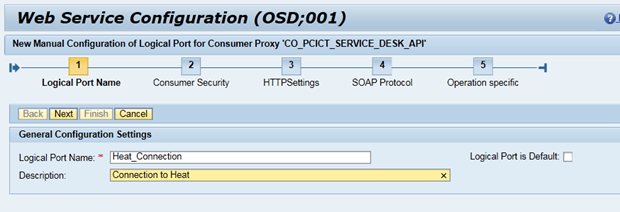
6.On the Logical Port Name screen, enter a name for the logical port and an optional description and click Next.
Logical Port Name Screen
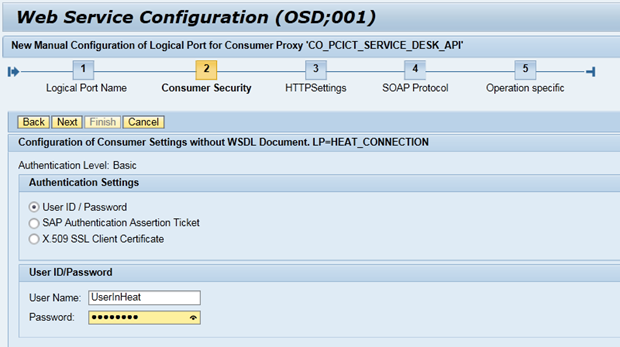
7.On the Consumer Security screen, under Authentication Settings, select User ID / Password. Under the User ID/Password section, enter a user name and a password. Because SAP Solution Manager uses HTTP basic authentication, you must enter a user name and password. Click Next.
Consumer Security Screen
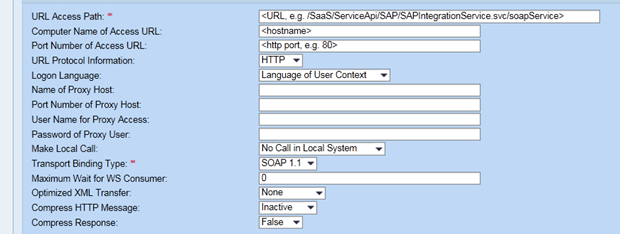
8.On the HTTP Settings screen, enter information into the fields. Click Next.
HTTP Settings Screen
9.On the SOAP Protocol screen, for the Data transfer scope field, enter Minimal Data Transfer. For the Transfer protocol field, enter Transfer via HTTP header.
SOAP Protocol Screen

10.Leave the other settings as is. Click Next until you finish the configuration.
Configuring the Backend External Service Desk Configuration
Follow these steps to configure the ICTCONF transaction by creating a new external service desk application entry.
1.Log in to the SAP Solution Manager user interface.
2.Go to the ICTCONF transaction.
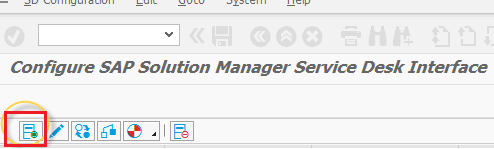
3.Click the add icon.
SAP Solution Manager Add Icon
4.For the new entry, enter details. For the Logical Port field, enter the logical port that you created in Setting Up the Consumer Proxy. Check Automatically synchronize to ensure that the incidents get updated automatically when linked to Service Manager.
New Service Desk Entry Details

5.Click the Generate Default Mapping icon.
Generate Default Mapping Icon

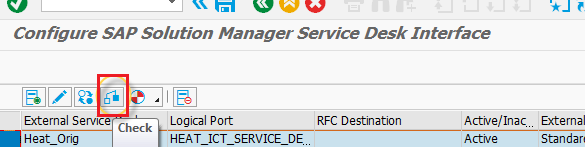
6.Click the Check icon to check the configuration. The application displays a message with information.
Check Icon
Configuring Post Processing Framework
You configure these business rules for scenario-specific settings, such as when an incident should be forwarded from the SAP Solution Manager to Service Manager.
1.Log in to the SAP Solution Manager user interface.
2.Go to the SPPFCADM transaction.
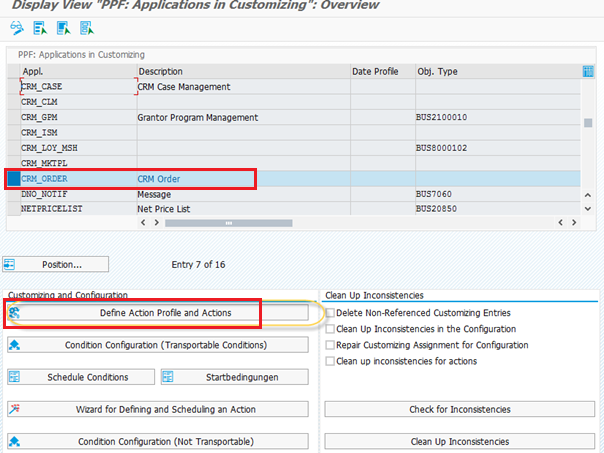
3.Highlight the CRM_ORDER application and click Define Action Profile and Actions.
SPPFCADM Transaction
4.Search for the SMIN_STD action profile.
SMIN_STD Action Profile
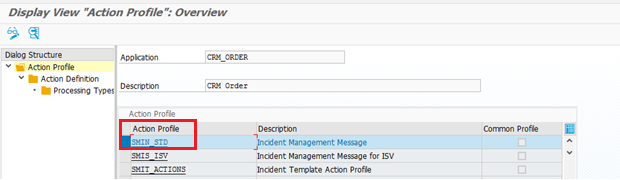
5.Double-click the SMIN_STD action profile to display its action profiles.
Action Profiles Screen
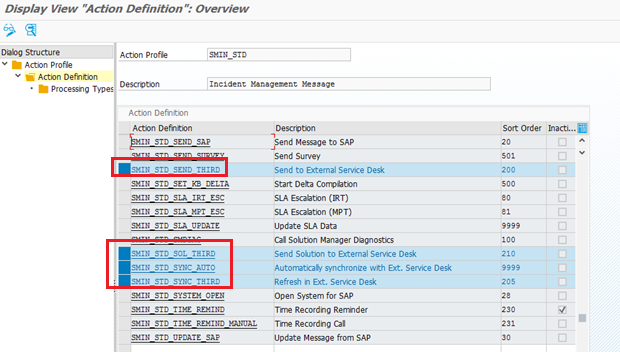
6.Check the following actions: SMIN_STD_CLOSE_THIRD, SMIN_STD_SEND_THIRD, SMIN_STD_SOL_THIRD, and SMIN_STD_SYNC_THIRD. Double-click on them to bring up the Action Definition screen.
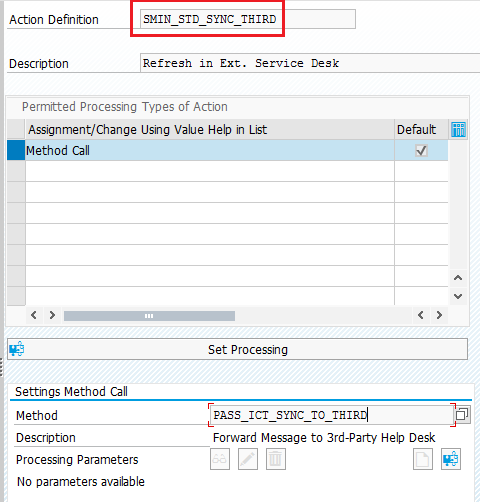
Action Definition Screen
7.Go to the SPPFCADM transaction, highlight the CRM_ORDER application, and click Condition Configuration (Transportable Conditions).
8.Click Technical Names to display the technical names.
Technical Names

9.Under the Scheduling of Actions header, highlight SMIN_STD and select the corresponding action definition on the right.
Corresponding Actions

10.Click the Overview tab. Make sure that for the Schedule Condition field, you select Schedule Automatically.
Adding Business Rules
To add a business rule, click the Schedule Condition tab. The application displays the condition editor. In the condition editor, you can set a customer-specific rule (according to status schema, service teams, and so on) to process messages.
Condition Editor

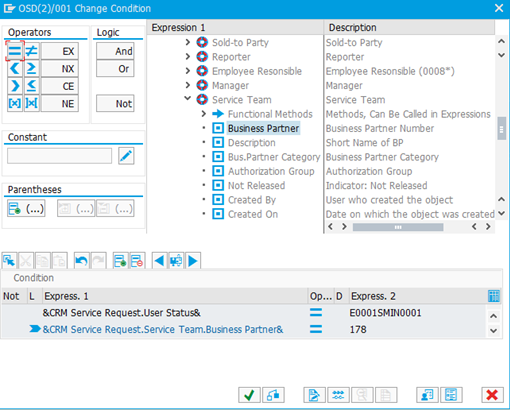
In the following example, the message is being triggered due to a combination of a certain status and a certain business partner entered in the service team.
Condition Editor Example
As a best practice, we suggest implementing a business rule that sends incidents from the SAP Solution Manager to Service Manager. The business rule checks whether the service team consists of a particular item that needs to be sent to the Service Manager Service Desk for further processing. To create this business rule, you must have a certain business partner setup, such as a "BP" transaction for business partners or a "PPOMA_CRM" transaction for setting up organizational units, which resemble business partners.
1.From the Conditions for Actions screen, under the Scheduling of Actions header, select SMIN_STD and on the right side, select SMIN_STD_SEND_THIRD.
Conditions for Actions Screen

2.Click the Schedule Condition tab and then click Edit Condition to go into edit condition mode.
3.Click the condition definition to open the editor.
4.Add a logical expression to the condition. For example, select the business partner of the service team for the left side of the expression, select an operator such as =, and select the specific business partner.
Adding a Logical Expression

5.Limit the transfer to normal status, but not when closing incidents from the SAP Solution Manager. Exclude that particular close scenario by entering the following:
Condition Definition
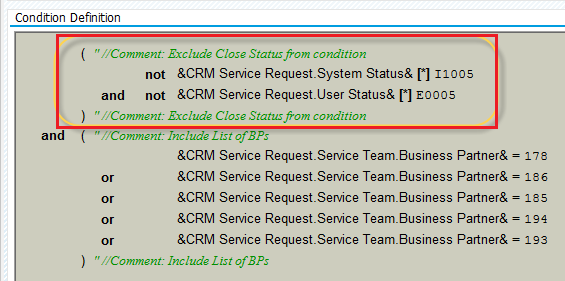
The result of the condition is this:
Condition Result

Note the following:
•If any of the stated business partners is assigned to the support team, the application transfers the incident to Service Manager. To automatically transfer the incident to Service Manager, regardless of the status, use this support team.
•If you reject a solution provided by Service Manager, the SAP Solution Manager also rejects the solution if the SAP Solution Manager changes the incident. To avoid this, specifically include or exclude these situations by not rejecting incidents very often.
•If you change any settings in the SPPFCADM transaction, log in again to ensure that the most up-to-date settings are active.
•Exchanged business partners (especially those who are reporters) must include email information for proper processing by Service Manager.
Troubleshooting the SAP Solution Manager Integration
Viewing Error Details
The SAP Solution Manager displays error messages on the top of the screen. If there is a Details link, click it for more information.
Error Message

Analyzing Web Service Errors
To analyze web service runtime errors, do the following:
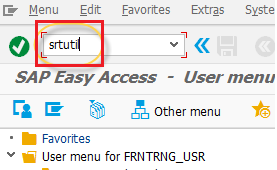
1.Run the SRTUTIL transaction.
SRTUTIL Transaction
2.Click Error Log.
3.Double-click a log entry to view more details about the error. The application displays additional information.
Viewing Technical Logs
For information about viewing technical logs, see HTTP://service.sap.com/sap/support/notes/1163386. You must have S user credentials. This article describes tracing options. The following contains a summary of some of the information in that article.
You can also analyze the actual HTTP network traffic with tools like Microsoft Network Monitor. See http://www.microsoft.com/en-us/download/details.aspx?id=4865.
Cause
Communication and data exchange between an SAP Solution Manager Service Desk and an external service desk can be monitored at the following levels:
•Message data (in XML format), for which the SAP Solution Manager Service Desk uses the interface to do the following:
•Receive the data from an external service desk.
•Send the data to an external service desk.
•Service desk web service (SOAP runtime in SAP NetWeaver) tracing
To analyze problems concerning the exchange of messages between two service desks using the web service interface, do the following:
•Activate tracing for both service desks. For the SAP Solution Manager service desk, the procedure is described below (see the section below concerning tracing data sent and received in SAP Solution Manager). To connect a service desk of another manufacturer, inquire about the existing trace options.
•If there are problems with the exchange of messages, note the message number (in the source and target application), the exact time, and possible error messages in the source application.
•Check in the target application if an XML file has arrived (for the service desk in the SAP Solution Manager, see the section below concerning tracing data sent and received in SAP Solution Manager). If an XML file was created in the target application, you must check the data transferred to the XML file, and if required, the customizing settings of the service desk.
•If no XML file was created for the message for the event in the SAP Solution Manager, the SAP Solution Manager service desk has not received or sent any data. In this case, check the web service to see if an error occurred during communication (see the section concerning tracing for the service desk web service called ICT_SERVICE_DESK_API).
•If no errors are displayed for the web service, network problems could be the cause. Check the relevant error messages in the source application.
Solution: Trace the Data Sent and Received (XML Files) in the SAP Solution Manager
Activate the trace function for the service desk interface as follows:
•Call transaction SM31 and enter the table ICT_CUSTOM.
•Select Maintain.
•Select New Entries and add the following new entries: TRACE_IN and TRACE_OUT.
•Save the new entries.
When you make these settings, the application logs and saves each message received or sent by the service desk using the web service interface, in the SAP Solution Manager.
You can download and analyze these messages for each message that was exchanged using the interface, as XML files in the local file application. To download the data in XML format, do the following:
•Call transaction SE38 and start the program ICT_DOWNLOAD_SNAPSHOT.
•Use the F4 input help to select the application GUID of the external service desk.
•Enter the transaction number (message number in the local application). If known, you can enter the ID (GUID) of the message in the Message number field.
•As a download path, enter the directory in which the XML file is to be saved.
•Execute the program. This starts the download in XML format.
The application saves the XML files in the directory specified and you can use a browser to view them. Each file name contains the exact time when the message was received or sent.
Solution: Trace the Service Desk Web Service ICT_SERVICE_DESK_API
If an external service desk has sent a message to the SAP Solution Manager service desk, but no incoming XML file has been saved in the SAP Solution Manager, there may have been a problem at the web service level. You can also activate a trace here:
•Activating the web service trace:
•Call transaction WSADMIN.
•Navigate to the web service ICT_SERVICE_DESK_API.
•Double-click ICT_SERVICE_DESK_API.
•In change mode, select the relevant trace and log settings (for example, "full trace" and "full log").
•Save your changes.
•Viewing trace files:
•Call transaction SM59.
•Select RFC > Display trace.
•Search for the text ICT_SERVICE_DESK_API or for the time.
Problems Closing Incidents
If you cannot close incidents, do the following:
1.Install the SAP GUI. See Installing the SAP GUI.
2.Run transaction SU01.
3.Select the user to log in.
4.Ensure that the SAP_SM_CRM_UIU_SOLMANREQU role is set to active for the user.
You should now see the Confirm button within an incident.
5.In the confirmation dialog box, click Yes.
Locked Messages
Errors can occur when users lock incidents.
Incident Locked Error Message

To unlock the incident, save the message and them navigate to another screen.
Reference Information
•Navigating in the ITSM Web GUI
Installing the SAP GUI
Install the SAP GUI so that you can access the SAP Solution Manager Backend. From the SAP Solution Manager Backend, you can configure settings and monitor items.
You need the installation CD or the SAP GUI download package, or go to http://service.sap.com/~form/handler?_APP=00200682500000001943&EVENT=DISPHIER& HEADER=Y& FUNCTIONBAR=N&EVENT=TREE&NE= NAVIGATE&ENR= 67837800100200024791&V=INST. For more information, see https://scn.sap.com/docs/DOC-59053.
1.Click Installation.
2.Click the object to download.
3.Run the executable file.
4.Extract the file.
5.Configure the software, such as entering a description.
6.Log in with the user ID of FRNTRNG_USR and set the language to English.
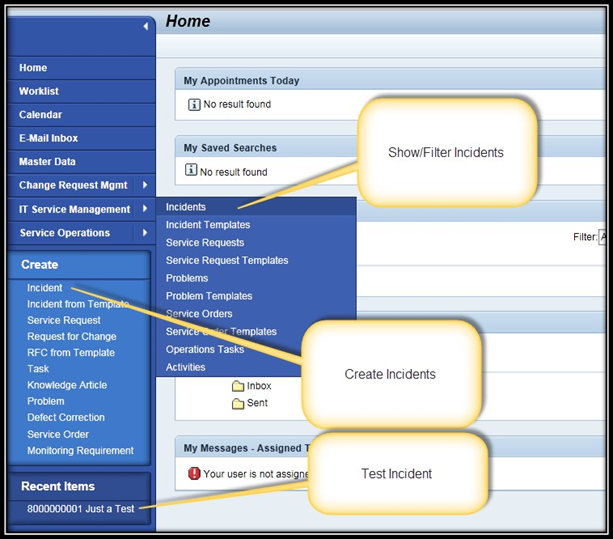
Navigating in the ITSM Web GUI
Ensure that popups are enabled.
1.Go to http://server:port/sap/bc/webdynpro/sap/ags_workcenter?sap-language=EN.
2.Under the Common Tasks section, click IT Service Management.
3.See the layout:
SAP Solution Manager IT Service Management