Styling the Self Service Mobile Portal
You can configure the look and feel of the Self Service Mobile portal using the Self Service tab in the Style Editor.
The following are the steps to customize the Self Service Mobile portal:
- From the Configuration console, click Build > User Interface Styles > Style Editor. The application displays the Style Editor page.
- Click the Self Service tab.
- Use the options in this tab to customize the Self Service Mobile portal to suit your taste.
- Edit Self Service Widget - takes you to the Self Service Mobile portal in edit-mode where you can design the Self Service Mobile dashboards for different Self Service Mobile extended roles.
- Edit Enterprise Self Service Page - takes you to the Enterprise Self Service page in an edit-mode where you can design the page.
To restore the Self Service Mobile portal to its default configuration, click the Remove Customization icon ![]() at the top of the Style Editor page, next to the Role list.
at the top of the Style Editor page, next to the Role list.
| Section | Parameter | Description |
|---|---|---|
|
Select Theme |
Text |
The Self Service Mobile user interface theme. |
| Common | Text | The text color of all items in the home page, including dashboard panels. |
| Background | The background color of the home page. | |
|
Image |
The background image on the upper part of the home page. |
|
|
Footer Image |
The Background image on the lower part of the home page. Not applicable when Legacy theme is set. |
|
| Link | The text color of any links on the home page. | |
| Border | The color of all borders on the home page, including borders around dashboard panels and borders under headings. | |
| Mouseover | The background color of text when you hover your mouse over it. | |
| Active | The background color of text when it is the active line in a list. | |
| Panels | Background | The background color of all panels and dialog windows. |
| Header Color | The text color of the text in all panel headers. | |
| Header Background | The background color of all panel headers. | |
| Buttons | Text | The text color of buttons. |
| Background | The background color of buttons, such as in the chat area. | |
| Highlighted Color | The background color of a selected button. | |
| Highlighted Text | Text color of a selected button. | |
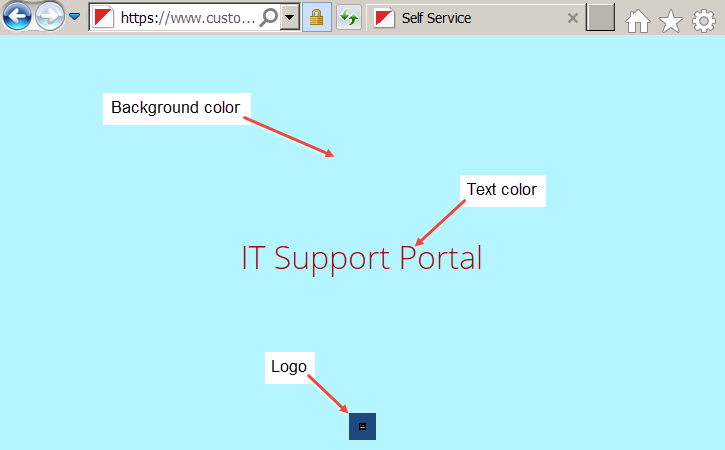
| Header | Logo |
The Self Service Mobile user interface logo and enables you to replace it with your own logo. |
| Text | The color of the menu icon and IT Support Portal. | |
| Background | The color of the header background. | |
| Accent (Header) | Visible |
The accent is a horizontal line at the bottom of the header. True means visible. False means not visible. |
| Width |
The width of the accent line, from 0 to 38 pixels. The accent paints over the header. |
|
| Color | The color of the accent line. | |
| User Panel Info | Text | The color of the menu button and IT Support Portal. |
| Background | The color of the user panel background. | |
| Accent (User Panel) | Visible |
The accent is a horizontal line at the bottom of the user panel. True means visible. False means not visible. |
| Width |
The width of the accent line. The first 200 pixels paints over the user panel. Additional pixels paint over the navigation menu. |
|
| Color | The color of the accent line. | |
|
Navigation Menu
|
Text |
The color of the text in the navigation menu. |
|
Background |
The color of the background in the navigation menu. |
|
|
Mouseover |
The background color of text when you hover your mouse over it. |
|
|
Active |
The background color of text when it is the active line in the menu. |
•If the user panel and navigation menu are not visible in the right pane, click the menu icon ![]() to display them.
to display them.
• For information on making color changes, see Working with Colors in the Style Editor.
Adding a New Logo to the Self Service Mobile Portal
In the Self Service Mobile portal, logos are scaled to fit a 27-pixel vertical space in the header. Because scaling reduces image quality, the preferred logo dimensions are 27 pixels high and up to 200 pixels wide. The maximum logo dimensions are 650 pixels high by 650 pixels wide.
The settings you make for Header also affect the Self Service Mobile user interface loading screen.
Self Service Mobile User Interface Loading Screen
To add a new logo to the Self Service Mobile user interface, do the following:
1.Access the Style Editor. See Accessing the Style Editor.
2.Click the Self Service tab.
3.From the Header section, click Upload file.
4.Click the Select File icon ![]() .
.
5.Browse for the logo on your to add and double-click the file name.
The application displays the new logo in place of the default logo and on the header in the right pane.
Self Service Mobile User Interface Logo
![]()
The application marks the unsaved value with a red triangle  at the left and the Revert icon
 ![]() at the right.
at the right.
6.Click Save.
Restoring the Default Logo for the Self Service Mobile User Interface
To restore the default logo for the Self Service Mobile user interface, do the following:
1.Access the Style Editor. See Accessing the Style Editor.
2.Click the Self Service tab.
3.In the Header, click the current logo.
4.Click the Delete Uploaded File icon ![]() .
.
5.The application deletes the current logo and displays the default Service Manager logo in its place.
The application marks the unsaved value with a red triangle at the left and the Revert icon ![]() at the right.
at the right.
6.Click Save.