Getting Started with Self Service portal
This topic helps you get started with using the Self Service portal as a Self Service User. Use the portal to create and track incidents and service requests, and view company-wide announcements, FAQs and knowledge articles.
A mobile version of the portal is available for Self Service Mobile users who use smart phones or tablets. For more information, see Self Service Mobile Portal.
Logging in to the Self Service portal
You must be assigned the Self Service User role to log in to the portal.
1. In a browser, enter the login URL provided by your administrator.
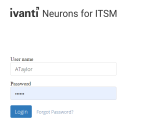
2.Enter your username and password in the login page.
3.Click Login. A list of roles displays.
4.Scroll down and select the Self Service User role, then click Submit.
Changing your password, language, and profile picture
1.Log in to the Self Service portal.
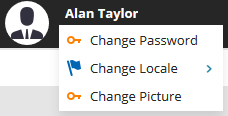
2.Click your username. From the drop-down list, click Change Password.
3.In the Change Password dialog, enter your old password, then enter the new password and confirm it. Note that passwords are case sensitive.
4.Click Change.
5.Log out and log in again with the new password.
This feature is only available for internal authorization and does not work for external login.
1.Click Forgot password? from the main login window.
2.Enter your user name or email address and click Submit.
You will receive a one-time reset link to your registered email address. The link will expire in 20 minutes or as configured by your administrator.
3.Click the link. You will be re-directed to the Reset Password page.
4.Enter your User ID, New Password and Confirm Password. If you do not know your User ID, contact your organization's administrator.
5.Click Submit.
The default language for the application is English (United States). However, if your administrator has given you privileges, you can change the language displayed in the interface to that of your preference. Your changes will be retained, and you will be logged in with the set language until you change it again.
1.Log in to Neurons for ITSM, click your username from the top menu.
2.Hover mouse over Change Locale. A list of languages set up by your administrator is displayed.

3.Select the language to use. The application automatically refreshes with the changed locale.
1.Log in to Neurons for ITSM, click your username from the top menu.
2.Click Change Picture.
3.In the Change Photo dialog, click Browse to select an image file.
4.Click Save. The selected picture is displayed next to your user name.
