Using Business Rules
•Enabling and Disabling Business Rules
•Working with Read-Only and Required Business Rules
•Example: Updating Field Values in Related Business Objects
•About Business Rule Inheritance
•Editing Business Rule Evaluation Order
•Business Rule Cycle Dependencies
About Business Rules
Neurons for ITSM business rules implement domain-specific business logic. Rules are defined in metadata as part of business object definitions. Business rules automate or aid business object interactions with a user, with other business objects, and with various services, both internal and external. Notable internal services are workflow service, email service and escalation watch.
A domain model is defined as a set of interdependent business objects, where the dependencies are defined by relationships and business rules. For example, you can link an incident to a customer via a relationship defined in metadata. Once you have established the link between the incident and the customer, you can derive other information from it, such as the department of the customer and contact information, including email address, of the customer. Then you can assign an incident to the appropriate owner, based on the services of each department. After you have assigned an owner, the application sends an email to the customer with a status update and changes the status of the incident to active. You can then link the email to the incident via a relationship. The application starts the escalation watch and tracks metrics for the service level for the active incident.
These are all activities that are either automated by business rules, or are aided by them.
About Business Rule Inheritance
Neurons for ITSM does not support business rule inheritance. If a business rule applies to a group business object, it does not also apply to the children business objects (unless you specifically apply it to a child business object). For example, the FRS_knowledge business object is a group business object and the FAQ business object is a child. Business rules for the FRS_knowledge business object do not apply to the FAQ business object. Therefore, you must apply business rules to all of the business objects that they apply to.
Business Rule Types
| Business Rule Type | Description |
|---|---|
| Triggered Actions |
Contain generic rules. They are executed during business object transactions, typically when you save a business object. The trigger is based on one of the events or a combination of events, such as business object events (insert, delete, or update), field events (initialize or update), or relationship events (link or unlink). You can also add an additional filter expression that if provided, is a predicate expression.
These rules are evaluated on the server side. |
|
Initialization Rules |
Business rules that the application executes when a business object is created.
The application executes the rules in the order listed. Therefore, the results of rules that are lower on the list can change depending on the returned values of the rules that are higher on the list. You can reorder the initialization rules. See Modifying Business Rules.
These rules are evaluated on the server side. |
|
Editing and Calculation Rules |
Listed by condition. The calculation rules are listed under the Whenever fields are changed set condition.
Business rules that automatically populate the value of a field when a dependent field changes. These rules contain field references. For example, the rule called IsReclassifiedForResolution uses this expression: $(if Category != ActualCategory then true else false). Whenever the value of either the Category field or the ActualCategory field changes, the application executes the IsReclassifiedForResolution rule.
Editing rules, also called autofill rules, can also include calculation fields allowing you to define calculations on the field.
For editing rules, use the On Change and Set drop-down lists to create a sequence. Add expressions in the field provided.
The results of these rules may also trigger additional business rules such as triggered actions.
These rules are evaluated on both the client side and the server side. |
|
Read-Only Rules |
Adds read-only rules for entire business objects. For example, you can render a business object as read-only when the status field changes to resolved.
A business object must contain a read-only field to use this option.
When a form is opened for a read-only object, all controls (except those listed in the exception list) become read-only. When defining an exception list, it is important to understand which fields can be changed by business rules. These fields must be also be added to the exceptions list. Updating a field that is not part of the exception list generates an error message.
Child business objects are not affected when a business object is changed to a read-only state. However, you may not be able to link a new child business object to this business object.
These rules are evaluated on the client side, provided that the field is in the form that you are working on. Read-only business rules for fields that are not in the form that you are working on are evaluated on the server side. |
|
Required Rules |
Determine when a rule is required. Required rules can be conditionally required using expressions. For example, the value entered in one field can determine if another field is required or not.
These rules are evaluated on the client side, provided that the field is in the form that you are working on. Required business rules for fields that are not in the form that you are working on are evaluated on the server side. |
|
Before-save Rules |
Rules that are executed just before a business object is saved. These business rules usually populate a field.
The application executes the rules in the order listed. Therefore, the results of rules that are lower on the list can change depending on the returned values of the rules that are higher on the list. You can reorder the before-save rules. See Modifying Business Rules.
These rules are executed on the server side. |
|
Regular Expression Validation Rules |
Add custom validation rules based on regular expressions (RegEx). These rules run when you save an object.
See https://developer.mozilla.org/en-US/docs/Web/JavaScript/Guide/Regular_Expressions and http://stackoverflow.com/questions/46155/validate-email-address-in-javascript for information about regular expressions.
The following regular expressions apply: Alphanumeric: Contains the validation type: ^[a-zA-Z0-9\s.\-]+$ Zip Code: Contains the validation type: ^((\d{5}-\d{4})|(\d{5})|([A-Z]\d[A-Z]\s\d[A-Z]\d))$ Email: Contains the validation type: ^[A-Za-z0-9](([_\.\-]?[a-zA-Z0-9]+)*)@([A-Za-z0-9]+)((\[\.\-]?[a-zA-Z0-9]+)*)\.([A-Za-z]{2,})$ Phone US: Contains the validation type: ^([0-9a-fA-F][0-9a-fA-F]:){5}([0-9a-fA-F][0-9a-fA-F])$ IP Address: Contains the validation type: ^(\d{1,2}|1\d\d|2[0-4]\d|25[0-5])\.(\d{1,2}|1\d\d|2[0-4]\d|25[0-5])\.(\d{1,2}|1\d\d|2[0-4]\d|25[0-5])\.(\d{1,2}|1\d\d|2[0-4] \d|25[0-5])$ MAC Address: Contains the validation type: ^[01]?[- .]?\(?[2-9]\d{2}\)?[- .]?\d{3}[- .]? \d{4}$ Percent: Contains the validation type: ^100$|^\s*(\d{0,2})((\.|\,)(\d*))?\s*\%?\s*$ Custom: Requires the additional entry of a custom expression.
Enter the message to show when this validation encounters an error.
These rules are executed on the client side. This depends on the field references used in the rule. |
|
Validation Rules |
Prevent users from saving a record unless the result of the validation rule is true. The validation rule calculates the result of an expression as a record is saved, and if the result of that calculation is false, the user cannot save the record. You can define the error message shown to the user if the rule prevents saving the record.
An example is the validation expression found in the Incident business object:
$( ((Status != "Closed") && (Status != "Resolved")) || IsTrueForAllChildren("Incident#", RecId, "Task#Assignment.Rev3", "$(Status == 'Completed' || Status == 'Canceled')") )
This expression prevents a user saving an incident with a status of resolved or closed unless all child Task#Assignment records have a status of completed or canceled.
These rules are executed on the client side. This depends on the field references used in the rule. |
Business Rule Engine States
All business rules go through several states, as shown in the figure below.
Business Rule Engine States
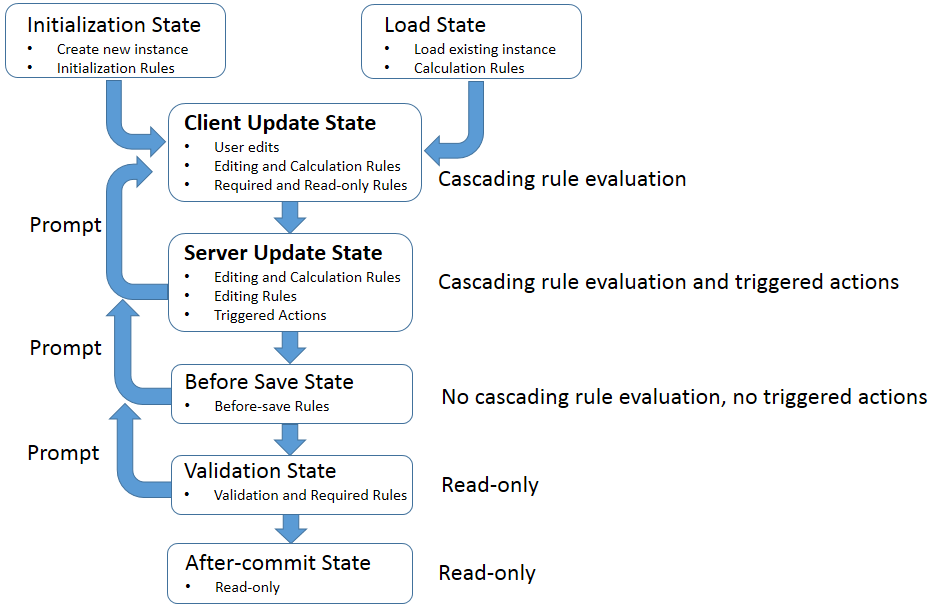
| Business Rule Engine State | Description | Business Rules |
|---|---|---|
| Initialization | When you create a new instance of a business object. Typically the application displays a form with data in the fields. |
Initialization rules |
| Load | When you are not creating a new instance of a business object, but are updating an existing business object. |
Calculation rules |
| Client Update |
When clients (such as the user interface, workforce engine, email listener, and so on) enter data about the business object instance. This is when the editing and calculation rules are executed to update the values. When you save, the required and read-only rules are executed on the client.
The client sends the data to the server. |
Editing rules Calculation rules Read-only rules Required rules |
| Server Update |
When the server fills the business object with the data that the client submitted. This is when the application executes editing and calculation rules. This is the only state when triggered actions execute.
|
Editing rules Calculation rules Triggered actions |
| Before-Save |
The state immediately before saving the business object.
Any of these business rules may cause the application to prompt the client for information. If the client enters information, the flow goes back to the client update state. |
Before-save rules |
| Validation |
The business object is now in a read-only state on the server. This is when the application validates all of the required rules and ensures that all validated fields meet the validated conditions.
Any of these business rules may cause the application to prompt the client for information. If the client enters information, the flow goes back to the client update state. |
Validation rules Regular expression validation rules Required rules |
| After-Commit | When certain quick actions are executed, such as Send Email Action. Note that this quick action was actually triggered in the server update state, but was not executed until this state. |
Read-only rules |
Editing Business Rule Evaluation Order
A business rule can have a trigger field and one or more expression field dependencies. There are two things that can cause a rule to execute: trigger fields and expression field dependencies.
Editing Rule

In the figure above, the Owner field is the trigger field and [OtherObject]PrimaryEmail is the expression field reference. The expression field reference can have more than one expression in it.
The application activates a field reference dependency only after the editing rule has been triggered at least once by its trigger field. Trigger fields are not necessarily referenced in the expression field references.
Business Rule Cycle Dependencies
Some editing business rules may have cyclic dependencies.
Business Rule Cyclic Dependency
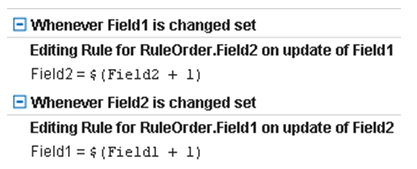
In the figure above, in the first editing business rule, whenever there is a change to field 1, field 2 changes. In the second editing business rule, whenever there is a change to field 2, field 1 changes. This results in a cyclic dependency that cannot be properly evaluated. In this case, there are no final values for field 1 and field 2 and the application cannot calculate the result. However, there are cases where recursive editing rules do produce a definite and useful result and you do not need to avoid these rules.
When the application cannot evaluate recursive rules, the application stops re-evaluating them at a certain point and returns a result that may not be the intended result. We recommend that you avoid recursive business rules.
If a business rule returns the same value that its target already has, the application does not re-evaluate its dependent rules.
Using Business Rule Tracing
To turn on the rule trace, do the following:
1.From the Configuration Console, click Monitor > Application Logs > Logging Configuration to open the Logging Configuration workspace.
2.Double-click the AppServer_RuleTrace service to open it.
3.In the Log Level field, select a log level, such as DEBUG, from the drop-down list.
4.Click Save.
After you create an instance of a business object, such as creating an incident, you can review the logs associated with the rule trace by doing the following:
1.Log in to Neurons for ITSM.
2.Open the Logs workspace.
3.Select Rule Trace from the Saved Search drop-down list.
4.Open a log entry, and view the data in the Message field.
The Message field lists all of the actions that the application has taken, including when it executed each rule. At the beginning are the initialization rules, followed by editing and calculation rules. The information may be very long and there may be more than one entry for each action. It shows each and every rule that the application has executed.
Viewing Business Rules
You access the business rules from the Configuration Console.
1.From the Configuration Console, click Build > Business Objects to open the Business Objects workspace.
2.Open a business object.
3.Click the Business Rules tab. The application displays the Business Rules workspace. The business rules are displayed in category groups.
4.To view all of the business rules in an expanded view, click Expand Rules.
5.To view the business rules in category groups, click Collapse Rules.
6.To view all of the business rules for a category in an expanded view, click the down arrow next to the category name.
7.To view just the business rule category name, click the up arrow next to the category name.
8.To reload the business rules, click Reload.
9.To search for a term in a business rule, enter the term in the search area.
10.To search for a field name in a business rule, enter the field name in the search area and click Search field names only.
11.To show business rules only for a certain form, select a form from the Show rules for form drop-down list.
Creating a Business Rule
Business rules apply to records that are created after the business rule was created, and do not apply to existing records.
•Creating an Initialization Rule
•Creating a Regular Expression Validation Rule
Creating a Triggered Action
1.From the Configuration Console, click Build > Business Object to open the Business Objects workspace.
2.Open a business object.
3.Select the Business Rules tab.
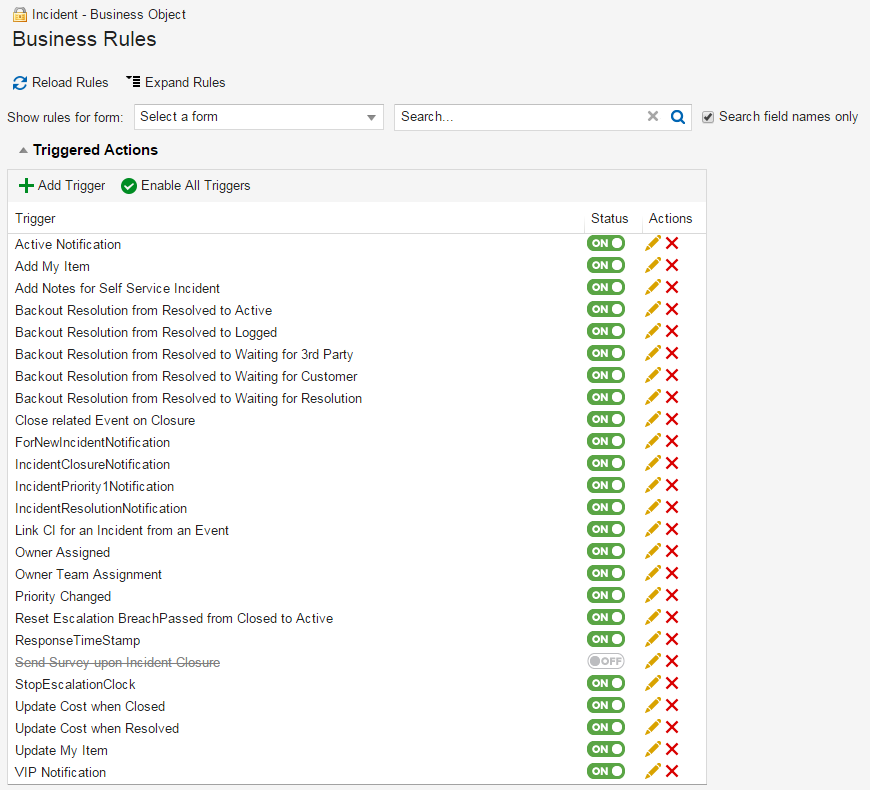
4.Click Triggered Actions. The Triggered Actions window appears.
List of Triggered Actions
5.Click Add Trigger. The Create Triggered Action window appears.
Create a Triggered Action
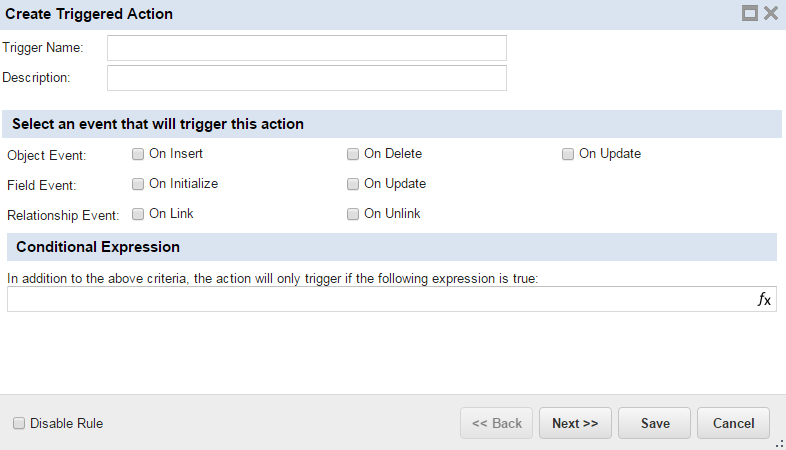
6.Enter information into the fields.
| Trigger | Description |
|---|---|
| Trigger Name |
Name of the triggered action. |
| Description | Optional description of the triggered action. |
| Select an event that will trigger this action | |
| Object Event: On Insert | Runs when the business object is inserted. |
| Object Event: On Delete | Runs when the business object is deleted. |
| Object Event: On Update | Runs when the business object is modified and saved. |
| Field Event: On Initialize |
Runs when a specific field is initialized. Select the field from the drop-down list.
The following additional parameters appear when this option is selected, depending on the specified field: is changed (runs when the field is modified) is set to condition (runs when the field is modified to a specific string) |
| Field Event: On Update |
Runs when a specific field is modified. Select the field from the drop-down list.
The following additional parameters appear when this option is selected, depending on the specified field: is changed (runs when the field is modified) is changed to condition (runs when the field is modified) is changed from condition (runs when the field is modified from a specific string) is changed from condition to other condition (runs when the field is modified from a specific string to a specific string) is set to condition (runs when the field is modified to a specific string) |
| Relationship Event: On Link |
Runs when a specified relationship is linked. Select the relationship from the drop-down list. |
| Relationship Event: On Unlink |
Runs when a specified relationship is unlinked. Select the relationship from the drop-down list. |
| Conditional Expression | |
| In addition to the above criteria, the action will only trigger if the following expression is true: |
Specifies a Boolean expression that allows the trigger to occur if this expression is true.
NOTE: The action only triggers if both the selected event as specified above occurs and the expression specified in this field occur.
The action also does not trigger if the expression specified in this field does not occur but the selected event as specified above does occur.
Both must occur for the action to trigger. |
| Disable Rule |
Disables this triggered action. Select this option to create a read-only business rule.
NOTE: You cannot disable triggered actions that contain calculations. |
7.Click Next >>.
8.Select one of the following actions:
| Action | Description |
|---|---|
| New Action Type: Configure new action | Configures a new quick action. Select a quick action from the drop-down list. See Using Quick Actions. |
| Select Action: Use copy of existing action | Uses a copy of an existing quick action. Select a quick action from the drop-down list. See Using Quick Actions. |
9.Click Next >>. The options that appear depend on the selected action. See .
10.Click Save.
Creating an Initialization Rule
1.From the Configuration Console, click Build > Business Object to open the Business Objects workspace.
2.Open a business object.
3.Select the Business Rules tab.
4.Click Initialization Rules.
5.Click Add Initialization Rule.
Add Initialization Rule

6.Enter information into the fields.
| Field | Description |
|---|---|
| Field Name | The field that the initialization rule applies to. |
| Name | An optional name for the initialization rule. |
| Description | An optional description for the initialization rule. |
| Expression Editor | The expression that specifies the value that the initialization rule sets the field to. |
| Disable Rule | Specifies if the initialization rule is disabled. |
7.Click Save.
Creating an Editing Rule
1.From the Configuration Console, click Build > Business Object to open the Business Object workspace.
2.Open a business object.
3.Select the Business Rules tab.
4.Click Editing and Calculation Rules.
5.Click Add Editing Rule.
Add Editing Rule

6.Enter information into the fields.
| Field | Description |
|---|---|
| On Change | The field which, when changed, triggers the rule to execute. |
| Set | The field that gets changed when the field specified by the On Change parameter changes. |
| Assign only if target field is empty | Specifies to only change the value of the field specified by the Set parameter if the value is empty. The value does not change if there is a value already there. |
| Invoke editing rules for the dependent fields of the target field (cascade change) | Enables the cascading effect. |
| Name | An optional name for the editing rule. |
| Description | An optional description for the editing rule. |
| Expression Editor |
The expression that specifies the value that the editing rule sets the field specified by the Set parameter to. |
| Disable Rule | Specifies if the editing rule is disabled. |
7.Click Save.
Creating a Calculation Rule
1.From the Configuration Console, click Build > Business Object to open the Business Objects workspace.
2.Open a business object.
3.Select the Business Rules tab.
4.Click Editing and Calculation Rules.
5.Click Add Calculation Rule.
Add Calculation Rule

6.Enter information into the fields.
| Field | Description |
|---|---|
| Field Name | The field to change by this calculation business rule. |
| Condition |
Specifies when the business rule is evaluated. Can be one of the following: Always: The rule is not evaluated in the business rule engine state called Before-Save or in the business rule engine state called After-Commit. Evaluated on the client side. BeforeSave: The rule is only evaluated in the business rule engine state called Before-Save, before the business object is saved. Evaluated on the server side. AfterSave: The rule is only evaluated in the business rule engine state called After-Commit, after the business object is saved. Evaluated on the server side. |
| Also Recalculate on Load | Calculates the field value when reading the record from the database. |
| Name | An optional name for the calculation rule. |
| Description | An optional description for the calculation rule. |
| Expression Editor |
The expression that specifies the value that the calculation rule sets the field specified by the Field Name parameter to. |
7.Click Save.
Creating a Read-Only Rule
1.From the Configuration Console, click Build > Business Object to open the Business Objects workspace.
2.Open a business object.
3.Select the Business Rules tab.
4.Click Read-only Rules.
5.Click Add Read-only Rule.
Add Read-Only Rule
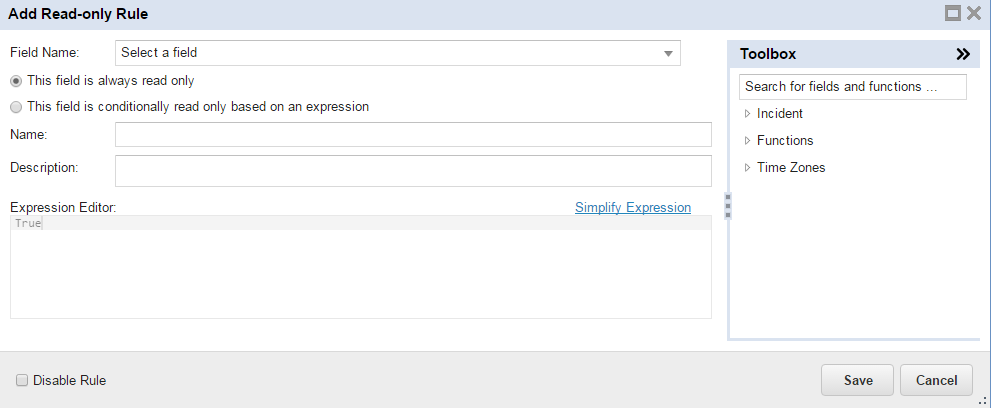
6.Enter information into the fields.
| Field | Description |
|---|---|
| Field Name | The field to change by this read-only business rule. |
| This field is always read only | Specifies that the field specified by the Field Name parameter cannot be changed (that is, is read only). |
| This field is conditionally read only based on an expression | Specifies that the field specified by the Field Name parameter cannot be changed (that is, is read only) depending on the value of the expression. |
| Name | An optional name for the read-only rule. |
| Description | An optional description for the read-only rule. |
| Expression Editor |
Only used if you selected This field is conditionally read only based on an expression.
Specifies a Boolean expression that if evaluated to true, allows the field specified by the Field Name parameter to be read only. |
| Disable Rule | Specifies if the read-only rule is disabled. |
7.Click Save.
Creating a Required Rule
1.From the Configuration Console, click Build > Business Object to open the Business Objects workspace.
2.Open a business object.
3.Select the Business Rules tab.
4.Click Required Rules.
5.Click Add Required Rule.
Add Required Rule
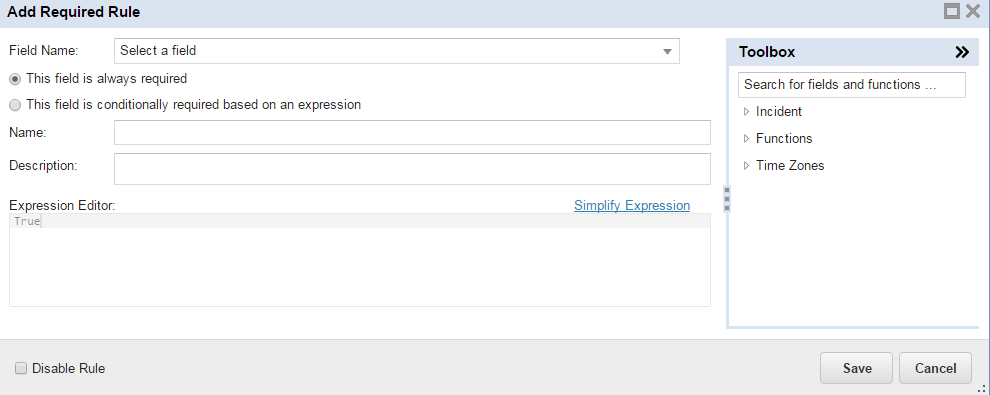
6.Enter information into the fields.
| Field | Description |
|---|---|
| Field Name | The field to change by this required business rule. |
| This field is always required | Specifies that the field specified by the Field Name parameter is always required. |
| This field is conditionally required based on an expression | Specifies that the field specified by the Field Name parameter is always required depending on the value of the expression. |
| Name | An optional name for the required rule. |
| Description | An optional description for the required rule. |
| Expression Editor |
Only used if you selected This field is conditionally required based on an expression.
Specifies a Boolean expression that if evaluated to true, allows the field specified by the Field Name parameter to be required. |
| Disable Rule | Specifies if the required rule is disabled. |
7.Click Save.
Creating a Before-Save Rule
1.From the Configuration Console, click Build > Business Object to open the Business Objects workspace.
2.Open a business object.
3.Select the Business Rules tab.
4.Click Before-save Rules.
5.Click Add Before-save Rule.
Add Before-Save Rule
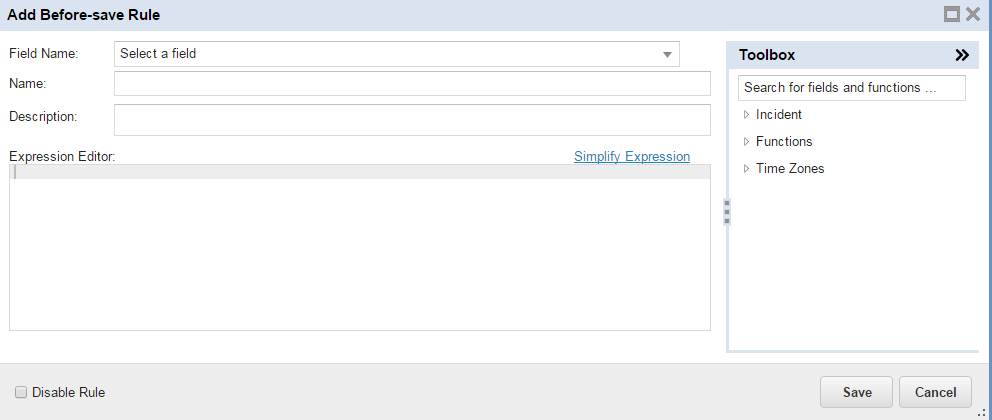
6.Enter information into the fields.
| Field | Description |
|---|---|
| Field Name | The field to change by this before-save business rule. |
| Name | An optional name for the before-save rule. |
| Description | An optional description for the before-save rule. |
| Expression |
The expression that specifies the value that the before-save rule sets the field specified by the Field Name parameter to. |
| Disable Rule | Specifies if the before-save rule is disabled. |
7.Click Save.
Creating a Regular Expression Validation Rule
1.From the Configuration Console, click Build > Business Object to open the Business Objects workspace.
2.Open a business object.
3.Select the Business Rules tab.
4.Click Regular Expression Validation Rules.
5.Click Add Regular Expression Validation Rule.
Add Regular Expression Validation Rule
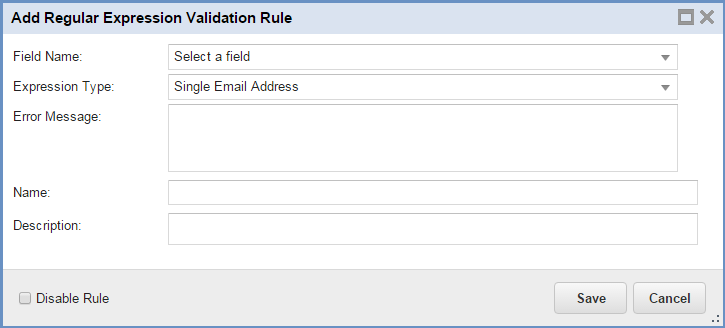
6.Enter information into the fields.
| Field | Description |
|---|---|
| Field Name | The field to check the expression type for. |
| Expression Type | The expression type. Can be one of the following: Alphanumeric: Contains the validation type: ^[a-zA-Z0-9\s.\-]+$ Zip Code: Contains the validation type: ^((\d{5}-\d{4})|(\d{5})|([A-Z]\d[A-Z]\s\d[A-Z]\d))$ Email: Contains the validation type: ^[A-Za-z0-9](([_\.\-]?[a-zA-Z0-9]+)*)@([A-Za-z0-9]+)((\[\.\-]?[a-zA-Z0-9]+)*)\.([A-Za-z]{2,})$ Phone US: Contains the validation type: ^([0-9a-fA-F][0-9a-fA-F]:){5}([0-9a-fA-F][0-9a-fA-F])$ IP Address: Contains the validation type: ^(\d{1,2}|1\d\d|2[0-4]\d|25[0-5])\.(\d{1,2}|1\d\d|2[0-4]\d|25[0-5])\.(\d{1,2}|1\d\d|2[0-4]\d|25[0-5])\.(\d{1,2}|1\d\d|2[0-4] \d|25[0-5])$ MAC Address: Contains the validation type: ^[01]?[- .]?\(?[2-9]\d{2}\)?[- .]?\d{3}[- .]? \d{4}$ Percent: Contains the validation type: ^100$|^\s*(\d{0,2})((\.|\,)(\d*))?\s*\%?\s*$ Custom: Requires the additional entry of a custom expression. |
| Error Message | The error message that the application displays if the field specified by the Field Name parameter is not the expression specified by the Expression Type parameter. |
| Name | An optional name for the regular expression validation rule. |
| Description | An optional description for the regular expression validation rule. |
| Disable Rule | Specifies if the regular expression validation rule is disabled. |
7.Click Save.
Creating a Validation Rule
1.From the Configuration Console, click Build > Business Object to open the Business Objects workspace.
2.Open a business object.
3.Select the Business Rules tab.
4.Click Validation Rules.
5.Click Add Validation Rule.
Add Validation Rule
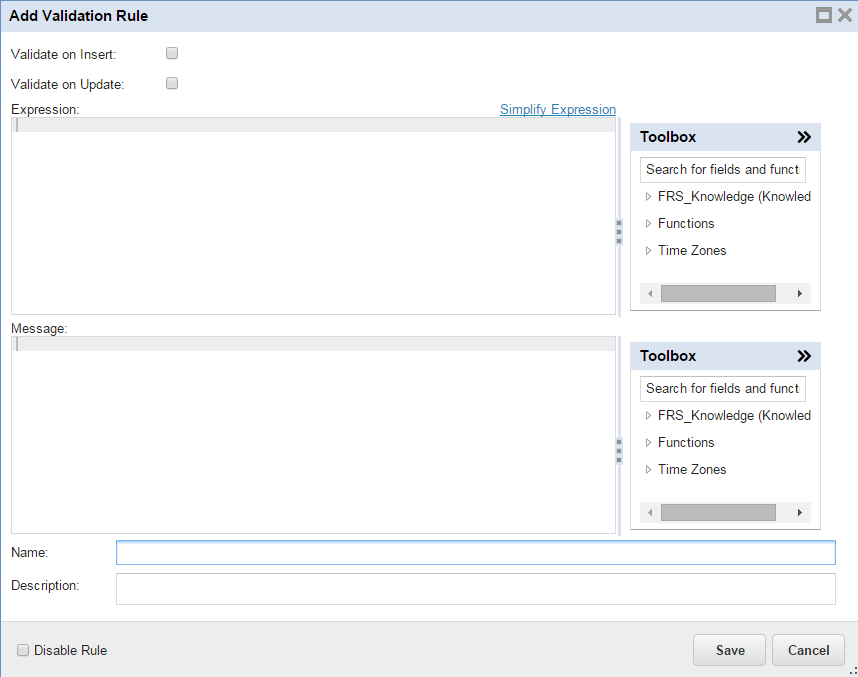
6.Enter information into the fields.
| Field | Description |
|---|---|
| Validate on Insert | Runs the validation business rule the first time that you create and save the business object. |
| Validate on Update | Runs the validation business rule whenever you modify the business object. |
| Expression | The expression that specifies the validation condition. |
| Message | The expression that specifies a validation message that is displayed if the expression specified by the Expression parameter is not true. |
| Name | An optional name for the validation rule. |
| Description | An optional description for the validation rule. |
| Disable Rule | Disables the validation rule while it is being created. |
7.Click Save.
Enabling and Disabling Business Rules
You can enable or disable most business rules except for rules containing calculated fields. By default, the application enables business rules when they are created.
1.From the Configuration Console, click Build > Business Object to open the Business Object workspace.
2.Open a business object.
3.Select the Business Rules tab.
4.Open a category of business rules.
5.To disable all of the business rules for a category, click Disable All.
If you click Disable All Read-only Rules, the application displays a dialog box with information. Select an option:
Disable and Clear: Disables the rule and removes the read-only restriction from existing business objects.
6.To enable all of the business rules for a category, click Enable All.
7.To enable an individual business rule, click the off icon  . (The application shows the off icon because it is currently disabled.)
8.To disable an individual business rule, click the on icon  . (The application shows the on icon because it is currently enabled.)
9.If you disable
Modifying Business Rules
Business rules apply to records that are created after the business rule has been modified, and not retroactively to existing records.
Use caution when modifying a business rule as it might affect dependent business objects.
1.From the Configuration Console, click Build > Business Object to open the Business Object workspace.
2.Open a business object.
3.Select the Business Rules tab.
4.Navigate to the business rule to modify.
5.Click the edit icon  . The Edit window appears.
6.Make changes.
7.Click Save.
8.You can also move the order of the initialization and before-save business rules by highlighting a business rule and clicking the up and down arrows on the right side of the list.
Deleting a Business Rule
Use caution when deleting a business rule as it might affect dependent business objects.
1.From the Configuration Console, click Build > Business Object to open the Business Object workspace.
2.Open a business object.
3. Select the Business Rules tab.
4.Navigate to the business rule to delete.
5.Click the delete icon  . The Delete confirmation window appears.
6.Click Yes to delete the business rule.